Your cart is currently empty!
Tag: mac book
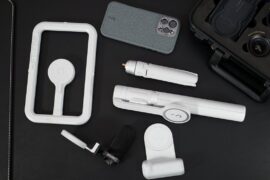
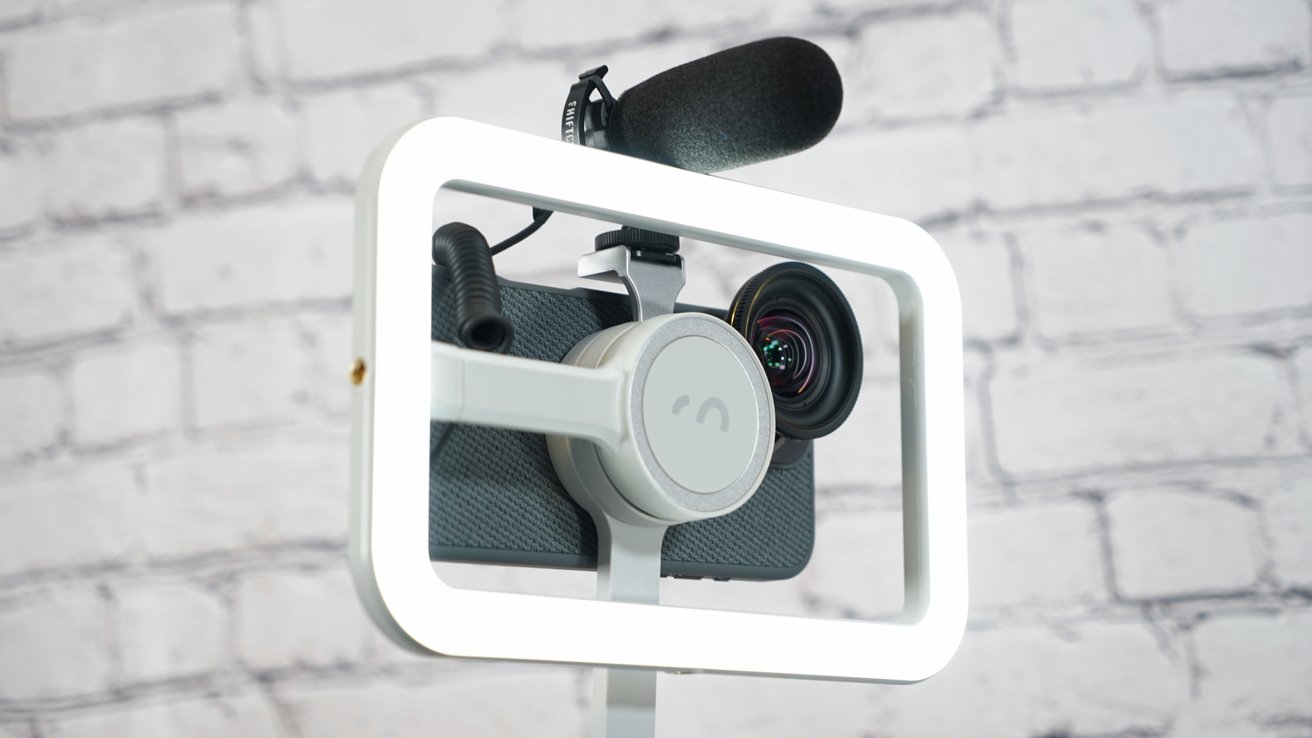
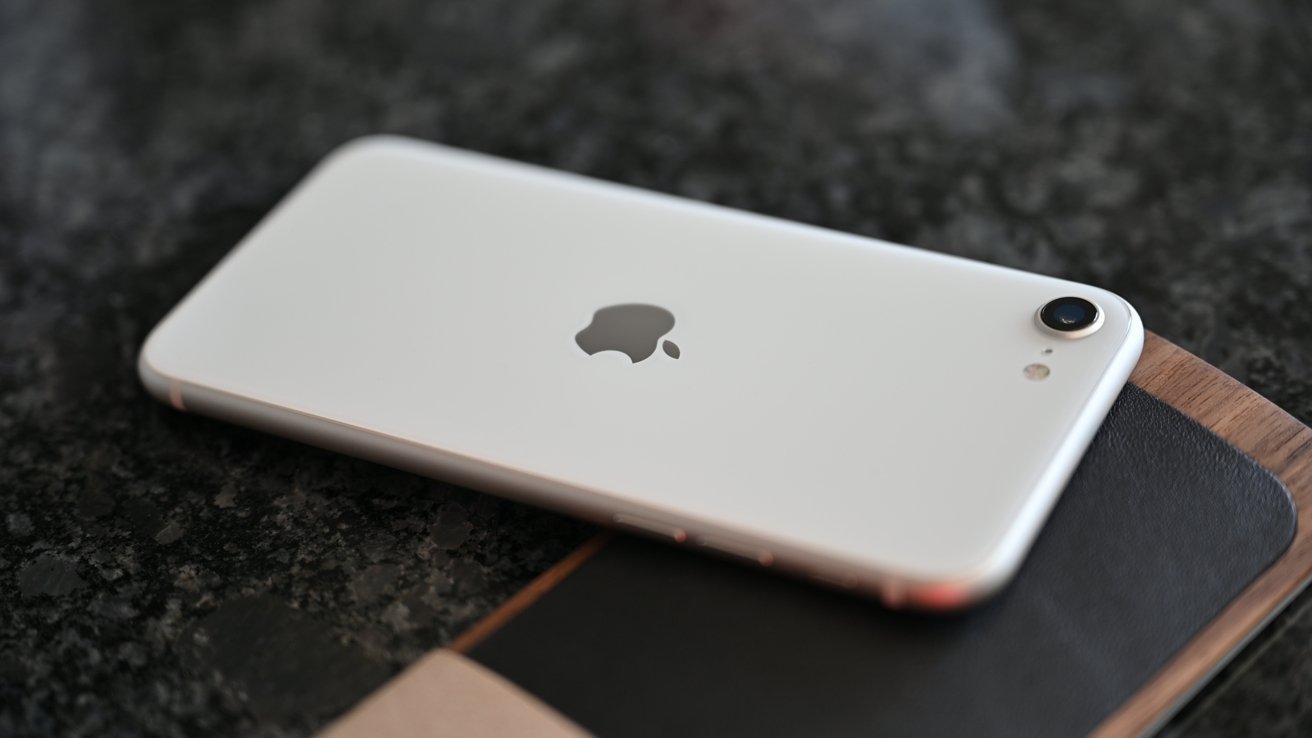
ShiftCam SnapSeries roundup: a MagSafe ecosystem
The ShiftCam SnapSeries lineup has evolved to include a more powerful battery pack, a larger studio light, and a much taller tripod — all connected via MagSafe. Here’s how it all fits together.
ShiftCam offers an increasingly varied range of equipment for content creators and photographers that work from iPhone. When I reviewed the original SnapGrip, I was excited by the prospect of an evolving MagSafe accessory ecosystem, and ShiftCam continues to deliver with the latest SnapSeries products.
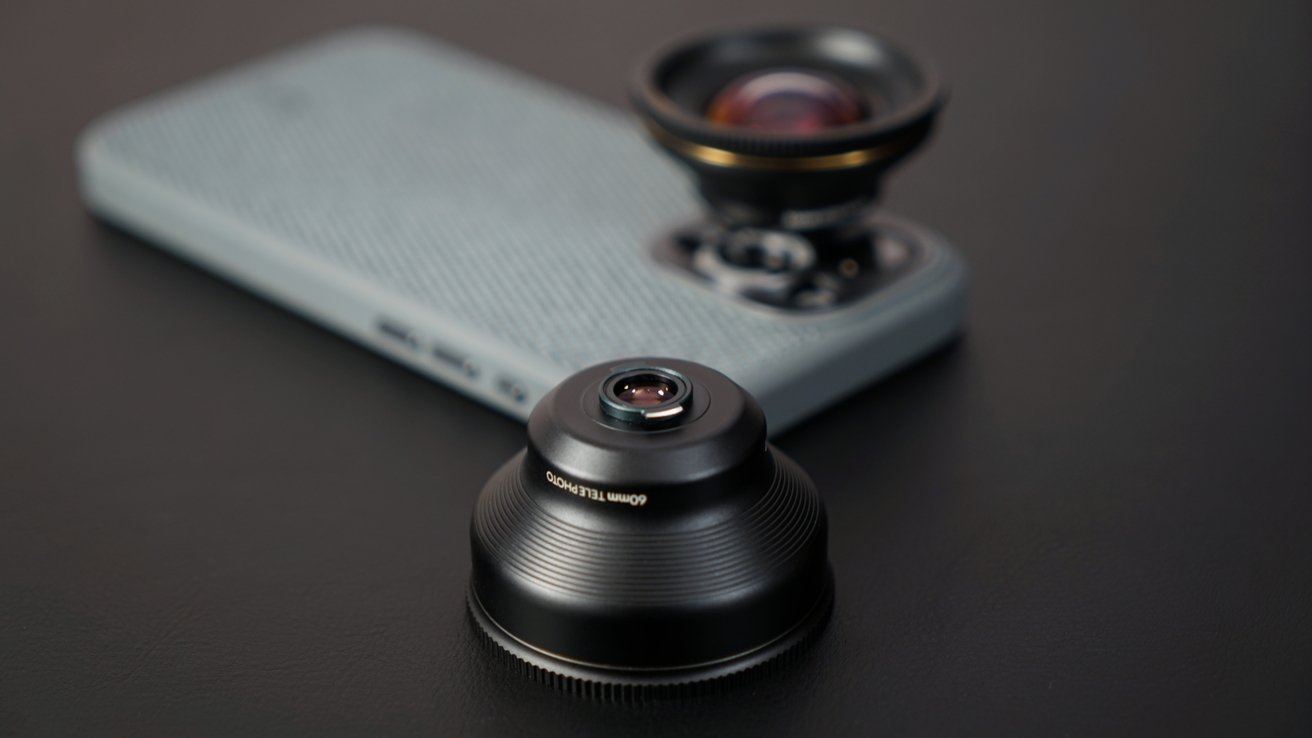
ShiftCam also offers a lens set for iPhone called LensUltra, which I found to be a strong competitor to other attachable lens options. The iPhone 16 Pro Max is compatible with this set via a new case, so I’ll discuss the set alongside SnapSeries here in this roundup.
There’s a lot going on with ShiftCam and it seems the company is paying close attention to how people use their iPhone to create. The company has also introduced MagSafe SSDs that can snap into place alongside any SnapSeries accessory.
Everything snaps together with magnets, but you may not need or want everything, so here’s how each accessory works and fits in with the rest.
SnapGrip Pro
The SnapGrip Pro is a big update to the original model with a 5,000mAh capacity and Qi2. It’s much more efficient and lets you capture photos and record video much longer.
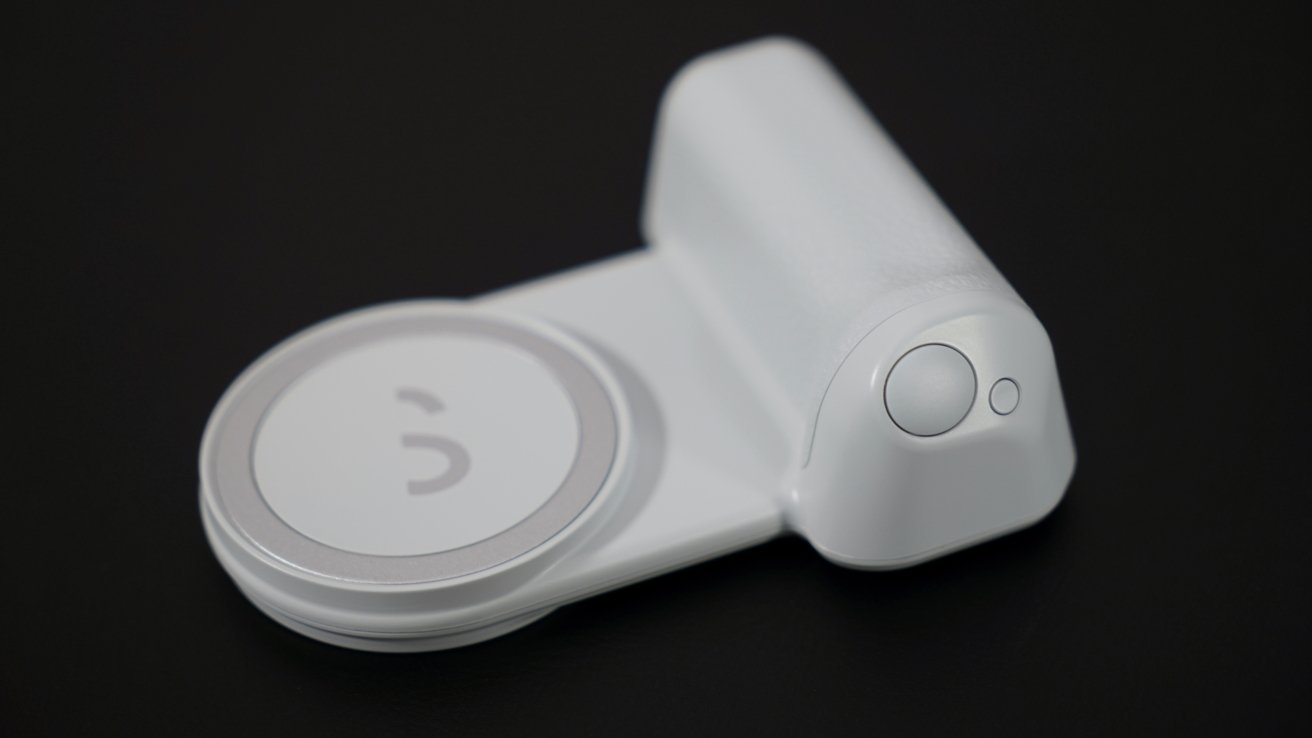
SnapGrip Pro is a MagSafe battery pack and shutter control for iPhoneConnect directly to the USB-C port for 20W PD charging. It’s much faster than Qi2 and handy when recording high-resolution video that’s draining the battery quickly.
The SnapGrip Pro isn’t just a MagSafe battery though, it’s a Bluetooth shutter that can control the iPhone’s camera. The grip is shaped like a traditional camera grip too, so it helps steady shots.
The iPhone 16 lineup has a dedicated button called Camera Control, but it’s not quite the same as using SnapGrip Pro’s shutter button. There are a lot of swiping and pressing gestures with Camera Control, which can be useful in some situations, but there’s nothing better than an easy-to-press shutter.
Get a better grip while shooting photos and capture with less shake with SnapGrip ProI really like Camera Control, but I tend to use it while holding the iPhone with two hands. It’s a bit fiddly too, so pressing the shutter can sometimes lead to accidentally zooming.
With SnapGrip Pro, you can easily hold the iPhone steady with one hand and press the shutter. It’s really about what function you need, as I find both can exist and have their separate uses.
Get the SnapGrip Pro for $89 from ShiftCam’s website.
SnapStand Max
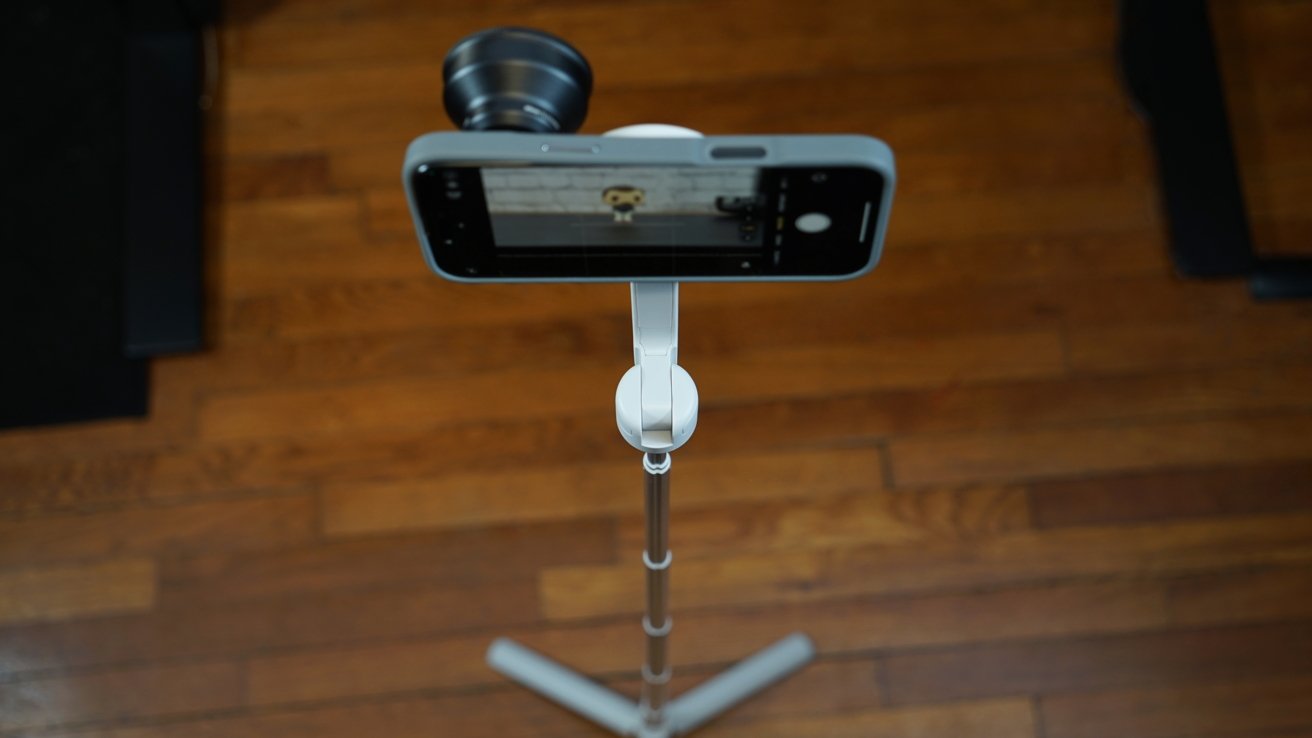
The 70-inch SnapStand Max is a great portable tripod that collapses to just 11 inches long and uses MagSafe to attach an iPhone. There is a built-in rechargeable shutter button that can be removed from the handle too.
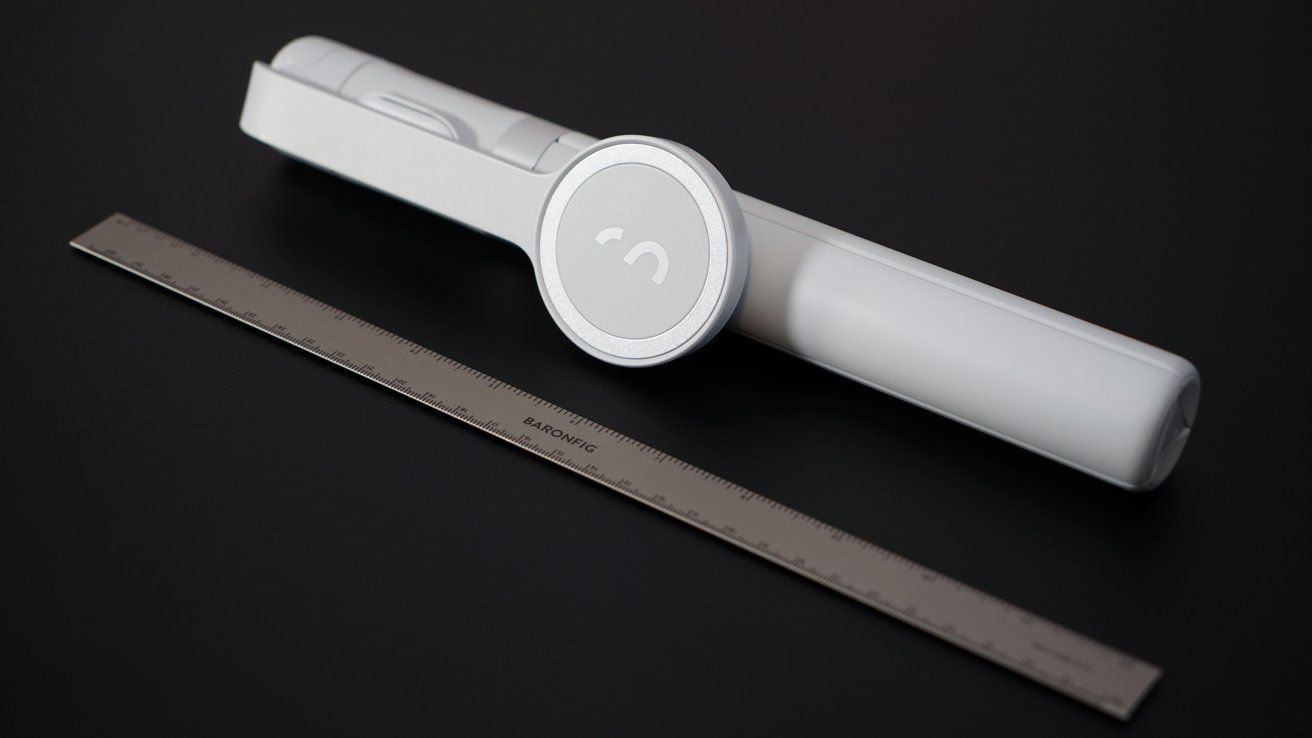
SnapStand Max folds up to fit in your bagThe MagSafe mount head can swivel 200 degrees for whatever angle you need. It’s sturdy enough to hold your iPhone aloft without worrying about sag.
The stand opens with a button at the base of the handle when it’s closed. It telescopes smoothly upwards and can be left at any length securely.
The mount still feels plenty sturdy even if you load it up with accessories like the SnapStudio Light, SnapGrip Pro, and an iPhone. However, be aware of how much weight there is as you extend the tripod, as an uneven surface could cause the entire device to tilt and fall.
The full 70-inch height can get wobbly, especially with other accessories attachedWhen extending the SnapStand Max to its tallest setting, it may be best to limit it to the iPhone and SnapLight. It remains its sturdiest to about 48 inches in length — any taller with more accessories attached, perhaps keep a person holding it steady.
I’m happy that the SnapStand Max can extend to such a tall height. It’s handy for capturing a quick photo or video in some situations. However, that extra length comes at a tradeoff to stability and a slight bump can cause everything to fall over.
Even just setting it to 55 inches increased my confidence in its ability to stand without a wobble by a lot. Like any tall stand like this, it’s important to understand its limits.
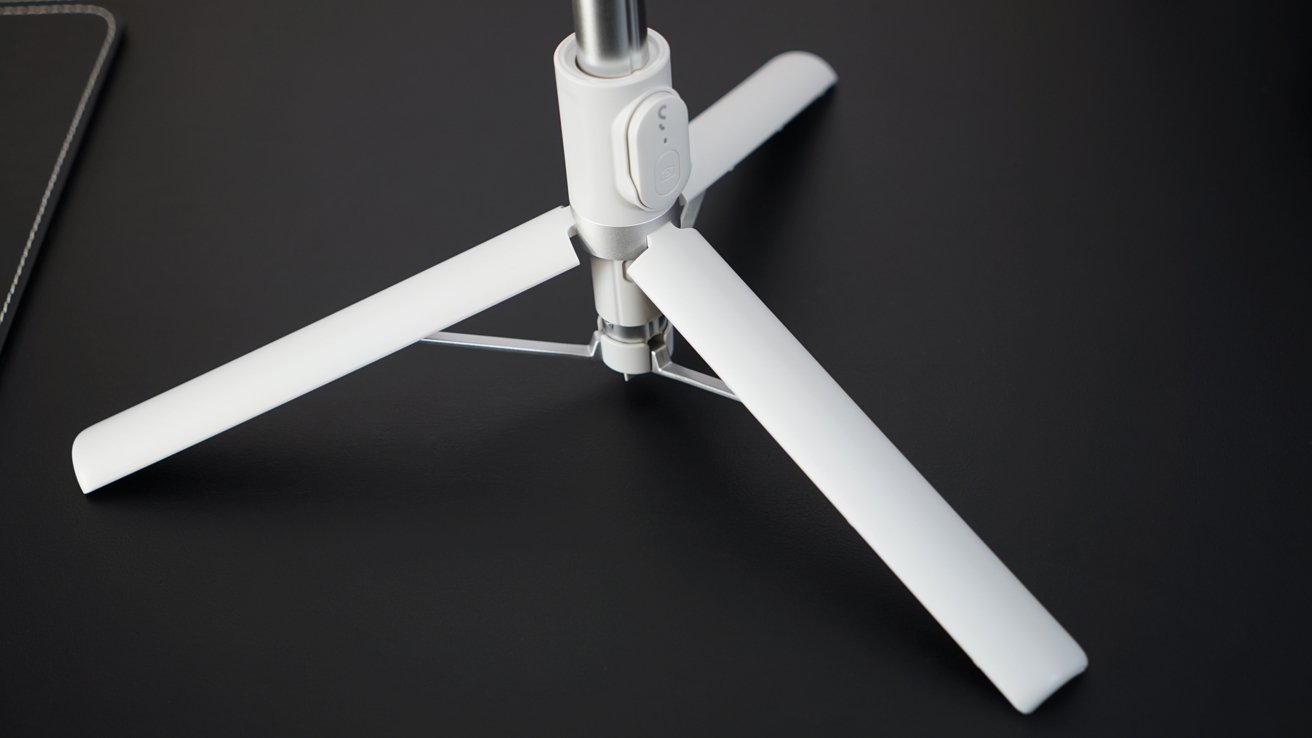
The collapsible feet don’t do much to prevent tiltingThe SnapStand Max isn’t like a traditional tripod that has three legs that extend. Instead, it’s got three feet that stay the same size while a neck is extended, which is automatically not as sturdy by design, but you do get a much smaller product when folded up.
All that said, I wouldn’t ask for the stand to be shorter. Users just need to be careful and use their best judgement when setting up.
Get the SnapStand Max for $71.10 from ShiftCam, currently discounted from $79.
SnapStudio Light
The SnapStudio Light is another battery-powered accessory from ShiftCam. It has 10 steps of brightness adjustment up to 440 lumens while on battery or 600 lumens when connected to a power source.
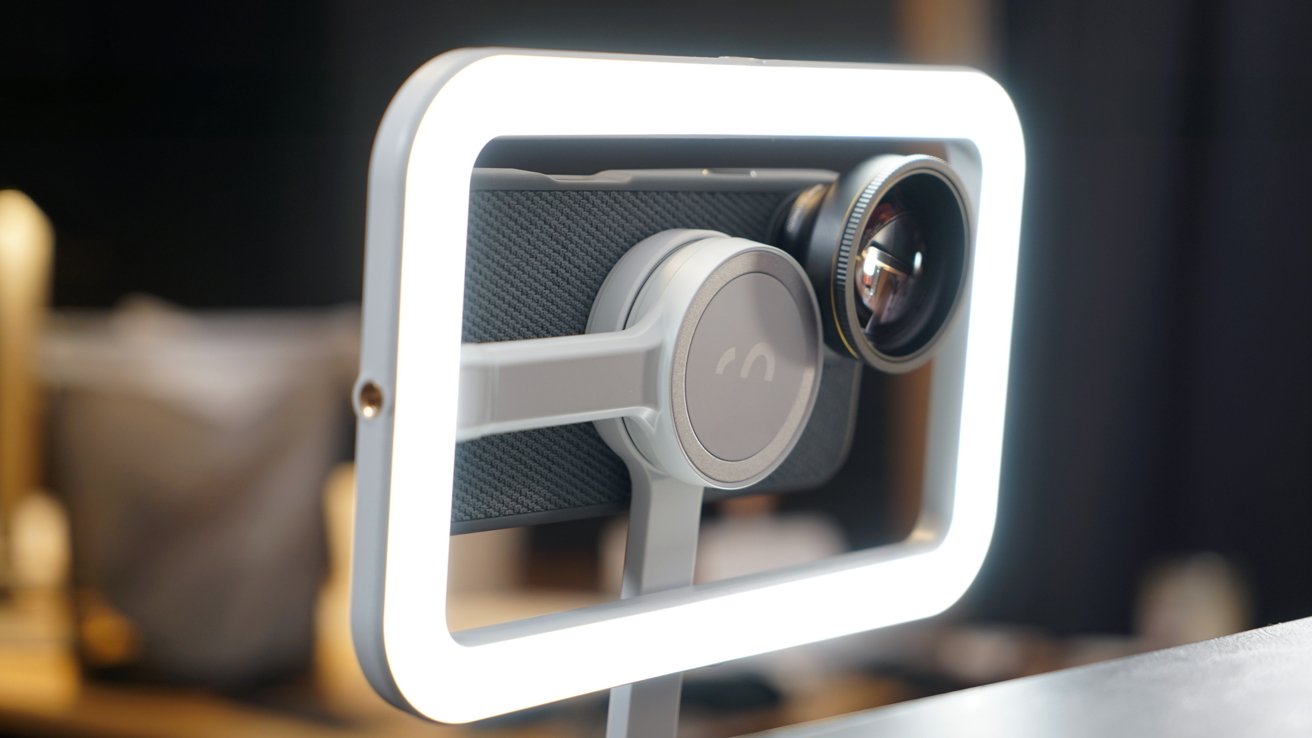
SnapStudio Light offers great lighting options for photos and videoUsers can also control temperature 10 steps between 2,500K and 6,000K. Buttons on the side of the light provide easy access to controls.
The MagSafe mount in the center can be rotated 180 degrees for easy switching between front and back cameras. Attach it to the SnapStand Max for a studio setup, or connect it to the SnapGrip Pro for a portable selfie or vlogging tool.
Like with any ring light, reflections are going to be a problem, especially at a close proximity. You’re going to see the square light in your glasses or even reflected in your eyes unless you’re at a certain distance or angle from the light.
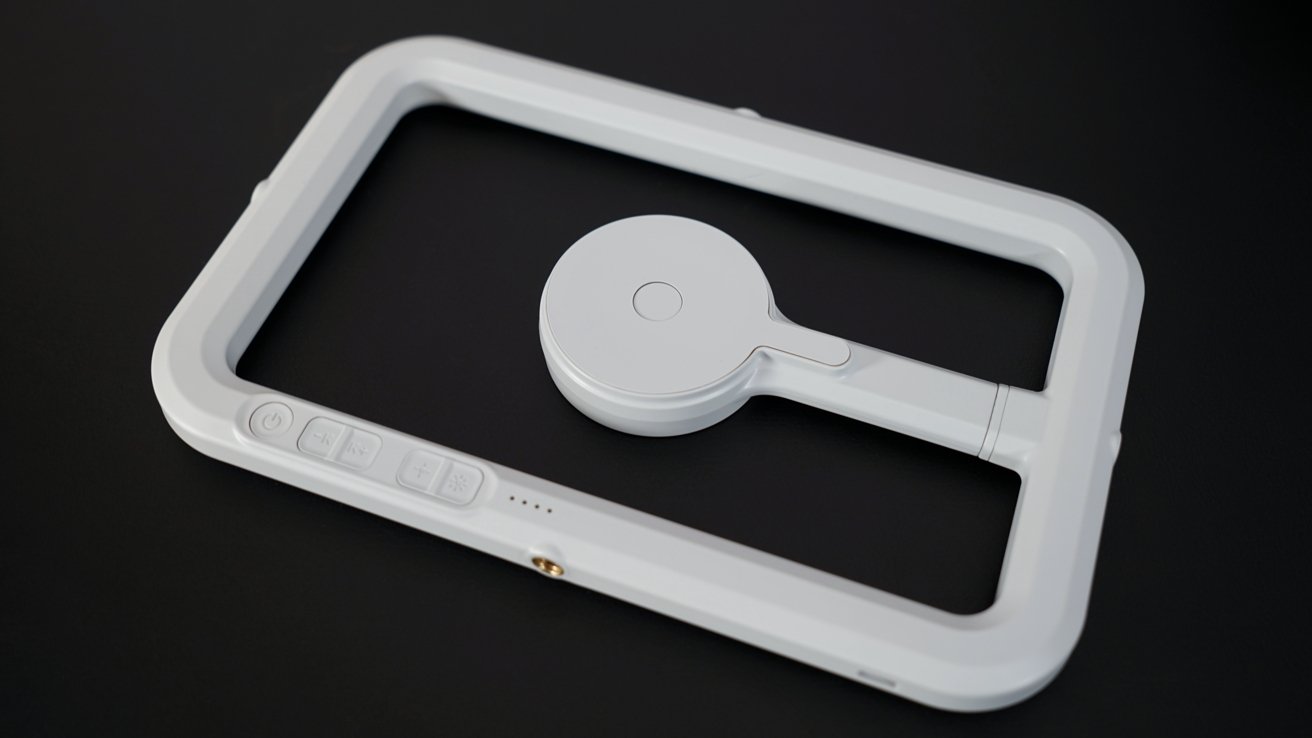
The SnapStudio Light has a center MagSafe mount that can be rotatedThe nice thing about the ShiftCam ecosystem is all of the options for mounting devices. There’s a screw mount on each side that can attach to the included stand or any standard tripod mount.
The internal battery can last about 40 minutes at max brightness. Connect the SnapGrip Pro and wire it to the light to extend its time and available brightness.
Get the SnapStudio Light for $89 from ShiftCam.
ProMic Shotgun and Cold Shoe Mount
If you’re looking to add a little more versatility and universal compatibility, ShiftCam has a cold shoe mount called the SnapShoe. It’s only $29.99 from ShiftCam.
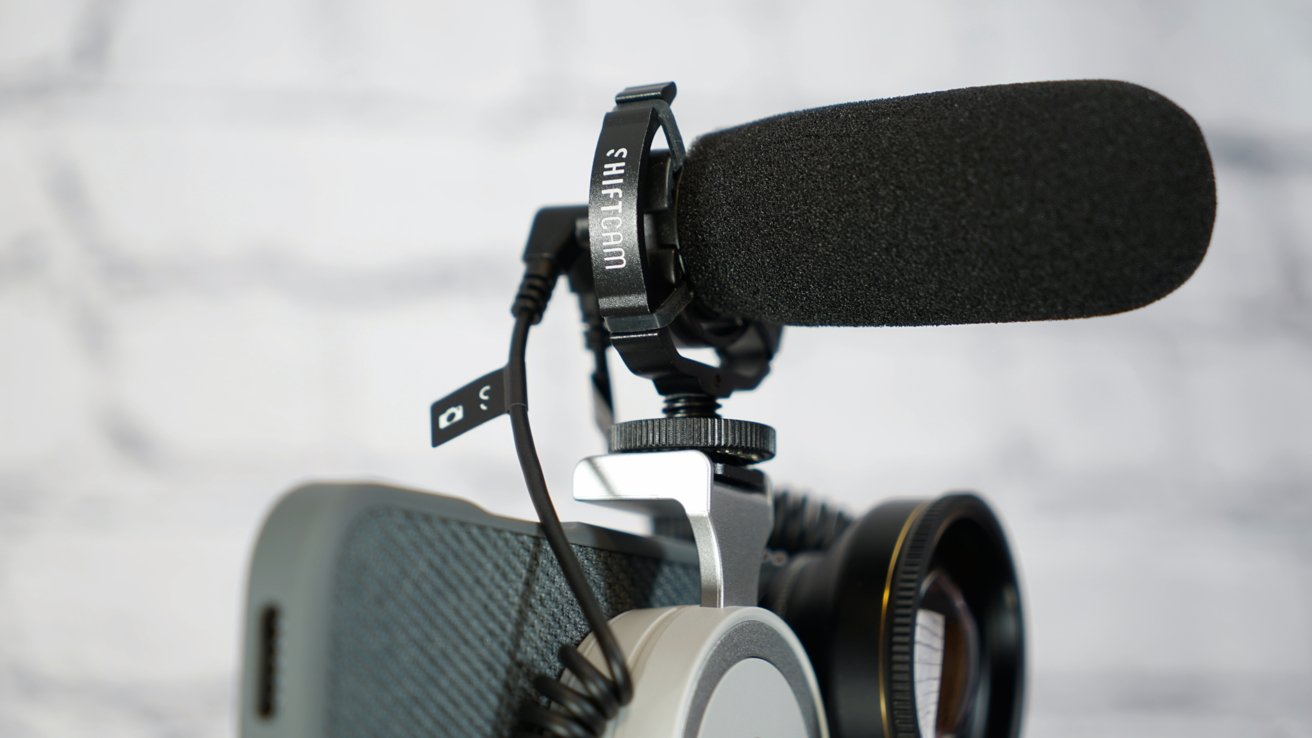
The ProMic Shotgun attaches to the MagSafe SnapShoe mountIf you buy the ShiftCam ProMic Shotgun, it can be set into the SnapShoe. Buy them as a bundle for $109.98 or get the mic alone for $79.99.
The SnapShoe is a great addition because it attaches via MagSafe but allows other accessories outside of the ShiftCam ecosystem to be attached. It’s just a standard cold shoe mount, so bring whatever light or mic you’d like.
The ProMic Shotgun does a great job picking up your voice, and it’s going to be better than your iPhone mic in some situations. That’s especially true since you have the options for different wind filters.
It’s a Super-cardioid mic with a 20Hz to 18kHz frequency response. It works over a standard audio jack and has a second port for connecting headphones.
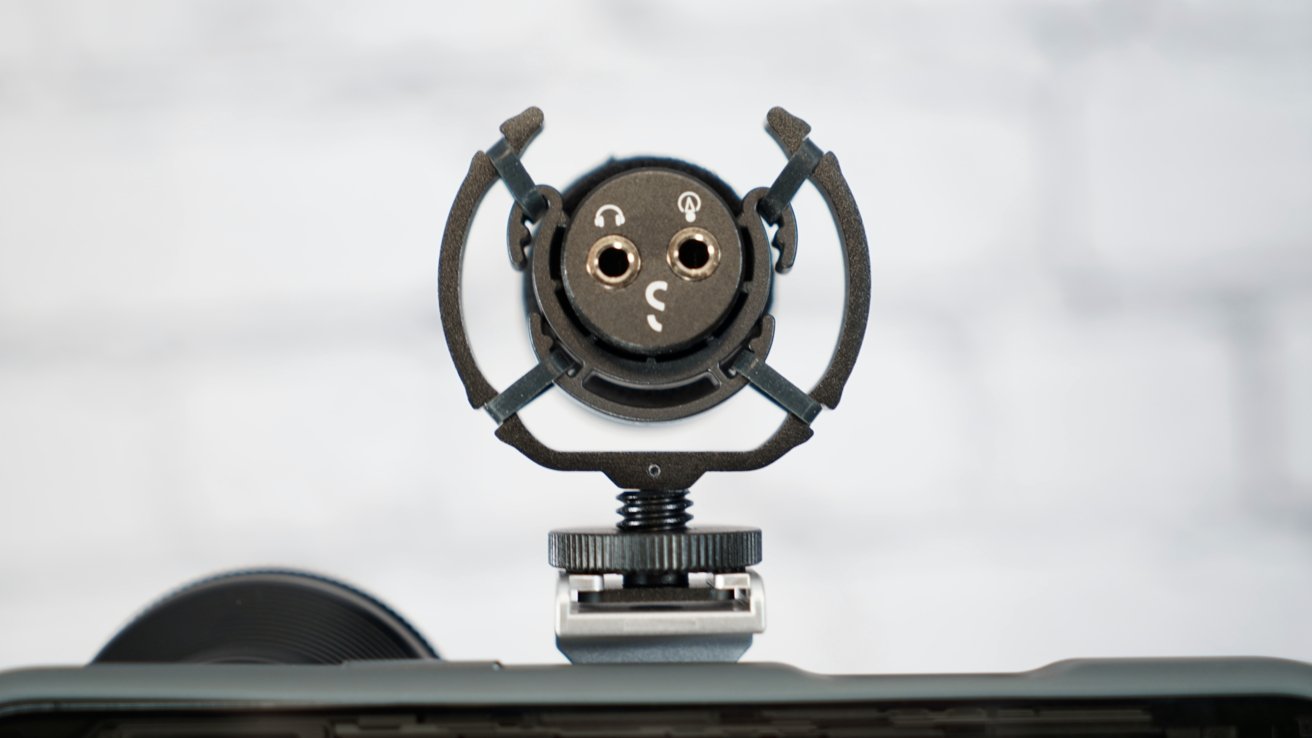
ProMic Shotgun relies on audio jacks for interfacingYou’re going to need a USB-C to headphone jack adapter to use this mic, so it’s probably not the best choice for modern iPhones. Though, if that’s not an issue, then it’s a good mic.
Perhaps ShiftCam can work on releasing a new version with USB-C connectivity.
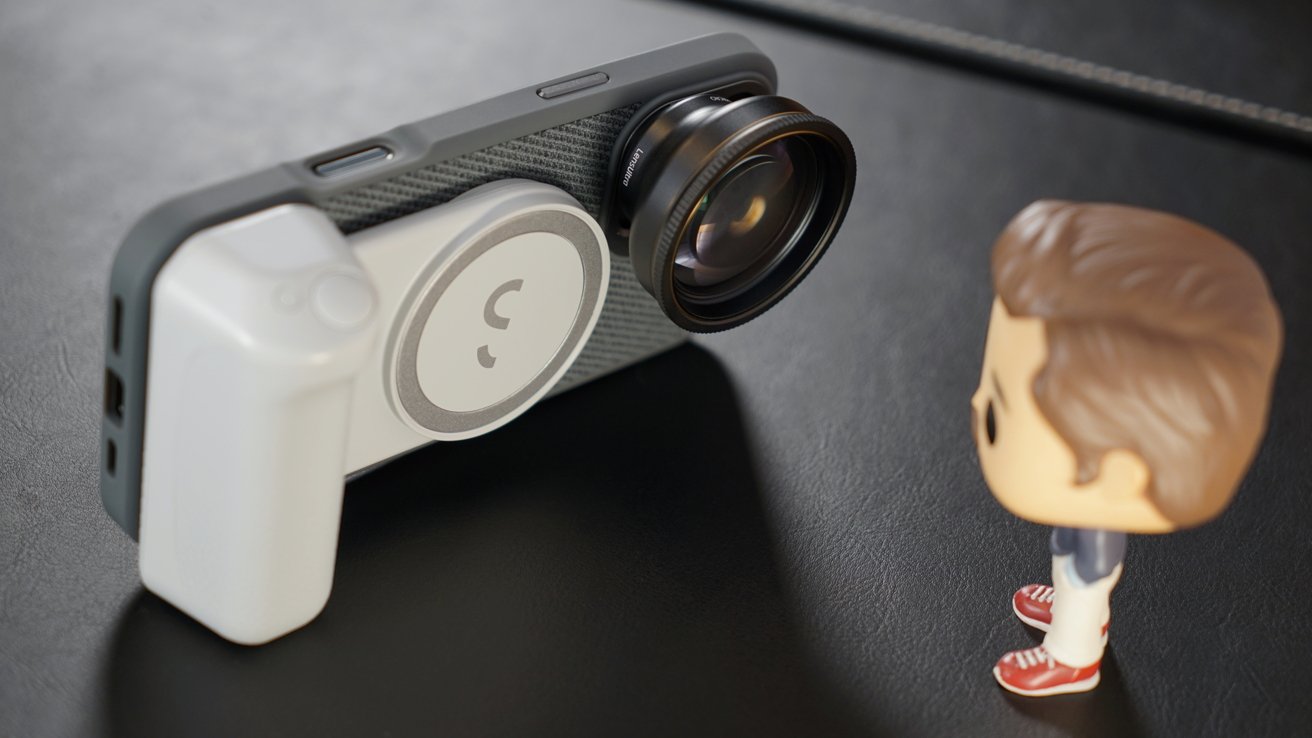
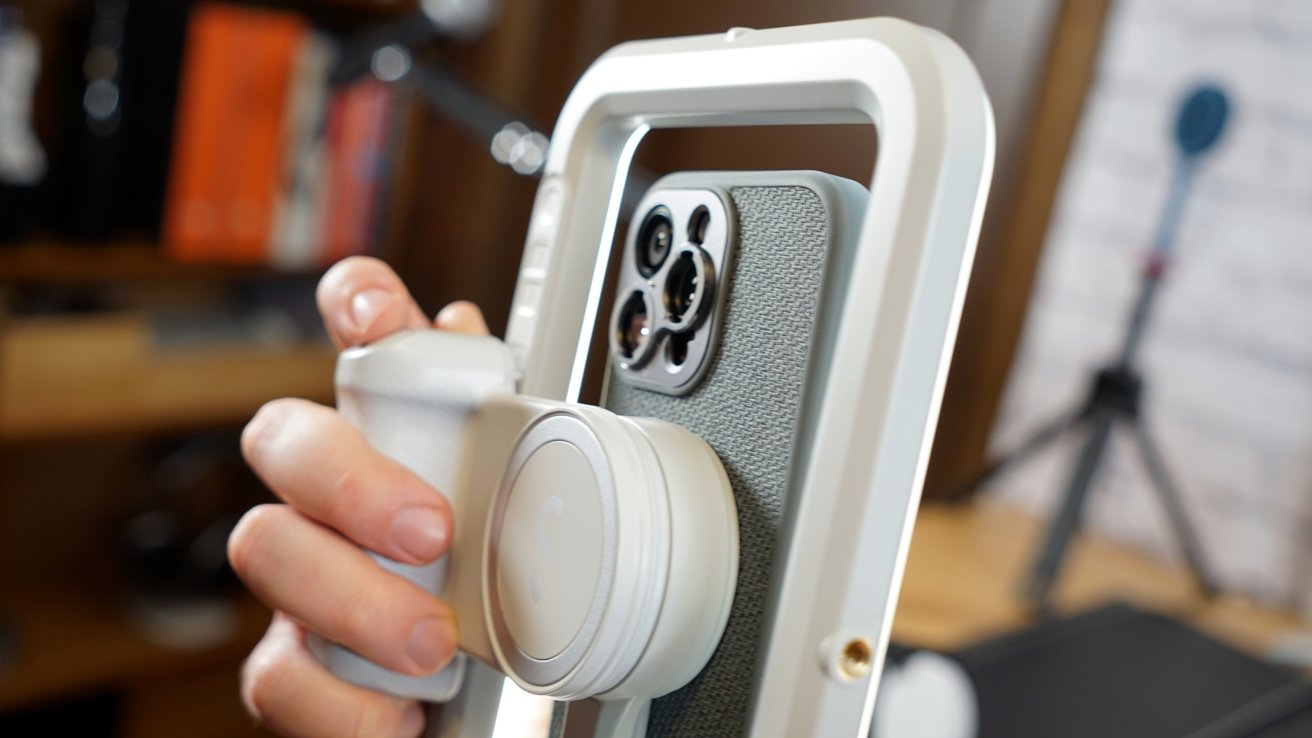
SnapMount Camera Case
ShiftCam let me try out its SnapMount Camera Case in addition to its SnapSeries accessories. It’s part of a complete photography or media production package, so I had to put it all together with the LensUltra set.
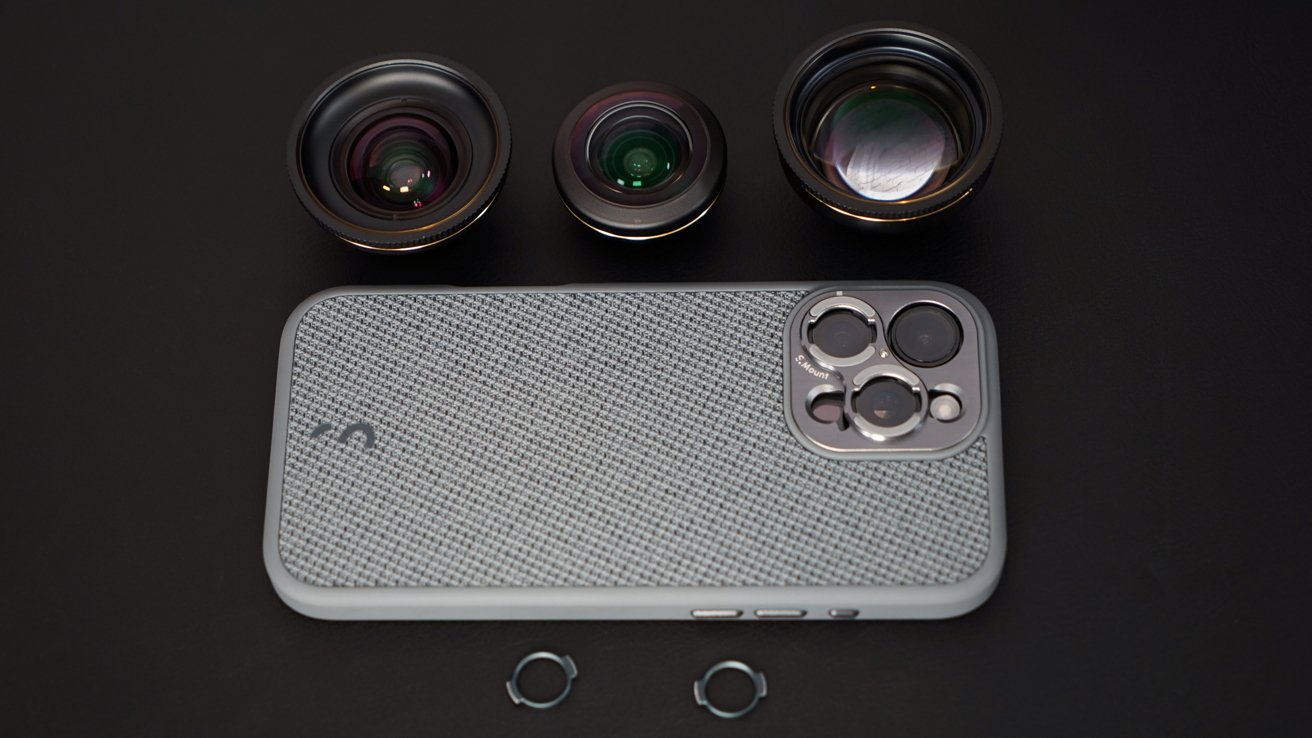
SnapMount Camera Case with adapters bring LensUltra to iPhone 16 Pro MaxThe new case is made from a really nice textured fabric that’s actually machine washable. It has a cutout for Camera Control and tactile covers for the other buttons.
The lens mounting system changed to something ShiftCam calls an S-mount. It was previously a 12mm thread, so this change is a bit odd considering the LensUltra system still uses that older thread style.
I assume it’s due to a shift in how they want to make lenses in the future. The 12mm mount requires a couple of turns to secure the lens completely, while the S-mount is just a simple twist mechanism that feels secure with a half turn.
The SnapMount Camera Case comes with two S-Mount adaptersThe SnapMount Camera Case ships with two of the S-mount adapters, so that should be enough for users to get by. However, for someone like me that owns the full lens set, I wish I could order more S-mount adapters separately just so I didn’t have to swap the mount between lenses.
The case supports MagSafe charging and works with all the SnapSeries accessories without issue. I like that the case has a nice design and isn’t too bulky, so it can be used as a case regularly without feeling like I need to take it off when not using the lenses.
Get the SnapMount Camera Case for $49.99 from ShiftCam. Be sure to choose your iPhone model from the list.
Using SnapSeries
If you get the SnapSeries Professional Kit and the other accessories mentioned above, they can fit together in interesting ways to accomplish different tasks. Of course, you can snap them all together into a kind of monster MagSafe tower, but it’s likely not very practical.
ShiftCam SnapSeries can be used together for a modular setupSet up to record a video with the stand, light, and microphone, and since you’re likely stationary, use an external power source instead of attaching the MagSafe battery to the already wobbly stack. Use the battery pack when you’re looking to go handheld rather than relying on the stand.
That isn’t to say you can’t connect everything together, but it’s just a little unwieldy. As I’ve said previously, use your best judgement.
I do think it’s really cool that you can pick and choose accessories to snap together for whatever you need at that moment. However, there may be some trial and error in figuring out exactly which order the pieces should go in.
The only way the SnapGrip Pro charges the iPhone is if it is directly attached, but there are situations where you’d want it anyway. For example, place the iPhone in the SnapStudio Light then attach the SnapGrip Pro so you have a grip with a shutter button for taking well-lit selfies.
Take better selfies with SnapGrip Pro and SnapStudio LightTake that setup even further by using a USB-C cable to provide power and increase the SnapStudio Light brightness, or charge the iPhone over cable at 20W.
There are lots of ways to use the SnapSeries magnetic accessories. The kits are the best way to get everything you need, but be warned, you’ll likely keep coming back for more from ShiftCam to improve the versatility of the setup.
Get the SnapSeries Professional Kit with the SnapStudio Light, SnapStand Max, and SnapGrip Pro for $231.30 from ShiftCam, a 10% discount available at publication. The SnapSeries Professional Kit Pro includes everything plus the ProMic Shotgun and SnapShoe for $311.93, also discounted by 10%.

How to import photos using the Image Capture app on Mac
Image Capture is Apple’s image acquisition app for grabbing pictures from your camera or scanner. Here’s how to use it in a variety of settings.
While Apple’s iPhone, iPad, and the Photos apps in iOS and macOS are the standard for image acquisition and processing today, there’s another way to get images into your Mac: Apple’s Image Capture app.
Image Capture has been around in macOS for decades and it’s fairly easy to use.
The reason to use Image Capture in macOS is for ingesting images from third-party cameras and scanners. These include DSLR and compact point-and-shoot cameras, as well as flatbed USB and WiFi scanners or multifunction printers.
macOS now supports most common drivers for these devices and setting them up is a breeze. Though you can still download and install third-party drivers and apps from device manufacturers.
Third-party cameras
macOS and its modern driver subsystem have support for most third-party cameras built-in for use over USB or WiFi. The USB standard includes a class driver for cameras (Base Class 06h Still Image). When you plug a digital camera into your Mac over USB, macOS automatically loads the class driver for you so it can communicate with the device.
A class driver is a generic software component designed to communicate with an entire class of devices. WiFi camera connections work in a similar manner, but use networking protocols or protocol bridges to connect to the device.
Some cameras may appear as composite devices since they are actually several devices in one. For example, as a camera and a card reader.
For the most part, with consumer and pro-grade cameras (and webcams), you don’t need to do anything special: just plug the device in or connect over WiFi and turn it on. For some cameras, you may need to download and install additional software from the manufacturer’s website.
It’s also a good idea to make sure your camera’s firmware is up to date.
For some camera brands, such as Canon, you must first disable WiFi on the camera in order for its USB connection to work.
All USB-compliant still imaging devices have a USB base class ID of “06h”, a subclass of “01h” and a protocol value of “01h”.
You can also use Image Capture to import videos from most cameras. There’s also a USB video device class.
Camera image acquisition
When you plug a camera into your Mac and turn it on, macOS should launch Image Capture automatically. If it doesn’t, double-click it in the /Applications folder at the root of your Mac’s Startup Disk to launch it.
On the left in Image Capture’s main window, you’ll see a “Devices” and “Shared” category. This is where connected devices appear. To access the images on a device, single-click it in the sidebar on the left.
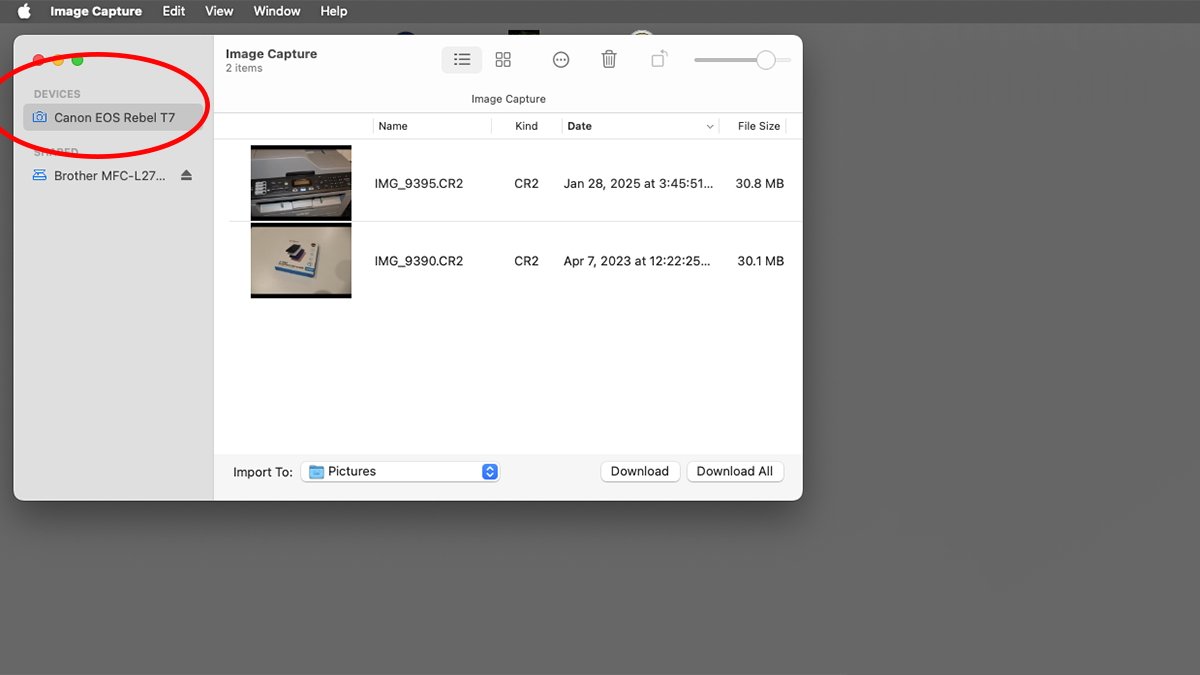
The Image Capture window with a camera selected.When you do, Image Capture will load thumbnails of all the images on the device. You can scale the thumbnail size in Image Capture by dragging the slider control in the toolbar at the top of the window.
You can also view the thumbnails in a list or grid view by clicking the toolbar buttons. There are also controls for rotating and deleting images.
To select where to import images to on your Mac click the Import To: popup menu, then select either one of the standard destinations, a custom folder location, or select Build web page. If you select the web page option, a new folder will be created in your Pictures folder inside your user’s home folder.
To select which images to import, hold down the Command key, click individual images, and click Download or click the Download All button.
Image Capture will begin copying the images from your camera to the selected location on your Mac. When finished, navigate to the destination folder to see the downloaded image files.
Image capture from webcams and even USB-compliant microscopes is roughly the same as for consumer or pro cameras.
Scanners and multifunction printers
If you have a flatbed USB scanner or a USB or WiFi multifunction printer, you can use Image Capture to acquire its scanned images.
A little setup for printers and scanners is needed first: open the System Settings app and click Printers & Scanners->Add Printer, Scanner, or Fax
This opens the Add Printer window. Click the device you want to add from the list under Name, give the device a location name in the Location: text field, and click Add.
Adding printers and scanners works over WiFi as well if your device supports AirPlay or Apple’s Bonjour network discovery service. The device must be on the same network as your Mac.

A multifunction printer with WiFi enabled.When adding new printers or scanners, macOS will look for the matching class driver automatically and activate it for the device. If macOS doesn’t find a matching driver, you may need to download one from the device manufacturer’s website and install it, but this is rare.
Once your device has been added, it will appear in the Printers & Scanners pane in System Settings. To use a printer or scanner click it in the pane.
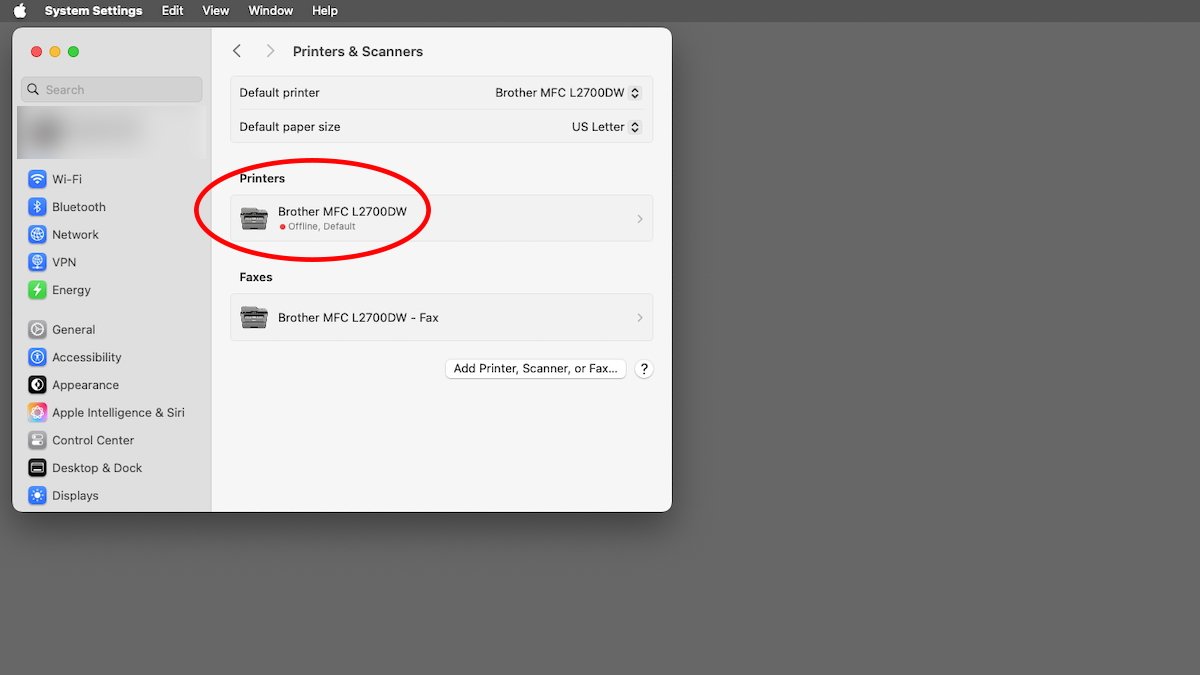
Click a device name in System Settings to open its sheet.You can also Control-click a device name in the pane to get a popup menu with options for removing the device, setting it as the default, and resetting the printing system.
Once your device is installed, click its name in the System Settings app pane, and a new sheet will appear with several controls:

The device sheet showing the Open Scanner button.Click Open Scanner… to launch Image Capture for the device. When Image Capture opens it will automatically select the device and start an overview scan.
This gives you a preview of what’s on the scanner’s bed.
If your device is a multifunction printer, the sheet also has buttons for seeing its supply levels and sharing it on a network, if your device supports it. If your device is using WiFi or is shared on a network, it appears under the “Shared” section in the sidebar.
When the overview scan completes, the Image Capture window shows an image of what was scanned on the flatbed. You can drag and make a selection around the image to crop what is scanned.
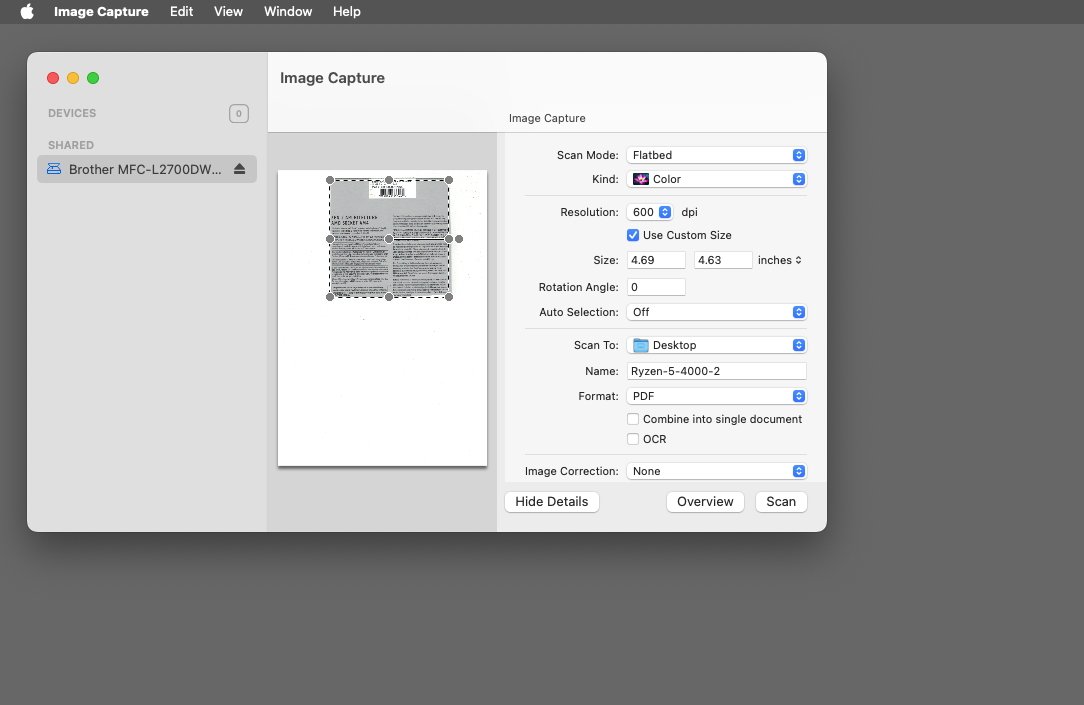
An overview scan showing the scanned image with handles for cropping.There are also controls in the window for switching to a document feeder, setting black and white, grayscale, or color, setting resolution, and file name, type, and location. To restart the overview scan click the Overview button.
Depending on what features your device supports you may also be able to combine multiple scanned pages into one document.
Once you’re satisfied with the settings, click the Scan button. This starts the full-resolution scan. For very high-resolution scans it may take some time as the scan head moves slowly when recording more pixels.
When the scan completes, images will be saved at the location and in the format you specified. You can now open the file to view it.
If you want a simpler interface without all the advanced controls, click the Hide Details button. This switches to a simpler UI with just a few controls: Location, Size, Show Details, and Scan.
If your device has a document feeder, there’s also a checkbox for that in simple mode.
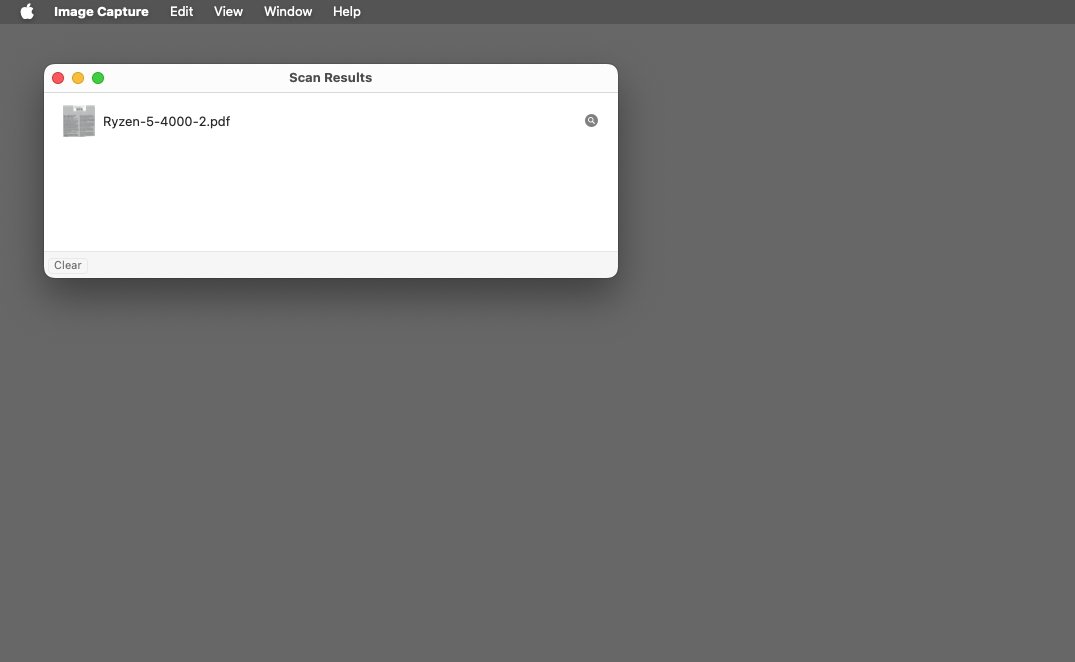
After a scan completes, the Scan Results window appears. This window doesn’t do much except show the file, name, and a magnifier icon. If you click the magnifier the file’s location will be revealed in the Finder.
Scan Results window.Probing the bus
If you have an Apple Developer account, you can log in to the Apple Developer website and download an older tool called USB Prober. This tool allows you to peek at the USB hardware hierarchy on your Mac (part of the IORegistry) to see details about the specifics of each attached device.
To see the USB portion of the IORegistry on your Mac in USB Prober, click the IORegistry tab.
If you’re using macOS Sequoia and want to see the bus logs, you’ll need to install an additional Kernel extension which USB Prober will prompt you to install.
Each USB device listed can be a hub, a display, or a device. Each device has a company and product ID, a port number, a device descriptor, and a configuration descriptor.
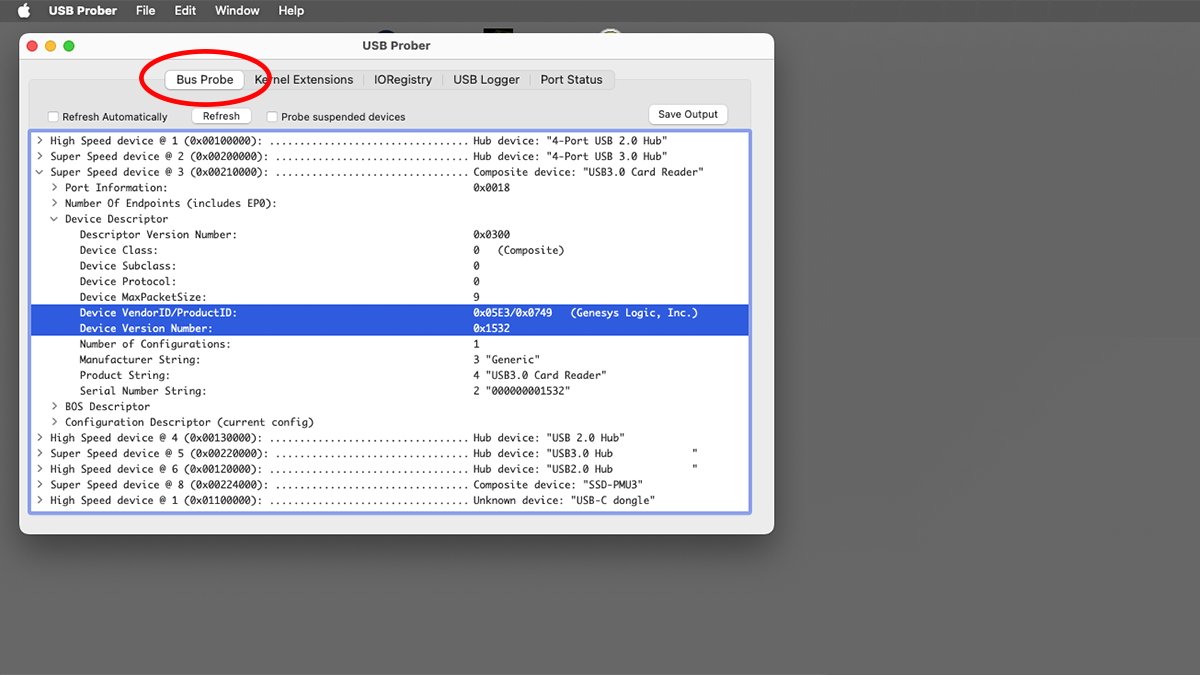
Running USB Prober to see all USB devices on a Mac.The device descriptor contains most of the info about a specific device. Some USB devices can be composite devices.
To see all USB hubs and devices connected to your Mac click the Bus Probe tab.
If you have a camera connected it may be listed as a USB card reader or composite device since some cameras don’t export any USB interface other than storage.
Image Capture makes it easy to import images from a device into your Mac. Apple was wise to keep the app’s interface simple over the years and not add too much to it.
Dwarf 3 Smart Telescope review: Specs, Features, Price
Amateur astronomers and beginners will find the Dwarf 3 Smart Telescope useful for capturing shots of the night sky with the help of an iPhone, and get decent results very quickly.
Like photography and many other hobbies, astronomy can require both resources and knowledge. To understand what’s in the night sky, you have to know what you’re looking at, and where you should look in the first place.
The other half of the equation is the accumulation of gear. For astronomers wanting to photograph the night’s sky, buying a telescope and a camera to attach to it can get pretty expensive pretty quickly.
One solution is the Dwarf 3 Smart Telescope from DwarfLab. It’s a small book-sized telescope that can be quickly set up and aimed at the sky, and can also be used to take photographs as well.
It also does so in a way that makes it reasonably easy to get the shot you want, thanks to some iPhone app assistance.
Dwarf 3 Smart Telescope review: Compact size
While the usual expectation of a telescope is something resembling a tube with lenses, the Dwarf 2 goes for a much flatter approach. Measuring 8.7 inches long by 5.6 inches wide and 2.6 inches thick, it’s something that can be easily packed into a bag.
At 2.86 pounds, it’s not massively lightweight, but it’s still certainly something that can be carried around without too much effort. At least, a lot easier to move than a typically larger telescope and camera setup.
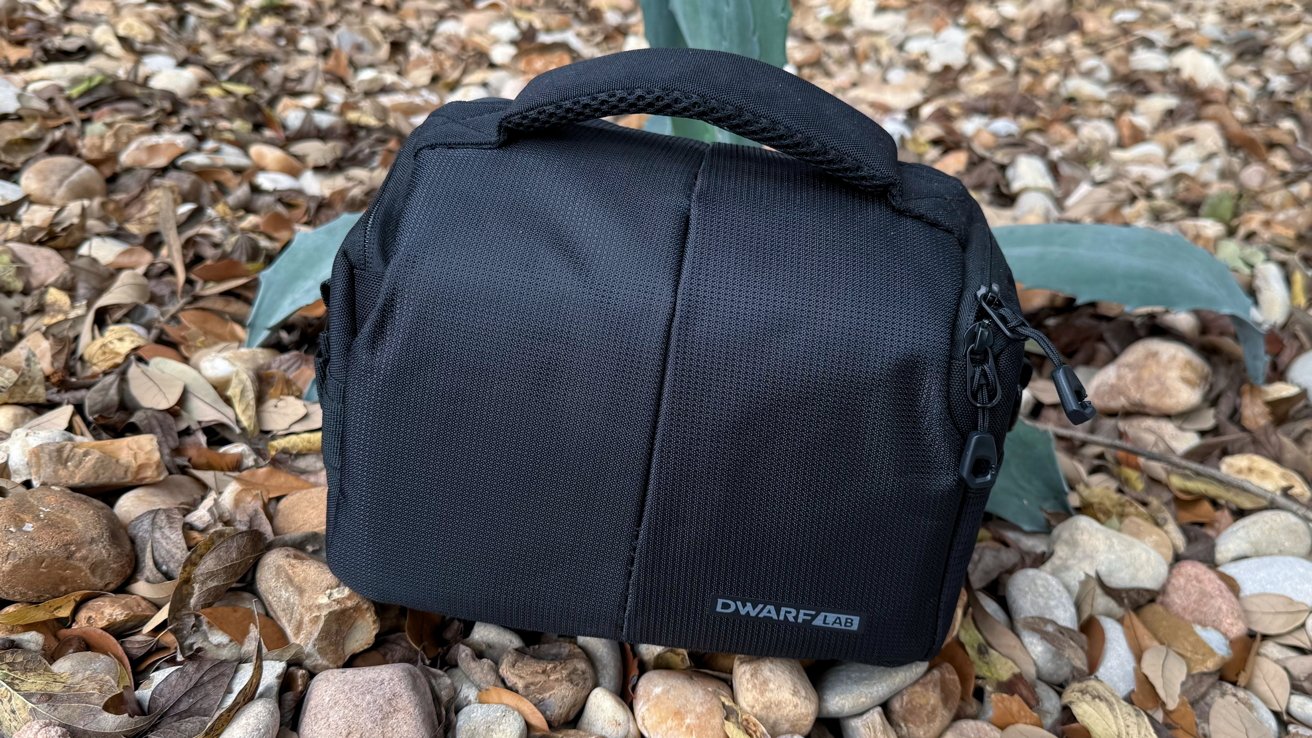
Dwarf 3 Smart Telescope review: The reasonably small carrying caseThe base includes a fixing to attach it to a tripod. You could stand it on its own, but using a tripod means it could be placed safely on uneven ground. A stool will do in a pinch.
While mostly flat, there is a tubular section at the top that will move to focus on objects. A flattened section here contains the cameras, which are used to shoot the night’s sky.
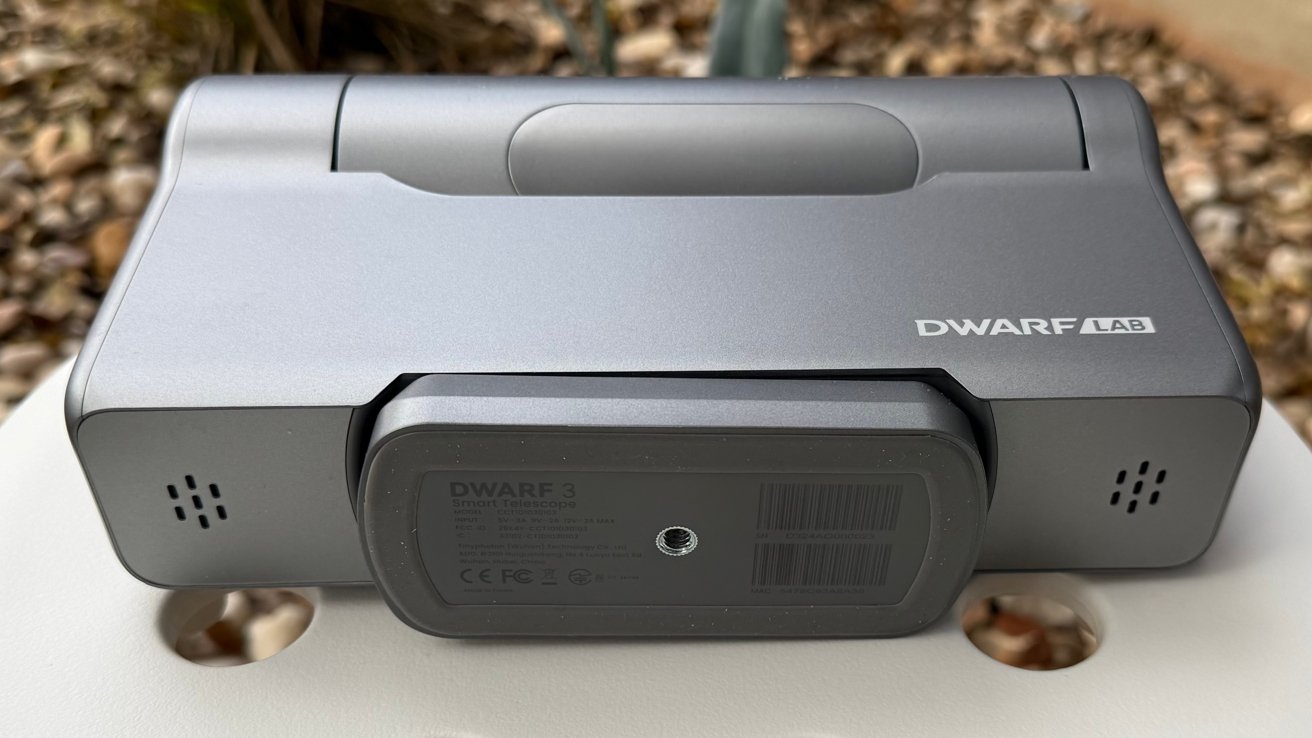
Dwarf 3 Smart Telescope review: the base includes a tripod mount holeThe intention is for the cameras to be easily angled upwards to specific points in the night’s sky. The precision needed to focus on an astronomical object being driven by the app automatically is a nice touch and mostly prevents the need to manually aim the device. More on that in a bit.
Since it’s designed for outside usage, it has a built-in 10,000mAh battery, though you can extend its usage time further with an external power bank using USB.
In our usage of it, the battery held its charge on standby for a very long time. It was still at full power after leaving it alone for a month.
Practical use time is about eight hours on a single charge. So, environmental exposure is
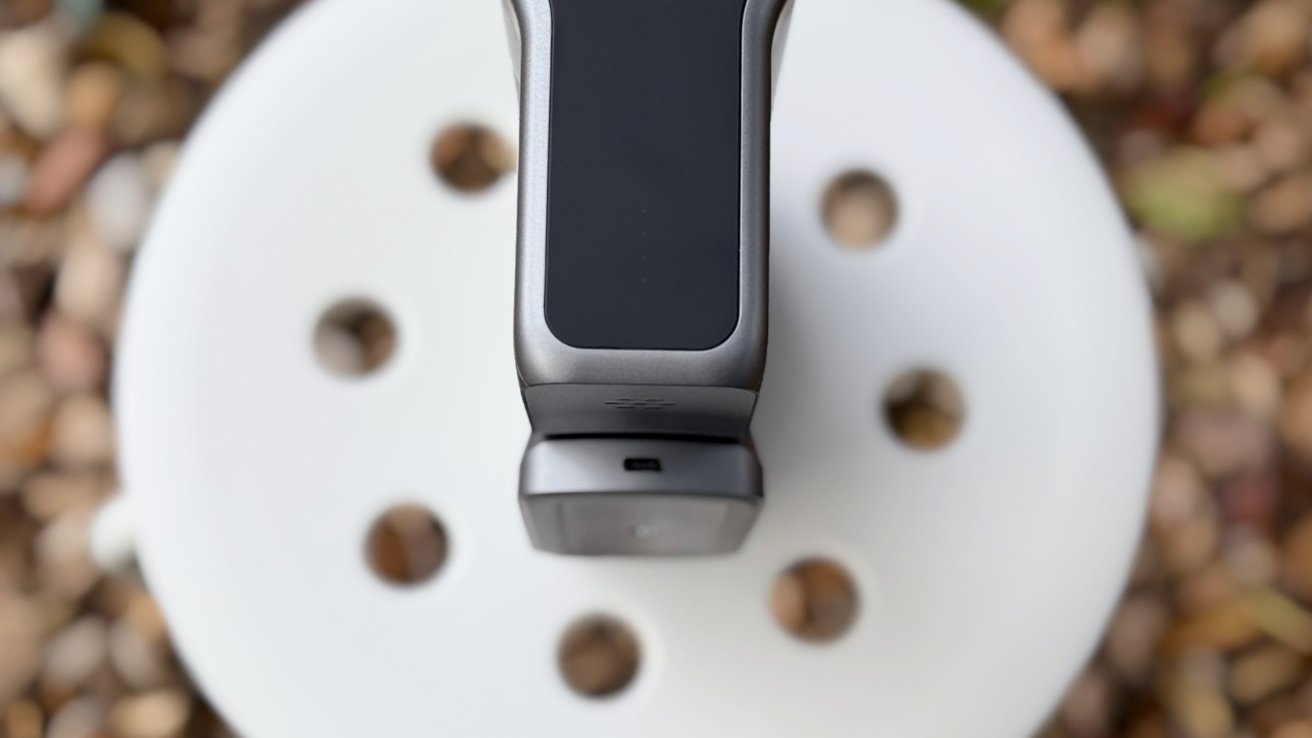
Dwarf 3 Smart Telescope review: The USB-C port can be used to provide more powerIt also happens to have IP54 dust and moisture resistance, which will help during extended night sessions and to fend off the morning dew.
Dwarf 3 Smart Telescope review: Cameras
The most important part of the smart telescope are its cameras, with it using a pair of shooters.
One is a Wide camera which is used for both astrophotography and for daytime usage. It’s not really a high-resolution sensor, as it can output a 1080p still image or 1080p video at 30fps, complete with a 3.4mm aperture and a 6.7mm focal length, giving a 35mm equivalent of a 44mm lens. This is sufficient for task.
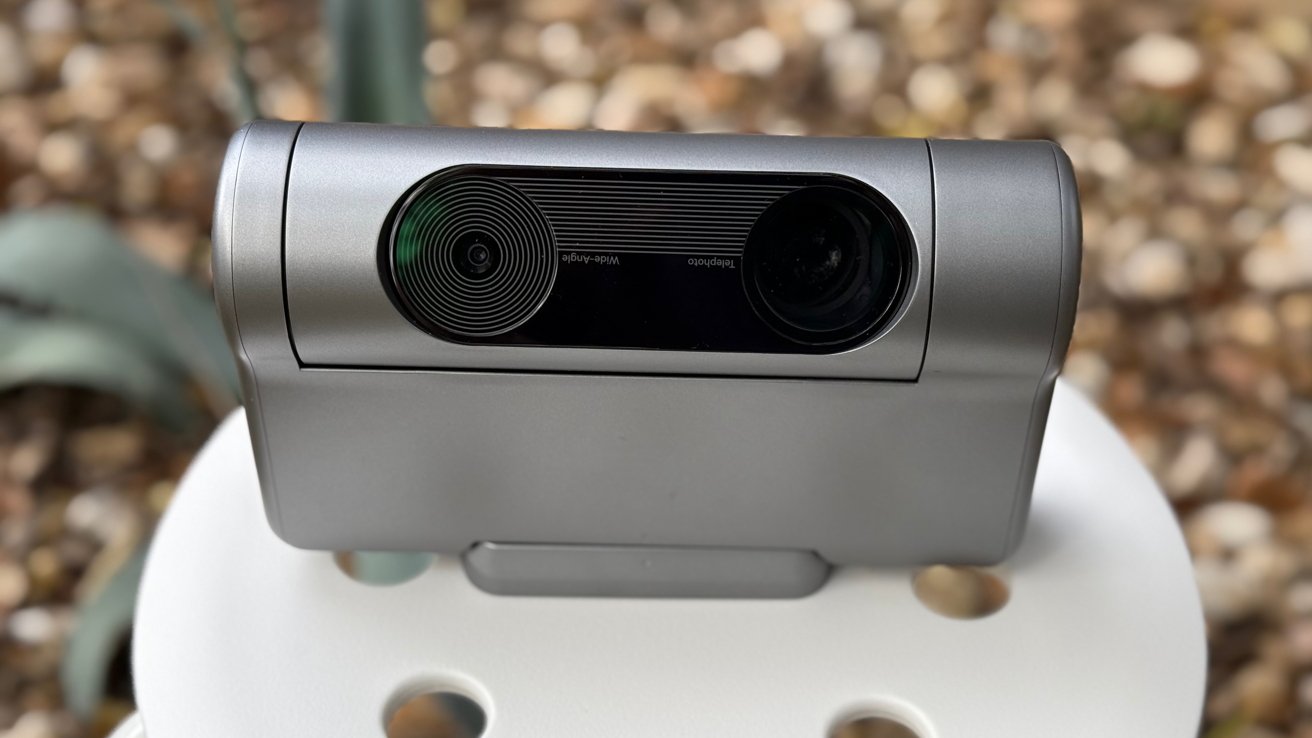
Dwarf 3 Smart Telescope review: The cameras swivel on a central barrelThe Telephoto camera is much more important for astrophotography, and it has the specifications to match. It uses a Sony IMX678 Starvis 2 sensor, capable of capturing an 8.3-megapixel still image.
That sensor has a pixel size of 2 microns, 90% bigger than the Dwarf 2’s comparative sensor, increasing the light it collects. This also helps reduce the amount of noise for extended exposure shots.
That sensor is also able to capture shots with an exposure time of up to 60 seconds. Its video capabilities extend to 4K at 30fps and 1080p at 60fps.
The Tele lens arrangement includes a 35mm arrangement with a periscope mechanism, doubling the light it can gather versus its predecessor. It uses multiple extra-low dispersion lenses to minimize diffraction.
That gives the Tele lens a focal length of 150mm, or a 35mm equivalent of 737mm.
To better work for astrophotography, it has a number of included filters. Both the Wide and Tele cameras have filters for low-light astrophotography that extend into the infrared range.
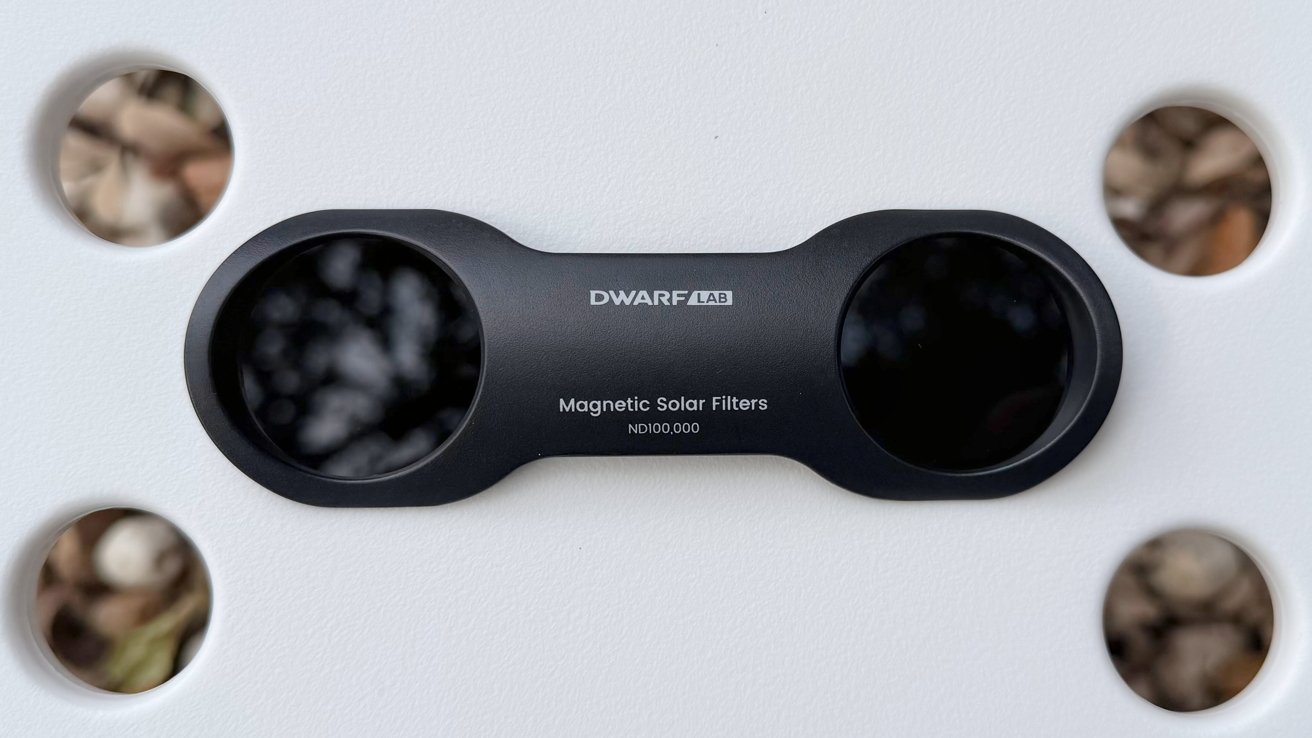
Dwarf 3 Smart Telescope review: Filters for the camerasThe Tele also benefits from a VIS (visible light) filter, as well as a Dual-Band filter. This latter filter excludes certain wavelengths to cut down city light pollution and moonlight, increasing the chances of better nebula shots.
Dwarf 3 Smart Telescope review: App and usage
The point of the Dwarf 3 is to make astrophotography simple for users. After setting it up, all you need to do is to connect it to the DwarfLab companion app on an iPhone, and take control of the device from the small screen.
With the app installed, connecting to the Dwarf 3 is handled by an NFC element, signified by a glowing green ring on the side. This handles setting up the Wi-Fi connection between the iPhone and it.
There is a little bit of a learning curve when it comes to the user interface. It takes about 30 minutes to get used to it, but by then, you can go to town.
Once connected, the app offers a map of the sky, including sets of daily recommended items to look at.
A lot of this is automated, including automatic detection and configuration on behalf of the user, minimizing the overall setup time. Users are also able to exert more manual control over the settings, which is useful if they have a particular photographic style in mind.

Dwarf 3 Smart Telescope review: The accompanying app with some (sometimes unhelpful) tooltipsOne thing to remember is that it has to be used in an open area, with little around it that could interfere with its sensors. One time it was set up next to a fence that was intended to be used as a wind break, but its presence meant the telescope failed its calibration.
After the initial failure, there wasn’t an apparent setting to retry the calibration after repositioning it to the middle of the field.
The app also includes a scheduling system, so that you could set up a number of shots to be taken at specific times of night. Again, this automates the process and hands off the hard work to the telescope itself.
Oddly, while it can deal with nebulas, galaxies, and individual stars, it doesn’t like taking planetary shots. The manufacturer is clear on this point, though.
The types of shot you can take are also quite varied, including solar and lunar eclipses, and an Astro Mosaic that combines multiple shots to create a larger overall image. Shots can also be taken of the Milky Way and star trails, with the latter showing how stars move across the night.
Once set up, there’s little need for the user to have more than a cursory eye on the Dwarf 3 as it does its night-time thing. The app can be minimized or closed while the Dwarf 3 is shooting, with it continuing to take its pre-configured shots.

Dwarf 3 Smart Telescope review: Viewing the night sky’s subjects in the appThe auto-search tool is great, and it moves really fast. This makes the wait between requesting a shot and actually being able to take it really short.
But, I feel the interface should be forced to be used in a horizontal mode, just like Star Walk. Using it in portrait orientation was covering up tooltips, which isn’t a great exemplar of UI design.
Generally speaking, it’s best to use the recommendations from the search, then let the app find the body in space. You can manually move the camera, but it’s frustrating and time consuming for astrophotography. It is more useful for taking pictures of (relatively stationary) birds, though.
Practically, the Astro mode takes several pictures that may be adequate enough for some, but weren’t to my own liking. Switching over to Photo mode, I was able to get the shots I actually wanted.
One annoyance was discovered when searching for M45 and M42. While it did mark M45 in an album when I used Astro mode, I wish the app was able to automatically mark for a shot to be taken in Photo mode too for an alternate version.
Another instance was in searching for the constellation of Orion, as the search results didn’t appear to include constellations. Try as I might though, this may well be user error, as it seems like an obvious thing to include in searches and an odd thing to omit or obscure.
Connectivity is generally good, but could use some improvement. To actually control the Dwarf 3, I had to stand within a few feet, or otherwise it would lose connection. Remote control of the device is a great idea, but only if you can shelter from the elements and the cold while doing so.
At this short range, you’re probably not going to be in shelter until you can finish configuring it and then escape to warmth and dryness.
Onboard storage consists of 128GB eMMC memory. It doesn’t sound like that much, but bear in mind you’re going to be mostly taking photographs, not recording tons of space-hogging video. So, it works.
With that 128GB, there’s ample storage for multiple weekends worth of stargazing built into it.
Dwarf 3 Smart Telescope review: After-afterdark
While a telescope in nature, the Dwarf 3 can also be used in a few other ways that have little to do with stars and comets. There’s a few daytime uses available for it too.
Landscape photographers can take advantage of its dual-camera system and auto-stitching capability to produce gigapixel panoramas. Massive panoramic images with high amounts of detail throughout.
It’s also quite handy for ornithologists, with its far range shooting ideal for capturing easily-disturbed birds. The Dual-Camera Sync feature lets users tap on a target while looking at a wide-angle view, which then triggers the telephoto camera to automatically focus on the intended subject.
This idea is extended further with Auto-Capture Mode, with the system tracking the selected bird while it flies around. It does so automatically, even if the user’s not around to tell the Dwarf 3 to get the shot.
Dwarf 3 Smart Telescope review: Neat for leisurely astrophotography
This is certainly one of the more interesting iPhone-connected devices we’ve tested here at AppleInsider. Overall, it’s cool to look at the telescope and see it working, but it’s really for folks that want photos of the night’s sky.
Despite using it in very cold weather, it was still very easy to lose track of time because it was fun to use. Eventually, playing with it on that evening ended after losing feeling in my fingers.
This experience demonstrates a few things about the Dwarf 3. For a start, it only needed a little bit of effort to learn how to use it, so it’s fairly approachable as a device.
I’m not a professional astronomer, though. Your mileage may vary.

Dwarf 3 Smart Telescope review: Set up and ready for shootingThere are photographers around the world hooking up their big cameras to telescopes and creating awesome works. The Dwarf 3 certainly dials back the expertise needed to get a great shot of the night’s sky, in a much more approachable format for consumers.
It’s certainly not a miniature Mauna Kea observatory you can put in a backpack, and while the lenses and sensors are good, there’s only so much you can do in a small form factor. And, urban sprawl and light pollution are a problem too.
But the Dwarf 3 Smart Telescope does give you one more way to explore and appreciate the universe, connects to your iPhone, and can be had relatively inexpensively. Using it as a set of digital binoculars is just a bonus.
Dwarf 3 Smart Telescope pros
- Ease of use
- Compact size
- Hands-free adjustments
Dwarf 3 Smart Telescope cons
- Mode switching isn’t fantastic
- Search is spotty
- Short-range remote control
Rating: 4 out of 5
Where to buy the Dwarf 3 Smart Telescope
You can pick up the Dwarf 3 Smart Telescope for $549 from DwarfLab.com or B&H Photo.
Apple’s original and delayed HomePod shipped seven years ago
Eight months after it was first announced, Apple’s first HomePods began shipping on February 9, 2018 — and started a peculiar journey of life, death, and resurrection.
There’s been a subtle but fundamental change about the HomePod since it was first launched, and especially since it was first rumored. But it isn’t a technical change, it’s an alteration in how we’ve come round to thinking of it the way Apple always wanted us to.
Today, the HomePod sits in a range of Apple audio devices that includes the later HomePod mini, but also the whole AirPods range. The HomePod is a speaker, and if Apple doesn’t make the absolute finest and greatest audio equipment, it certainly makes the most.
Flash back to the launch in June 2017, though, and a little further to the rumors that began around 2014, and HomePod wasn’t a music speaker. It was a smart speaker, it was Apple’s answer to Amazon’s Alexa.
We expected a Siri Speaker, and Apple was falling behind.
The first rumors
The Amazon Echo, the first Amazon speaker to feature the Alexa voice assistant, had been launched in 2014. Originally released to just Amazon Prime subscribers, by 2015 it seemed to be everywhere, and so Apple seemed to be nowhere.
Apple had acquired Siri and included it in the iPhone 4s back in 2011. Yet despite leading the way with digital assistants, in just those first few years, Siri was already being seen as eclipsed by its rivals.
In 2014, the rumors were starting that something was going to be done about this, and specifically that Apple would enter the smart home space. When WWDC 2014 came in June that year, it was true, Apple launched HomeKit and a push into the smart home — but not a speaker.
But then just shortly afterwards in August 2014, Apple acquired Beats. At $3 billion, it was and remains Apple’s largest ever acquisition of another company, and you don’t spend that money on an audio company without a plan.
Beats Pill+ was Apple’s first speaker after acquiring BeatsIt just didn’t seem as if a Siri Speaker were part of it. In 2015, though, Apple launched its first Bluetooth speaker under the Beats brand. Called the Beats Pill+, this $230 portable speaker introduced charging via Lightning — and did not introduce Siri.
Instead, while the launch seemed to confirm rumors that there would be a Beats-branded Siri Speaker soon, Apple and Beats concentrated on audio quality.
“When you obsess about sound the way that we do at Beats, portable Bluetooth speakers can be very tricky,” said Beats President Luke Wood at the time. “We spent countless days, weeks, months testing for that perfect combination of form and function – small enough to travel but still big enough to feel the emotion of the music. That’s what you get with Pill+.”
Apple isn’t interested
Then as now, Apple will not budge on its secrecy. But also then as now, Apple does find a way to make its position known — and it does have to comply with regulatory filings.
So in 2017, Apple was letting the world know that it wouldn’t be making a smart speaker, or at least not one that looked like the hit Amazon Echo. Early in the year, it was specifically reported that Apple had “no apparent interest” in making an Alexa-like device.
It was said that instead Apple wanted to make Siri an “omnipresent AI assistant across devices,” instead of having it in a speaker as some kind of central hub.
All these years ago, Apple was already talking about AI — and not only with unnamed executives briefing journalists about smart speakers.
“Look at the core technologies that make up the smartphone today and look at the ones that will be dominant in smartphones of the future — like AI,” Apple CEO Tim Cook had said in an interview in August 2016 discussing artificial intelligence company Acquisitions. “AI will make this product even more essential to you.”
And then there was Phil Schiller, who was asked directly in May 2017 what he thought about smart speakers. By then, not only was Amazon topping the sales charts with Alexa devices, but there was also Google Home, so Apple was being beaten to smart speakers twice over.
“My mother used to have a saying that if you don’t have something nice to say, say nothing at all,” responded Schiller — before going on to discuss smart speakers in general.
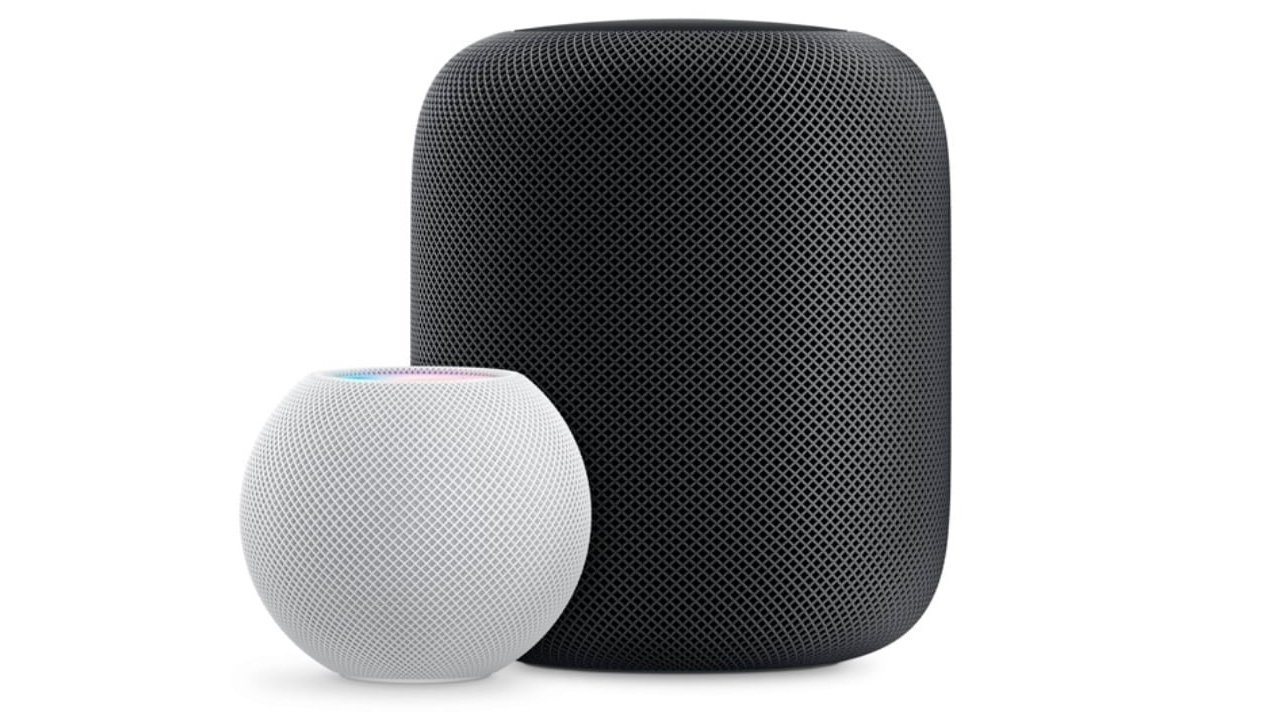
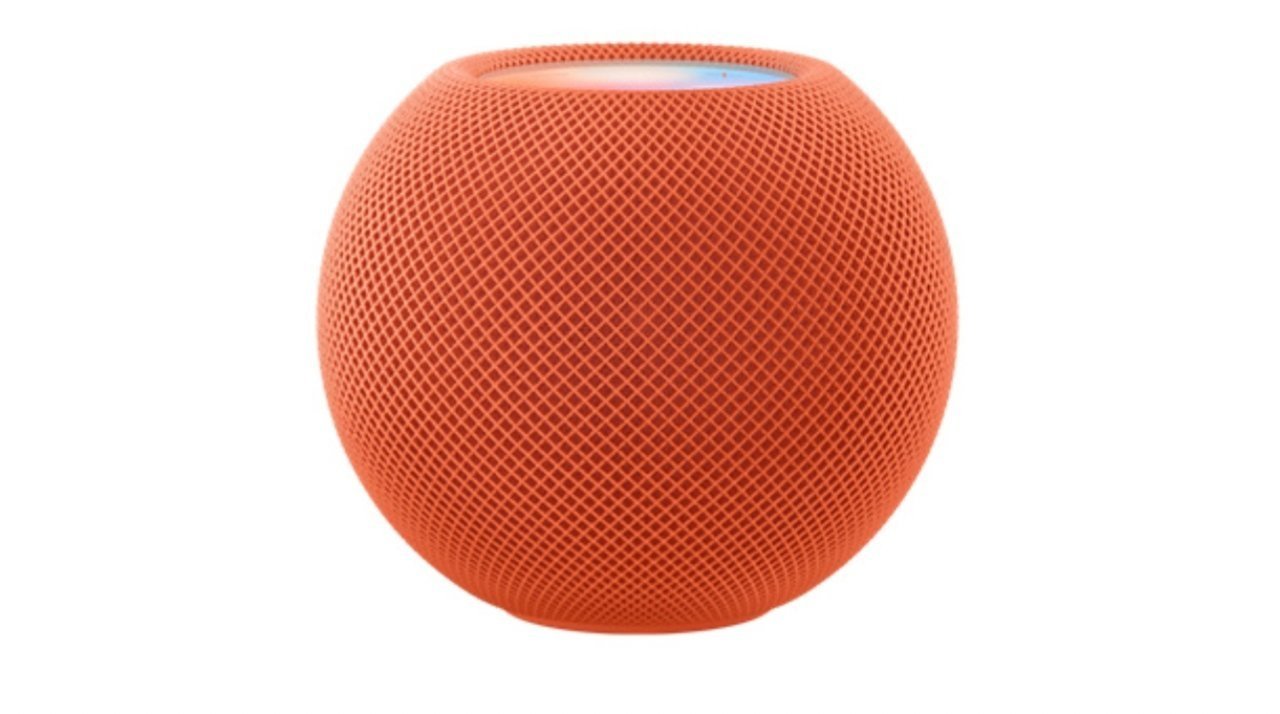
HomePod mini (left) and full-size HomePod“[We] think it’s important to — that there are times when it’s convenient to simply use your voice when you are not able to use the screen,” Schiller said. “For example, if you’re driving [and] you want Siri to work for you without having to look at the screen, that’s the best thing.”
“Or maybe you’re across the room, and you want to ask Siri to change the song you were listening to — you don’t have to walk over and back,” he continued.
That sounded like Apple was surely going to make a Siri speaker, but then Schiller came as close to saying no as any Apple executive ever would.
“So there’s many moments where a voice assistant is really beneficial, but that doesn’t mean you’d never want a screen,” he said. “So the idea of not having a screen, I don’t think suits many situations.”
“And so I think voice assistants are incredibly powerful, their intelligence is going to grow, they’re gonna do more for us,” he continued, “but the role of the screen is gonna remain very important to all of this.”
And that was that. Until a few days later when analyst Ming-Chi Kuo kicked off rumors that Apple would make a Siri speaker with some kind of touch panel. Others said that there was going to be a Siri speaker that resembled the then current Mac Pro.
In retrospect, they were all right. The Mac Pro at that time was a small cylinder, and when the HomePod finally shipped, it had a touch panel at the top.
And also in early 2017, the rumors were saying that Apple was finalizing its Amazon Echo rival. Ming-Chi Kuo even laid odds, saying there was more than a 50% chance that there would be a Siri Speaker announced at WWDC 2017.
Apple announces the HomePod
“Now, we’ve got one last thing to talk to you about,” said Tim Cook in the WWDC 2017 keynote. “Let’s turn our attention to music.”
“Music has always been a part of Apple’s DNA,” he continued. “We first revolutionized the music industry with iTunes… then we forever changed the way people listen to music on the go with the iPod.”
Cook stressed how the iPhone and Apple Music meant you had 40 million songs in your pocket. He stressed how AirPods meant Apple made “absolutely magical” wireless audio headphones.
“But what about our homes? We think we can do a lot to make this experience much better. Just like we did with portable music, we want to reinvent home music.”
After really hammering home that Apple was focused on music, Cook then handed over to Phil Schiller who married that to the idea of a smart speaker. Schiller basically dissed all existing portable speakers, saying either they were smart with poor audio, or they had okay audio but weren’t smart.
“Our team has been hard at work for many years now on a breakthrough home speaker,” he said.
Schiller claimed that HomePod would “rock the house,” with music. That it had spatial awareness to adjust its output to suit different environments.
Then he said that it would be released later that year. And that was the only thing he was wrong about.
We all presumed that by the end of year really meant absolutely late December, and that does seem to have been the plan. During the long months between June’s WWDC and that expected release date in time for Christmas, all we had were some aha moments as patent filings revealed details of the HomePod.
Delayed HomePod launches
Apple does make excellent audio devices, but it also seems to have trouble making them on time. Just as with the AirPods the year before in 2016, Apple aimed for Christmas with the HomePod and didn’t make it.
AirPods technically did, as small-scale shipping began in late December 2016, but it was into 2017 before those were truly available. With the HomePods, December just came and went.
Or at least, December came and went without a HomePod shipping, but there was news. It was in this month that stories began circulating about the HomePod’s origins.
Reportedly, the HomePod was started as a side project by Apple’s Mac audio engineers. And we learned that Schiller hadn’t been exaggerating when he said the project had been worked on for many years.
It was revealed that HomePod had gone from being this side project to an actual, official endeavour back in 2014. That was before the Amazon Echo was released, but despite feeling “blindsided” by that smart speaker, the Apple team didn’t think its audio was good enough.
And that was always key. Even in 2014, what would become the HomePod was to be about music and high-quality audio. Siri was always going to be part of it, but not an important part.
Specifically, Amazon had introduced the idea of “skills” — really just another word for apps — that could be added to the Echo. HomePod would not do that.
What it would do was play music, and we learned that by 2016 it was being tested across Apple. So in 2016, Apple’s audio engineers were using it, and apparently retail workers were recruited to test it out.
For the rest of us, we didn’t hear a word until mid-2017 — and then we wouldn’t hear a word until “early 2018.”
But others, including AppleInsider staff, did get to hear much more than a word. Apple spent the months between announcement and shipping, showing off the HomePod’s music quality in private briefings.
“I was able to listen to a prototype of Apple’s new HomePod audio device, both playing on its own and in concert with a second HomePod unit,” wrote Daniel Eran Dilger at the time. “Rather than sounding like a home speaker, HomePod made me feel like I was sitting in a luxury automobile surrounded by rich, engaging audio reproduction without an obvious source.”
Later, on the eve of when Apple was supposed to ship the HomePod, Daniel Eran Dilger summarized the HomePod for AppleInsider. And once more, the point was that HomePod was not about Siri, it was about “the future of home audio.”
Finally, a HomePod
There were and always will be audiophiles who did not and do not like HomePods. But overall, it’s fair to say that the HomePod was very well received for its audio quality.
No question, it blew Amazon Echo away. And no question, that was what Apple wanted. High quality audio was indeed always what Apple had aimed at.
But then there was something else that Apple always does, and it concerned the price. A HomePod originally cost $349 — seven times more than an Amazon Echo.
We will never know how many HomePods Apple sold, but by 2020 it was looking like the answer was not many. By late 2020 specifically, the rumors were that Apple was not going to make a HomePod 2.
But the same rumors were claiming that Apple would make a HomePod mini. For once, a rumor was right factually, and even right about the name.
On October 13, 2020, Apple launched the HomePod mini. And on November 6, 2020, it began taking pre-orders for the tiny device.
The price was smaller, too. HomePod mini launched at $99 — and was as well-received as the original HomePod, despite clear differences between the two.
Apple does seem to be fundamentally opposed to competing on price, and even at $99, the HomePod mini was twice the price of a base Amazon Echo. But it was a low enough price that if it weren’t exactly a casual purchase, it was a lot easier to buy a HomePod mini than the full-size original.
HomePod mini was less than half the price of a full-size HomePod, and came in many different colors tooAnd so while again it will never be revealed how many HomePod mini devices Apple has sold, there was a big clue that it was a higher number than for the original HomePod.
For in March 2021, Apple called it. The HomePod was dead, long live the HomePod mini.
“HomePod mini has been a hit since its debut last fall, offering customers amazing sound, an intelligent assistant, and smart home control all for just $99,” said Apple in a statement. “We are focusing our efforts on HomePod mini.”
“We are discontinuing the original HomePod, it will continue to be available while supplies last through the Apple Online Store, Apple Retail Stores, and Apple Authorized Resellers,” it continued. “Apple will provide HomePod customers with software updates and service and support through Apple Care.”
The end of the HomePod was exaggerated
There was a scramble to buy the remaining HomePods before they went out of stock. But out of stock they went, and while you could still pick some up on eBay, the original HomePod was practically erased from history.
Or so it was outside Apple.
Inside Apple, something was happening and yet again, we will never know exactly what. It’s possible that the success of the HomePod mini was such that Apple began thinking it could do more, that it had begun a market it could now sell more into.
Whatever it was, in January 2023 there was that rarest of rare things — an Apple product announcement that no one saw coming. The full-size HomePod was coming back.
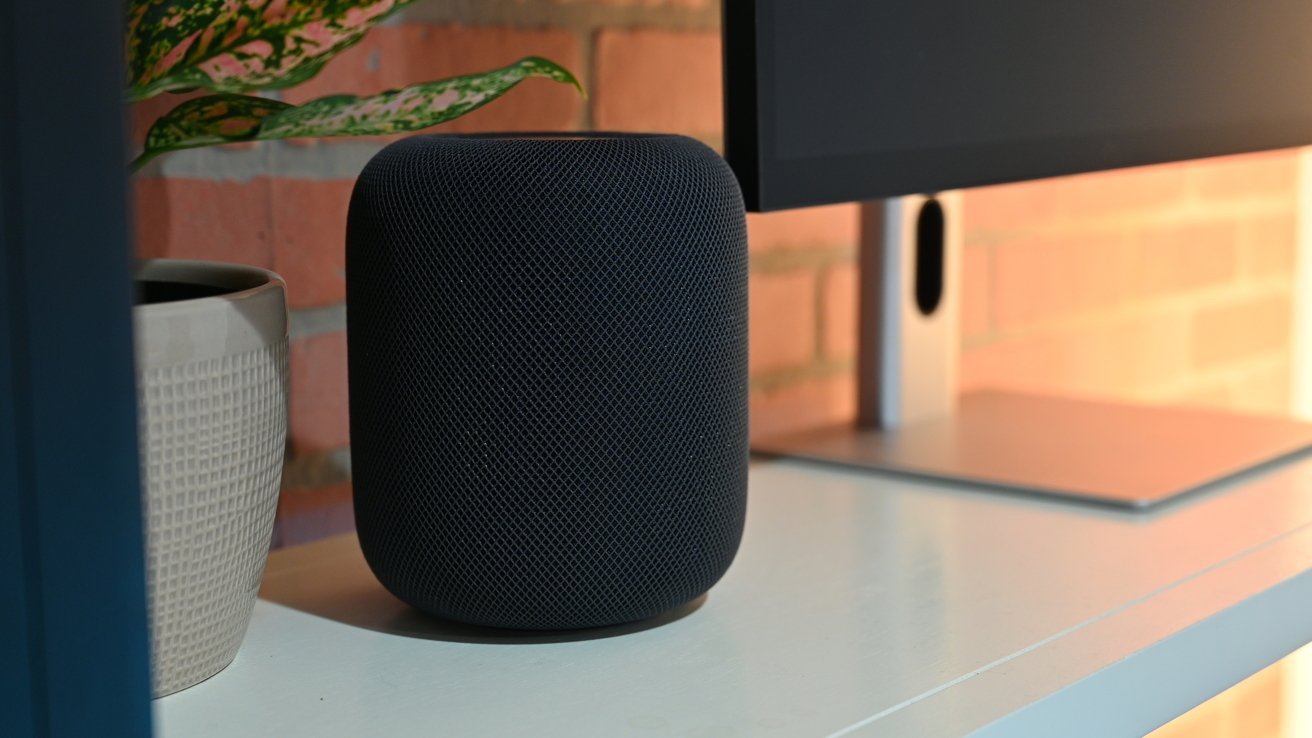
The reborn HomePod“Leveraging our audio expertise and innovations, the new HomePod delivers rich, deep bass, natural mid-range, and clear, detailed highs,” Greg Joswiak, Apple’s senior vice president of Worldwide Marketing, said at the time. “With the popularity of HomePod mini, we’ve seen growing interest in even more powerful acoustics achievable in a larger HomePod.”
The new HomePod would look mostly the same — the top screen is now inset rather than gently rising like a small dome. It would be considerably different on the inside.
But the most visible change was the price. The reborn HomePod retailed for $299, a saving of only $50 on the original, but also bringing it below $300.
HomePod was back — but the market was now different and maybe even diffident. In its review of the new model, AppleInsider concluded that it was “a great speaker” — but “doesn’t do much to justify its $300 price tag.”
What happens next
On the seventh anniversary of the original HomePod finally shipping, the home audio market is very different. At the higher music quality end, Sonos has severely stumbled, for instance.
Then at the lower smart speaker part of the market, Microsoft’s Cortana came and went. Amazon’s Alexa seemed to become practically abandoned, although there have been regular rumors of it being revamped with AI.
But perhaps the most telling thing for the HomePod is that while we finally, and unexpectedly, got a HomePod 2, there hasn’t been a HomePod 3. At least, not yet.
It’s now just over two years since the full-size HomePod came back, and Apple simply doesn’t mention it any more.
That said, though, the HomePod mini hasn’t exactly changed a lot since its launch in 2021. There have been new colors from time to time, though.
And in 2023, we saw an update that brought something surprising to both the HomePod mini and the resurrected full-size HomePod. Both models turned out to have temperature and humidity sensors, built right in.
Quite startlingly, what we learned was that the HomePod mini had always had this sensor. It just wasn’t used, wasn’t mentioned, wasn’t enabled for the first two years that the HomePod mini was on sale. It wasn’t until January 2023 that a software update turned on these sensors.
Apple must have had plans to use these sensors and — as ever — we’ll doubtlessly never know why it took so long.
But the result is that on the anniversary of the original HomePod’s launch, there are signs that Apple has long term plans. Yet with the years going by between updates, there are signs that those plans are not working out.
Apple is unlikely to cancel the HomePod again, not unless its sales are dramatically poor. And it does appear that the HomePod mini is at least a steady seller, if not an Amazon Echo-level one.
So the HomePod range is here to stay, and the HomePod range is very good for listening to music on at home. But maybe Apple has moved on from the HomePod range and what we’ve got now is all we’re going to get.
At least until Siri is revamped with Apple Intelligence — and Apple launches the expected Home Hub.
Most recent rumors have painted a picture of the Home Hub as an iPad-like screen. But at various times, it’s sounded like it could be more like a regular HomePod with a screen attached.
Perhaps that is what Phil Schiller was picturing, way back in 2017 when he chose not say anything unkind about the then-current smart speakers.

Price, screen, cameras, release date
The fourth-generation iPhone SE is set to bring about a multitude of visual and functional changes taken from earlier iPhone models. Here’s what to expect from Apple, as soon as next week.
For the past two iterations, Apple’s iPhone SE has maintained a dated look, with thick bezels and a Touch ID Home button that make it virtually indistinguishable from an iPhone 8. All of that is set to change quite soon, as the budget-friendly iPhone SE is going to receive its first major redesign in years.
Alongside its new design, the iPhone SE 4 will gain a variety of new hardware features, many of which are carry-overs from more recent iPhone models. With every iPhone release, however, it becomes difficult for the average person to know what to expect with the fourth-generation iPhone SE.
To remedy the situation and provide our readers with insights about the upcoming device, AppleInsider has spoken to people familiar with internal designs and pre-production prototypes of the iPhone SE 4. The individuals we spoke to have provided countless details about the iPhone 16 range ahead of launch.
Leaving no stone unturned, however, we have also decided to provide an outline of everything rumored for the fourth-generation iPhone SE, even though many of the claims made about the device outright contradict each other.
The rumor cycle of the iPhone SE 4 has been chaotic, more so than those of standard iPhone models. Initially, it was rumored to be a relatively straightforward update, derived largely from the design of the iPhone XR. Then it was suggested that Apple was testing its new in-house modem with the device, after which the project was supposedly canceled and subsequently brought back.
Here’s everything we know about the iPhone SE 4 so far, and how the different rumors stack up against each other.
The iPhone SE 4 will echo the standard iPhone 14
Apple’s next-generation budget-focused iPhone will receive a significant design refresh. Rather than resembling the massively outdated iPhone 8, the fourth-generation iPhone SE will feature a design derived almost entirely from the base model iPhone 14.
The iPhone SE 4 will likely be based on the standard iPhone 14, with minor changes.In practice, this means that the iPhone SE 4 will have the same overall dimensions as the iPhone 14, with an aluminum housing made of the same alloy. This information comes from people familiar with the matter, who have spoken to AppleInsider and accurately revealed details about prior Apple hardware releases.
For the fourth-generation iPhone SE, Apple plans to use a modified version of the iPhone 14 chassis, with minor changes such as room for the USB-C port, replacing the previously-used Lightning. USB-C has been the standard connector for iPhones since the iPhone 15 and iPhone 15 Pro, so its inclusion in the iPhone SE 4 is an obvious choice, as it ensures compliance with EU regulations.
Given that the device is largely based on the existing, base model iPhone 14, the fourth-gen iPhone SE will gain an OLED panel and support for Face ID, both of which have never been available on the iPhone SE until now. Some pre-production prototypes also featured an Action button in place of the mute switch, though it is unclear if the final mass production units feature this change, as Apple tested multiple hardware configurations.
While all signs, including prototypes, point to the phone heavily resembling Apple’s base model iPhone 14, that hasn’t stopped unreliable leakers from claiming otherwise. Some have said the device will use a modified iPhone 16 chassis, and there’s even a bizarre claim of an alleged “iPhone 16E” marketing name, which would seemingly phase out the iPhone SE branding. An unlikely scenario in any case.
iFace ID coming via iPhone 14-style notch, Dynamic Island unlikely
With the introduction of a 6.1-inch OLED display, Apple will finally phase out Touch ID on the iPhone SE. As a replacement, the iPhone SE 4 will feature a more modern form of biometric identification, known as Face ID. This information comes from people familiar with Apple’s pre-production designs and prototypes.
The fourth-generation iPhone SE is expected to feature a notch rather than Dynamic Island.The fourth-generation iPhone SE will most likely feature a notch near the top of the display, where the TrueDepth Camera and associated Face ID sensors are located. This will give the device a look similar to the standard iPhone 14 and iPhone 13, with a smaller notch compared to the iPhone 12.
Unlike the iPhone 15 and iPhone 16, the new-and-improved iPhone SE is not getting Dynamic Island. Apple wants to make its low-end iPhone visually distinct from its flagship models, while also saving on further development costs by re-using iPhone 14 components and designs.
Though some have claimed the iPhone SE 4 will indeed ship with Dynamic Island, the overall consensus is that the device will feature a notch. The people we spoke to, along with reliable leakers, and multiple different dummy units all suggest that Apple’s budget-oriented phone will be equipped with a notch rather than Dynamic Island.
One rear camera, with an impressive 48 MP
Another notable difference compared to the iPhone 14 can be seen in the rear camera availability of the iPhone SE 4. The device will feature a single rear camera on the back rather than two.
Though the iPhone SE 4 is getting a new 48 MP camera, its position will be similar to the one on the iPhone SE 3.This means that Apple has created a custom backplate for the fourth-generation iPhone SE. According to people familiar with the matter, the company experimented with at least five different designs for the backplate and rear camera bump. Even so, the device was always supposed to feature only one rear camera.
The flash module, meanwhile, will be on the right side. Leaked cases show a horizontal cutout for the camera, which may mean it won’t have a camera bump, but one lens jutting from the back. This is consistent with the designs Apple tested, AppleInsider was told.
The device is meant to include a 48 MP image sensor, developed under the codename Project Portland. Multiple different reports have indicated that the new-and-improved iPhone SE will feature a 48 MP rear camera, leaving little room for doubt.
Apple Intelligence, finally on the iPhone SE
With the fourth iteration of the iPhone SE, Apple will likely usher in support for its latest suite of generative AI tools. Known as Apple Intelligence, the software is currently available for devices with an A17 Pro or newer chip, or iPad and Mac products with an M1 or newer Apple Silicon system-on-chip.

Apple Intelligence will most likely be available on the iPhone SE 4 straight out of the box.Apple Intelligence offers a variety of AI-powered utilities, which were made available via the iOS 18.1 and iOS 18.2 updates. With Apple Intelligence, it’s possible to edit text, remove objects from photos, summarize conversations, categorize emails, and generate imagery, all through AI.
Apple’s artificial intelligence features are available across the entire iPhone 16 range, from powerful iPhone 16 Pro featuring the A18 Pro to standard iPhone 16 with its A18 chip. The iPhone maker wants to ensure that Apple Intelligence is available across different product tiers rather than being exclusive to “Pro” models, as is evidenced by the iPad mini 7, which uses the A17 Pro chip from the iPhone 15 Pro.
The iPhone SE 4 is expected to use the same A18 chip found in the base model iPhone 16, which partially serves as a means of bringing Apple Intelligence to the entry-level iPhone. This would allow the phone to compete and better position itself against similarly priced Android phones that include Google Gemini or similar generative AI software for the end user.
The iPhone SE 4 will not get Visual Intelligence, as the device more than likely won’t feature the Camera Control button.The popularity and overall prominence of artificial intelligence features has increased dramatically over the past few years. Naturally, consumers expect a new phone to offer generative AI features in some capacity. Apple’s CEO Tim Cook himself even said that Apple Intelligence influenced iPhone 16 sales, and that the device performed better in markets and regions where the company’s AI features were made available.
Apple’s iPhone SE 4 is expected to ship with iOS 18.3 pre-installed, so users will likely have access to Apple Intelligence features immediately after purchasing the device. This assumes, of course, that the device will be equipped with the A18 chip. It would be a logical choice for the iPhone SE, given that people will likely hold onto the device for years, all while expecting new software features.
New modem, older iPhone 14 battery
While not definitive, there is a strong possibility that the iPhone SE 4 might reuse the battery of the existing iPhone 14. This seems like an obvious upgrade, given that the device is heavily based on the standard iPhone 14, with only minor differences between the two.
The iPhone SE 4 could feature Apple’s “Sinope” project, an entirely new 5G modem.Pre-production units of the iPhone SE 4 are known to have used the same A2863 battery found in the standard iPhone 14. The A2863 battery has a capacity of 3279 mAh, which is 1250 mAh more than the 2018 mAh battery of the third-generation iPhone SE.
This could lead to a significant increase in battery life compared to the previous iteration of the iPhone SE — another potential selling point for the device.
Nonetheless, it’s worth pointing out that the iPhone 14 battery was used on pre-production prototypes of the fourth-generation iPhone SE. Apple often tests multiple hardware configurations ahead of launch, so there are no guarantees that the final product will use the same battery.
There’s also talk of a new 5G modem, developed in-house by Apple under the project codename “Sinope” with the intent of replacing the existing Qualcomm modems found in current iPhone models. AppleInsider is familiar with the project, and there’s a good chance it will debut with the device, though benefits for the end user are unclear, if there even are any.
iPhone SE 4 release date, availability, and price
As for pricing, the current third-generation iPhone SE can be purchased brand new for $429. Multiple rumors suggest that Apple wants to maintain a price point below $500, which would ultimately make sense for a budget-friendly device like the iPhone SE.
AppleInsider was told that the device could be available in white and black color options, with the latter being internally referred to as “Midnight” in some instances. This information comes from people familiar with pre-production prototypes, however, and may not reflect the final units, though it does align with colors seen on dummy units.
Apple could announce the fourth-generation iPhone SE as soon as the week of February 14, 2025, while the first units are expected to reach customers later in the month. It’s possible that there will be no dedicated launch event for this device, and that it will make its debut via a simple press release instead. Previous rumors have all said that the device would be available in early 2025, so the timing makes sense in that regard.

How Using a VPN Can Help You See Geoblocked Content
One of the best VPNs for Mac will not only protect your data, but it also helps you avoid location-based restrictions. Here’s how you can watch more TV shows and sports events.
The average consumer is pretty well catered to, when it comes to content consumption. With a wide selection of streaming services, broadcasters, and social media outlets at their fingertips, there’s a lot to consume.
However, you can’t always get what you want. Sometimes, the content you want to watch is offered through a streaming service you don’t have any desire in using, or it’s blocked off so it’s only usable in certain countries.
These blocks can be in place for a number of reasons, but a VPN is certainly one of the main ways to solve the problem. Having a VPN for Mac or your other devices can help get around the problems.
Limited Content
A big example of content restriction would be Netflix and how it secures licenses for previously broadcasted shows to be included in its content catalog. Licensing agreements often force services to only offer content in specific regions.
Typical reasons for this include agreements that limit the areas content can be served to in order to save money on the agreement itself. It’s also possible that a content owner has a preexisting agreement with another broadcaster or streamer for a territory that prevents other agreements from using its exclusive content.

Netflix catalogs vary by country, so use a VPN for Mac to see everything – Image Credit: David Balev/UnsplashFor streaming content, this can result in frustration, especially when dealing with shows you would expect to be on one platform, but not on another.
To deal with this problem, services can geoblock content. This uses the location of the user to determine what content on a service is available to them.
Taking the Netflix example, a user of the service in the United States may see a large section of the catalog, but those in France may see a completely different slate.
The UK’s BBC also restricts access to its iPlayer app to the United Kingdom. If you’re outside the UK, you can’t view the same content it provides specifically to UK residents.
Use a VPN for Mac to get around sports location blackouts
Sports fans may also find themselves at the mercy of geoblocking for two pretty big reasons.
The first problem is licensing, as major sporting events often sell licenses and permission to broadcast a match or a contest live, preventing other broadcasters from doing so. This is often observed in the form of events like the Olympics or the World Cup, for example.
This also manifests itself in the form of pay-per-view programming. A high-profile boxing match may be limited only to a specific sports broadcaster or streaming service in a specific country.
There is an obvious vested interest by the broadcaster to keep that content only for paying subscribers in that region.

Use a VPN for Mac to get around sports blackouts – Image Credit: WikiImages/PixabayBear in mind that same sporting fixture will most likely have different licensors in other countries, with a small chance of it being offered through other broadcasters and streaming services. However, geoblocks will be employed to prevent people from outside those countries from accessing said content.
For consumers, being able to access the event in a different country typically offers two benefits. The obvious one is a potential saving in the pay-per-view cost, as it can vary between countries and broadcasters.
Then there’s the content itself. In some cases, such as soccer, viewing the broadcast from another country can mean listening to a different set of commentators.
This isn’t just for the style of commentary, but also potentially the content of the commentary as well. A US commentator will err towards US participants more than a UK-based commentator, for example.
If you want to hear more viewpoints of other teams or players than those of local commentary teams, you have to go further afield.
On a more local level, there’s the topic of sports blackouts, the practice of preventing the broadcast of an event in a local area. The intention is to try and encourage local fans to go to the nearby stadium and to buy a ticket, instead of staying home and watching for free.
This is a phenomenon that has existed around the world in different forms. In the UK, there’s a rule that prevents the live broadcast of soccer matches playing at 3pm on a Saturday, forcing fans into attending the matches live.
However, these sorts of rules don’t typically apply in other regions of the country, and usually don’t apply at all outside it.
Another way that geological restrictions can get in the way is for social media services. In some cases, content appearing on a social media site may not be available for viewing, such as content licensing restrictions from the original owner.
This is less of an issue in general on social media, but a more pressing one is access altogether. It is not unheard of for a government to block access to a social media service or app.
For the U.S. this became apparent with the whole TikTok ban, under claims it poses a national security risk. While the ban did briefly shut the service down in the United States, it was still fully accessible in other countries.
FaceTime is a vital communications app, but blocked in the UAEOppressive regimes around the world often implement blanket bans on social media during times of unrest. This prevents citizens from communicating with the rest of the world, and often preventing them from being influenced by external views.
Sometimes, apps are blocked completely within a country. For example, the United Arab Emirates has strict regulations over VoIP services. Apps like FaceTime are officially restricted in the country, and aside from the occasional blip, don’t tend to work.
VPN for Mac – how it works
When you come across these issues, the main solution to them is to use a VPN.
The way a VPN functions means that you connect via a local server in your home country, with your Internet traffic piped through a tunnel to another VPN server in your target country. At this point, your Internet traffic carries on through the Internet to its destination server.
Since the web traffic is seemingly originating from the VPN server in your target country, it means that the traffic matches that of other local internet usage. This means the traffic shouldn’t be affected by any geoblocking that would normally block it.
Streaming services should see you’re “located” in a specific country, and so will open up its regional content catalogs to you. Sports broadcasters and streamers in the country will be more likely to stream events to you through the connection, again because you’re now a “local” connection to them.
Likewise, international social media restrictions will be limited in their effect.
This is a move that isn’t just limited to streaming services, but it is one of the bigger benefits. For example, using a VPN on your iPhone or Mac can help with getting better travel deals or other purchases.
While this is relatively straightforward, it is worth remembering that the streaming services and other companies will be very familiar with the existence of VPNs. Depending on the company, they may have technologies in place that can still block you from using the service, because it detects you’re using a VPN.
It is also possible that streaming services may pick up on other things than just your IP. For example, using an account registered to the U.S. version of the service may result in being offered the US catalog, despite using the VPN.
Other things like an address on an account or country-specific payment details could also be considered proof of where you’re really located. Using an account registered as if it’s from the target country wouldn’t be a bad idea, and disguising the payment method where possible wouldn’t be a bad idea either.
The bottom line is that a VPN can certainly help you watch TV shows and sporting events that you otherwise wouldn’t be able to, with some geological skullduggery. It may not work perfectly, but it’s going to be one of the better ways of solving the content problem. If you haven’t signed up for a VPN service and wish to do so, there are VPN deals in effect this week offering up to 86% off.