Your cart is currently empty!
Tag: latest tech innovations

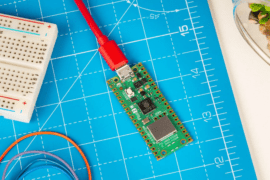
7 superpowers of a Raspberry Pi Pico that beat the regular Pi
The Raspberry Pi Pico might seem small and simple compared to the bigger Pi models, but it has some cool features that make it ideal for specific projects. Unlike the full single-board computer (SBC) form factor of the primary Raspberry Pi models, the Raspberry Pi Pico takes the form of a microcontroller.
This means it can be used more flexibly to power things, process inputs and outputs, and control hardware. This gives you more options when working with electronics or building systems that need to be quick and efficient. Here are seven scenarios where a Pico would be better-suited than the standard Raspberry Pi, and how you can use these advantages to improve your projects.
Related
Here’s how you can turn a Raspberry Pi Pico into a tiny portable console
It takes a lot of skill and components to make one, but it’s doable.
7
Explore the Pico’s low-power benefits
Learn why reduced energy consumption is great for longevity
The Pico is an excellent choice for battery-saving projects. It uses less power than a complete Raspberry Pi SBC and can last for days or weeks on a small battery. You can also save power by slowing down the clock or putting the Pico to sleep.
The Pico is perfect for projects with remote sensors. You don’t have to worry about running out of battery or dealing with complicated power systems. The Pico also doesn’t get too hot and works well in warm places.
A regular Raspberry Pi needs a more powerful power supply and can heat up. It has a complete operating system, which means it has many background tasks that use power even when you’re not using the main program. While you can make some power-saving changes on a Raspberry Pi SBC, putting the SBC to sleep isn’t as easy as it is with the Pico microcontroller.
The Pico’s ability to work with different voltages and its low active current makes it easy to use solar power and wearable technology as well.
6
Embrace the Pico’s real-time processing power
Why rapid response tasks are simpler on microcontrollers
The Pico microcontroller enables efficient handling of time-sensitive functions without the overhead of a comprehensive operating system. This allows for minimal latency in responding to sensor inputs or controlling outputs. In robotics and motion control applications, near real-time command issuance and sensor data reading are feasible.
In contrast, a complete Raspberry Pi runs Linux, a powerful operating system that introduces background processes that can disrupt time-critical code execution. Even with optimized software, the operating system’s inherent delays can complicate or even derail projects requiring precise timing.
The Pico offers a lean approach to software development, allowing code execution in bare-metal mode or with a lightweight runtime like MicroPython. This streamlined approach provides precise control over scheduling, enabling it to handle numerous tasks within microseconds or milliseconds. Thus, applications relying on strict timing, such as audio processing, servo control, or protocol handling, can be effectively implemented.
The Pico eliminates the operating system layer and ensures immediate attention to signals and interrupts. This is particularly advantageous for tasks like generating waveforms or reading rapidly changing sensor inputs. The project becomes predictable and consistent, allowing confident design around tight timing requirements.
5
Optimize hardware-level GPIO with Pico precision
Achieving deeper control of pins for robust performance
The Pico has direct control over its general-purpose input/output (GPIO) pins, which is useful when you need to precisely manage external hardware. This allows you to toggle and configure pins in different modes quickly. In real life, this means you can do things like bit-bang custom protocols without needing a lot of extra software.
On the other hand, a regular Raspberry Pi also has GPIO access, but you often have to use libraries and can’t control everything as easily. The operating system can also slow things down or cause interruptions, which isn’t great for real-time signals. While you can still interact with hardware, it might not be as consistent or fast as a dedicated microcontroller.
The Pico’s programmable I/O (PIO) blocks are a game-changer. These blocks can handle complex I/O tasks independently, freeing up the processor. This means you can offload tasks like encoding, decoding, or signal generation to dedicated hardware, which results in super reliable hardware performance that follows exactly what you programmed it to do. You don’t have to worry about scheduling processes or background operations.
4
Design embedded USB systems with ease
Building custom USB peripherals is straightforward on Pico
Source: Pimoroni The Pico is a chameleon when it comes to USB devices. You can turn it into anything, from a custom keyboard to a game controller or data acquisition tool. Just plug it into your computer, tablet, or other device, and you’re good to go.
In contrast, with a standard RPi, managing USB devices can be a bit tricky. The operating system can be complex, and you might need to do a lot of extra work to set things up. But with the Pico, it’s all plug-and-play. You simply connect it, and you’re ready to go.
One of the best things about the Pico is its small operating system. This means you can control everything directly without worrying about complicated software. You can even create your own USB classes or handle raw data in a way that is impossible with a larger Pi. This makes developing and testing your projects more manageable, especially if you’re working on something special.
The Pico also has some excellent real-time capabilities. This means you can ensure that your inputs and outputs happen at the right time. This is especially important when working with timing-sensitive protocols because it can help avoid delays or conflicts.
3
Rely on the Pico for rugged creations
Exploring durability and cost advantages in challenging conditions
When building physical projects, especially those that might get bumped or shaken, choosing a board that’s easy to make and tough is a good idea. The Pico is a small board with only a few parts, so it’s easy to assemble and fit into custom cases. This makes it more stable than a bigger board with many connections and ports.
If you break a Pico, it’s much cheaper to fix or replace it than to buy a whole Raspberry Pi. This is especially important if you’re working on many different prototypes. This is also a big deal in schools or workshops, where money and durability are essential. Using the Pico can save money and allow teachers to focus on teaching or testing without worrying about expensive hardware issues.
The Pico has solderable pads, so you can easily attach it to a circuit board or mount it in a rugged enclosure. This makes it less likely that the connectors will loosen or that the cables will come unplugged during use. This is a simple and effective way to build a small and durable system that can handle a few bumps or drops.
By choosing the Pico, you can save time and money by focusing on other parts of your design. You can keep your final product the same size and stay within your budget. This makes it easier to build a reliable and affordable device.
2
Leverage the Pico’s analog input capabilities
Understanding why onboard ADC simplifies sensor-based projects
The Pico has a cool feature called an integrated analog-to-digital converter (ADC). You can read analog signals directly from the Pico without extra hardware. This is especially handy when monitoring things like temperatures, voltages, or other analog readings from sensors. By not needing external ADC modules, you can save time and money.
On the other hand, a regular Raspberry Pi usually needs external ADC hardware or specialized HAT add-ons to get analog input. This means you must add extra wiring, spend more money, and deal with complicated code to talk to the ADC. The Pico makes everything easier, so you can easily monitor sensors in various projects.
The Pico can also take analog signals and turn them into digital data. This means you can make more precise and flexible measurements in environmental monitoring, robotics, and even basic DIY electronics. You can choose how often you want to sample the data, and you’ll get instant responses to changes. By putting all these tasks on a microcontroller, you can keep things running smoothly.
Whether you’re measuring a tiny sensor output or a changing voltage, the onboard ADC works well. This means you can focus on processing and analyzing the data, and you’ll end up with cleaner designs with fewer components and cables, especially if you’re working on prototypes or small devices with limited space.
1
Simplify with instant Pico startup times
How reduced complexity speeds deployment and lowers overhead
When you turn on a Pico, it starts working right away – no need to wait for an operating system to boot. This is helpful for projects that must be ready to go as soon as you plug it in. It saves you precious seconds, which can be crucial in safety systems or devices that need to be able to respond quickly.
On the other hand, a regular Raspberry Pi takes longer to boot because it loads the kernel and other things in the background. This may be okay in general, but it can be a problem if you need to start running code right away. By the time a regular Pi is fully up and running, the Pico might have already done something or gotten some data.
The Pico has fewer software layers, which makes it less likely to crash. It doesn’t have to worry about corrupted operating system files or messed-up services. This means you don’t have to spend as much time keeping the system running, and you can focus on the important stuff.
Working with the Pico makes building and monitoring simple and user-friendly programs easy. Once you’ve set it up, you can trust that your code will run flawlessly every time you plug it in. This is especially useful for devices that must be fast and reliable.
Final thoughts on maximizing your Pico’s unique advantages
These are just a few areas where a Raspberry Pi Pico can be better than a regular Raspberry Pi for specific tasks. The Pico’s tiny microcontroller makes it the clear winner when you need low power, real-time processing, easy GPIO control, toughness, analog input, or instant startup. By using its resources wisely and reducing power consumption, you can build projects that are super precise and responsive.
-
Raspberry Pi Pico
The Raspberry Pi Pico is an inexpensive microcontroller board with Raspberry’s in-house, ARM-based RP2040 chip. It’s programmable in C and MicroPython and features I/O options like I2C, SPI, and PIO.
-
Raspberry Pi Pico 2
The Raspberry Pi Pico 2 is a microcontroller featuring powerful Arm cores and optional RISC-V cores. It offers a great amount of capabilities for running DIY and industrial projects.
-
How Using a VPN Can Help You See Geoblocked Content
One of the best VPNs for Mac will not only protect your data, but it also helps you avoid location-based restrictions. Here’s how you can watch more TV shows and sports events.
The average consumer is pretty well catered to, when it comes to content consumption. With a wide selection of streaming services, broadcasters, and social media outlets at their fingertips, there’s a lot to consume.
However, you can’t always get what you want. Sometimes, the content you want to watch is offered through a streaming service you don’t have any desire in using, or it’s blocked off so it’s only usable in certain countries.
These blocks can be in place for a number of reasons, but a VPN is certainly one of the main ways to solve the problem. Having a VPN for Mac or your other devices can help get around the problems.
Limited Content
A big example of content restriction would be Netflix and how it secures licenses for previously broadcasted shows to be included in its content catalog. Licensing agreements often force services to only offer content in specific regions.
Typical reasons for this include agreements that limit the areas content can be served to in order to save money on the agreement itself. It’s also possible that a content owner has a preexisting agreement with another broadcaster or streamer for a territory that prevents other agreements from using its exclusive content.
Netflix catalogs vary by country, so use a VPN for Mac to see everything – Image Credit: David Balev/UnsplashFor streaming content, this can result in frustration, especially when dealing with shows you would expect to be on one platform, but not on another.
To deal with this problem, services can geoblock content. This uses the location of the user to determine what content on a service is available to them.
Taking the Netflix example, a user of the service in the United States may see a large section of the catalog, but those in France may see a completely different slate.
The UK’s BBC also restricts access to its iPlayer app to the United Kingdom. If you’re outside the UK, you can’t view the same content it provides specifically to UK residents.
Use a VPN for Mac to get around sports location blackouts
Sports fans may also find themselves at the mercy of geoblocking for two pretty big reasons.
The first problem is licensing, as major sporting events often sell licenses and permission to broadcast a match or a contest live, preventing other broadcasters from doing so. This is often observed in the form of events like the Olympics or the World Cup, for example.
This also manifests itself in the form of pay-per-view programming. A high-profile boxing match may be limited only to a specific sports broadcaster or streaming service in a specific country.
There is an obvious vested interest by the broadcaster to keep that content only for paying subscribers in that region.
Use a VPN for Mac to get around sports blackouts – Image Credit: WikiImages/PixabayBear in mind that same sporting fixture will most likely have different licensors in other countries, with a small chance of it being offered through other broadcasters and streaming services. However, geoblocks will be employed to prevent people from outside those countries from accessing said content.
For consumers, being able to access the event in a different country typically offers two benefits. The obvious one is a potential saving in the pay-per-view cost, as it can vary between countries and broadcasters.
Then there’s the content itself. In some cases, such as soccer, viewing the broadcast from another country can mean listening to a different set of commentators.
This isn’t just for the style of commentary, but also potentially the content of the commentary as well. A US commentator will err towards US participants more than a UK-based commentator, for example.
If you want to hear more viewpoints of other teams or players than those of local commentary teams, you have to go further afield.
On a more local level, there’s the topic of sports blackouts, the practice of preventing the broadcast of an event in a local area. The intention is to try and encourage local fans to go to the nearby stadium and to buy a ticket, instead of staying home and watching for free.
This is a phenomenon that has existed around the world in different forms. In the UK, there’s a rule that prevents the live broadcast of soccer matches playing at 3pm on a Saturday, forcing fans into attending the matches live.
However, these sorts of rules don’t typically apply in other regions of the country, and usually don’t apply at all outside it.
Another way that geological restrictions can get in the way is for social media services. In some cases, content appearing on a social media site may not be available for viewing, such as content licensing restrictions from the original owner.
This is less of an issue in general on social media, but a more pressing one is access altogether. It is not unheard of for a government to block access to a social media service or app.
For the U.S. this became apparent with the whole TikTok ban, under claims it poses a national security risk. While the ban did briefly shut the service down in the United States, it was still fully accessible in other countries.
FaceTime is a vital communications app, but blocked in the UAEOppressive regimes around the world often implement blanket bans on social media during times of unrest. This prevents citizens from communicating with the rest of the world, and often preventing them from being influenced by external views.
Sometimes, apps are blocked completely within a country. For example, the United Arab Emirates has strict regulations over VoIP services. Apps like FaceTime are officially restricted in the country, and aside from the occasional blip, don’t tend to work.
VPN for Mac – how it works
When you come across these issues, the main solution to them is to use a VPN.
The way a VPN functions means that you connect via a local server in your home country, with your Internet traffic piped through a tunnel to another VPN server in your target country. At this point, your Internet traffic carries on through the Internet to its destination server.
Since the web traffic is seemingly originating from the VPN server in your target country, it means that the traffic matches that of other local internet usage. This means the traffic shouldn’t be affected by any geoblocking that would normally block it.
Streaming services should see you’re “located” in a specific country, and so will open up its regional content catalogs to you. Sports broadcasters and streamers in the country will be more likely to stream events to you through the connection, again because you’re now a “local” connection to them.
Likewise, international social media restrictions will be limited in their effect.
This is a move that isn’t just limited to streaming services, but it is one of the bigger benefits. For example, using a VPN on your iPhone or Mac can help with getting better travel deals or other purchases.
While this is relatively straightforward, it is worth remembering that the streaming services and other companies will be very familiar with the existence of VPNs. Depending on the company, they may have technologies in place that can still block you from using the service, because it detects you’re using a VPN.
It is also possible that streaming services may pick up on other things than just your IP. For example, using an account registered to the U.S. version of the service may result in being offered the US catalog, despite using the VPN.
Other things like an address on an account or country-specific payment details could also be considered proof of where you’re really located. Using an account registered as if it’s from the target country wouldn’t be a bad idea, and disguising the payment method where possible wouldn’t be a bad idea either.
The bottom line is that a VPN can certainly help you watch TV shows and sporting events that you otherwise wouldn’t be able to, with some geological skullduggery. It may not work perfectly, but it’s going to be one of the better ways of solving the content problem. If you haven’t signed up for a VPN service and wish to do so, there are VPN deals in effect this week offering up to 86% off.
Epson Expression Photo XP-8800 Wireless Color All-in-One Review
The Epson Expression Photo XP-8800 Wireless Color All-in-One printer, Epson’s replacement for the Epson XP-8700, stands out for both its high-quality photo output and its long list of features. Built around a six-color ink system that helps boost photo quality, it offers a flatbed for scanning and copying, supports mobile printing, and can print directly on appropriately surfaced discs. It also has a 4.3-inch color touch screen to give commands, automatically extends the output tray from its closed position if needed when you start a print job, and asks if you want to retract it when you power down. At $299.99, it’s a little pricey, but it offers enough to make it our new Editors’ Choice pick for families who need a light-duty home printer that can also print high-quality photos.
Design: Lots of Hidden Features
The XP-8800 is easily small enough to find room for, at only 5.6 by 13.7 by 13.4 inches (HWD) with the output tray closed, and it weighs only 14.6 pounds, which makes it easy to move into place. The output tray opens to the front, extending an additional 7 inches. Setup is standard for a cartridge-based inkjet, using an automated setup routine you download from Epson’s website. For my tests, I connected the printer to our testbed PC by USB, the only wired connection option. However, Wi-Fi and Wi-Fi Direct are also connection possibilities.
Since 1982, PCMag has tested and rated thousands of products to help you make better buying decisions. See how we test.Printhead alignment is automatic, which is particularly welcome for a printer with six ink cartridges. The automated setup routine stepped through the entire process without problems in my tests, including printing an alignment page at the end and instructing me to place it on the flatbed so it could scan the image, analyze the results, and adjust the printhead settings as appropriate.

(Credit: M. David Stone)
You can also print from mobile devices. Epson offers apps for both iOS and Android that can print via your network, assuming the printer and device are both connected to it, or can print directly to the printer via Wi-Fi Direct. You can also print from and scan to USB memory keys and SD cards, although it’s easy to miss the USB port and card slot. Both are on the front panel, near the bottom left, when facing the printer. However, they’re hidden when the paper-tray cover and front panel that holds the touch screen are closed, as well as from some angles, even when the covers are open. And depending on the lighting, they can get lost in the shadows, due to the black color of the printer itself. Once you find them, plugging in a card or USB key will bring up a self-explanatory menu (for scanning and printing) on the touch screen.
(Credit: M. David Stone)
Another hidden feature is the tray for holding a printable disc. When not in use, it sits in a slot on the underside of the main paper tray, so if you don’t already know where to look for it, you might use the printer for years and never notice it. If you want to print labels on printable discs, be sure to read the manual to find out where the tray is and how to use it. Once you’ve learned how, you’ll appreciate the supplied Photo+ app’s ability to design disc labels easily and print them.
(Credit: M. David Stone)
Paper handling for printing is flexible but strictly light-duty. The main tray at the bottom front of the printer can hold 100 sheets of up to legal-size paper. It also supports automatic duplexing (two-sided printing), which worked without problems in my tests for letter-size paper. However, it doesn’t support automatic duplexing for legal-size paper. A second tray just above it lets you load up to 20 sheets of Epson’s Premium Photo Paper Glossy, so you can keep both photo paper and plain paper loaded at all times rather than having to switch back and forth between the two. The photo tray can handle sizes from 3.5 by 5 inches to 5 by 7 inches, as well as the wide-format 4 by 7.1 inches (for printing at a 16:9 aspect ratio). In addition, the XP-8800 has a manual feed slot at the back of the printer’s top panel that can accept paper up to 8.5 inches wide by 47.2 inches long. Both the main tray and the manual feed slot can handle either plain paper or photo paper.
Epson doesn’t offer a recommended maximum number of pages per month, but if you want to keep refills of plain paper down to once a week, the 100-page capacity translates to about 400 per month, which should be enough for most home printing needs. For scanning, the printer offers an 8.5-by-11.7-inch flatbed only, which means you can scan only one page at a time and no larger than letter or A4 size.
(Credit: M. David Stone)
As is typical for cartridge-based inkjets, particularly for photo-centric models, the running cost for the XP-8800 is relatively high. Based on prices and rated yields as given on Epson’s website, the cost per page (cpp) is 4 cents per mono page and 17.8 cents per standard color page when using the high-capacity cartridges and somewhat higher for the standard cartridges. Keep in mind that these running costs are based on a standard set of text and graphics pages. They have little to no relevance to the cost for printing photos.
Testing the XP-8800: Impressive Photos, Good Graphics, Pretty Good Text
To judge the XP-8800’s performance in the appropriate context, I compared it with three other photo-centric all-in-one printers aimed at home users: the Epson Expression Photo XP-970, the Epson EcoTank Photo ET-8550, and the Canon Pixma TS9521C Crafter’s All-in-One. (The Canon model we tested is discontinued, but Canon says the current TS9521Ca is the identical printer minus the Bluetooth Low Energy support that was used strictly as one option for initial setup.)
For printing our Microsoft Word text file, the XP-8800 was barely enough faster than the XP-970 to qualify for third place instead of being tied for last.
Meanwhile, on our full business-applications suite (which adds PDF, Excel, and PowerPoint files), the XP-8800 came in second overall. The ET-8550 was the fastest for both the Word file and the full suite, at 202 seconds (3 minutes and 22 seconds) for the suite, or 1 minute and 51 seconds faster than the XP-8800.
Of course, with these printers, our photo printing tests using photo paper are potentially more significant than our business suite using plain paper. On the photo tests, the average time for 4-by-6-inch photos was 23 seconds for the first-place TS9521C, compared with 29 seconds for the second-place XP-8800. The XP-970 was a close third, and the ET-8550 was a convincing fourth. In short, the XP-8800 offers a respectable photo print time for a photo-centric printer.
Photo output quality in our tests, using the supplied Epson Photo Paper Glossy, was a match for a professional photo lab. Shadow detail and highlights held well, and I saw no hint of dithering, posterization (shading changing suddenly where it should change gradually), or other common issues. That said, note that scanning a photo and printing it resulted in only a minor loss in color saturation and fine detail, while copying the same photo in one step degraded the photo quality much more significantly. In the copied version, I saw obvious color shifts and loss of both shadow detail and highlights. So, if you want to copy a photo, it’s best to do so by scanning it to a file first and then printing the file.
Graphics output in our official tests using default settings and plain paper was good but not in the same class as photo output. I saw no visible dithering and no posterization, even in the images that tend to show these problems. Still, colors were more in the range of pastels rather than being vibrant and nicely saturated. I also saw some banding in dark solid fills; it looked like sweeps of the printhead probably caused the bands, but they were subtle enough that you could miss them if you were not looking closely. Thin lines generally held well, although in our line graph with a black background, the thinnest line didn’t stand out as well as it should. Some additional ad hoc testing with Epson’s glossy photo paper and matte presentation paper confirmed that graphics output with the right paper offers the same high level of quality that I saw with photos, adding vibrant color in particular.
(Credit: M. David Stone)
Text quality on plain paper is best described as good enough for most purposes. All the fonts you’d use in a business document were easily readable at 6 points, and some were just as readable at 5 points. Still, a look through a loupe showed that even those that were readable at 5 points had a tendency to have ragged edges or be poorly formed, with adjacent characters bleeding into each other and a lowercase “e” in some fonts looking more like an “o” with a horizontal line across the middle. Even at 10 and 12 points, the characters in most fonts looked just a little less crisp than they should. One of the two stylized fonts with heavy strokes in our tests was readable but not well-formed, even at 12 points. The one that’s easier to render well hit that bar at 8 points.
On our ink-smudge tests using plain paper, black text showed smudging with water but was still readable. It didn’t smudge at all under our highlighter pen. Color inks in graphics on plain paper resisted smudging from water, but the pages were left with water stains. The same was true for color inks on the supplied photo paper.
Verdict: A Compelling Choice for Printing Photos at Home
All of the printers mentioned here deliver superb photo output. The trick is to pick the one that matches your other needs as well. Two key differences among the XP-8800 and the other three are that each of the others adds Ethernet as a connection choice, and each one can print on larger paper than the XP-8800 can.
The XP-970 is similar in most ways to the XP-8800 on features and performance, but it can accept single sheets of 11-by-17-inch paper in its rear slot for borderless prints, making it the obvious alternative if you need to print large once in a while, or even if you just want an Ethernet connection. The TS9521Ca is a close competitor to the XP-970. But although you can load more than one 11-by-17-inch sheet in its rear tray (the number depends on the paper type), it doesn’t offer borderless printing for anything larger than letter size.
(Credit: M. David Stone)
The ET-8550, one of our top picks for photo-centric printers, is the only printer mentioned here that can handle up to 13-by-19-inch paper, and it can hold up to five sheets of photo paper at that size. It’s the most expensive printer in this group, but because it uses ink tanks rather than cartridges, you can save enough on ink, if you print enough, to make up for its higher initial price. It’s the obvious choice if you need to print at 13 by 19 inches or if you print enough pages to benefit from the low running cost.
All that said, if you don’t print enough to save money by getting a tank-based printer, don’t need to print at larger than legal size, and don’t need Ethernet, the XP-8800 is hard to beat for great-looking photos. That’s enough to make it our new Editors’ Choice winner for light-duty photo-centric printers for printing on up to legal-size paper.
Epson Expression Photo XP-8800 Wireless Color All-in-One
Pros
View
MoreCons
The Bottom Line
High-quality photo output—plus the ability to scan, copy, and print on discs—makes the Epson XP-8800 a solid choice for printing photos at home.
Like What You’re Reading?
This newsletter may contain advertising, deals, or affiliate links.
By clicking the button, you confirm you are 16+ and agree to our
Terms of Use and
Privacy Policy.
You may unsubscribe from the newsletters at any time.
About M. David Stone
Contributing Editor
Read the latest from M. David Stone
AceBeam P20 review: A skinny flashlight that packs a mighty punch
I’ve tested quite a bit of kit from China-based illumination specialists AceBeam in the past and have always found the products to be fantastically well-made and high-performing.
I don’t think the night sky around my house has ever quite recovered from me blasting it with the AceBeam X75, and there is probably a message travelling through space from the squinting population of a planet in a distant galaxy, asking me to please not shine the bloody thing at them ever again.
I’ve also been impressed with the brand’s headlamps, which, while very different in design from classic outdoor models such as the Petzl Swift or the excellent Black Diamond Distance LT, have been up there with the best and most innovative head torches I’ve seen.
Suffice to say, I’ve been looking forward to testing out the P20, which is a lot smaller and half the weight of the X75, and yet boasts a beam that travels even further than its big brother. On paper this flashlight looks like being one of the very best hand torches on the market, but let’s see how it does in the field.
AceBeam P20 review
Price and availability
In the United States, the torch is generally available through a mix of online retailers and specialty flashlight shops, with prices typically ranging from around $100 to $150 USD. Retailers like Amazon, as well as dedicated tactical and outdoor equipment shops, often carry the P20.
In the UK, buyers can expect prices in the vicinity of £80 to £120, with availability primarily through online platforms and specialist retailers catering to outdoor and tactical equipment enthusiasts. In Australia, the torch is typically priced between AUD 150 and AU$200. Head over to Acebeam for more info.
Specifications
- RRP: $199 (US) / £190 (UK) / €183 (EU)
- Weight (including battery): 504g/17.7oz
- Length: 26.75cm/10.53 inches
- Head diameter: 79mm/3.11 inches
- Tube diameter: 25.4mm/1 inches
- Power: High-capacity 21700 battery pack with built-in USBC port (also compatible with 2 X 21700 lithium-ion batteries)
- Brightness: Ultralow (50 lumens), Low (150 lumens), Med1 (470 lumens), Med2 (1100 lumens), High (1800-2300 lumens), Turbo (1800–5500 lumens), Strobe (3000–3600)
- Range: Up to 1280m (1400 yards)
- Modes: 7 (Ultralow, Low, Med1, Med2, High, Turbo, Strobe)
- Run time: 2 hours 40 minutes on High / 74 hours on UltraLow
- Ingress rating: IP68
Design and features
(Image credit: Pat Kinsella)
The thin body of the P20 flashlight has a spiral textured grip handle, with an anti-abrasive, corrosion-resistant finish. Just below the head section you will find the thumb-operated side switch. A single press turns the beam on and off, and holding the button down takes you through the four main modes: low, med1, med2 and high. The torch remembers what mode it was on when turned off, and returns to that setting when reactivated. This side switch also lights up when activated, with a colour indicator letting you know how much juice is left in the battery (green for high, red for low).
To use the UltraLow 50-lumen mode (in which mode the battery will last up to three whole days) you hold the side switch down for half a second. At the other end of the spectrum, double-clicking the side switch turns on the Turbo setting, which shoots out a 5500-lumen beam with a range of 1280m. This lasts about 15 seconds, before stepping down to a mid-level beam. To activate the strobe setting, you triple-click the side switch.
Lastly, holding down this side switch for 3 seconds locks the torch, so you can’t accidently turn it on (three flashes let you know the lock is on). To unlock, hold it down for another 3 seconds (two flashes indicates it’s unlocked).
On the base of the torch is a ‘Tactical’ tail switch, which instantly activates the light (regardless of whether the torch is on or off) when pressed. If the torch is already on, and set to high mode, pressing this tail switch bumps the beam up to the Turbo setting.
(Image credit: Pat Kinsella)
The P20 is built tough, with an ingress rating of IP68, meaning it’s dust-proof and genuinely waterproof (fully submersible to 2 meters / 6.5 feet for up to 30 minutes). It can be bashed around a fair bit, too. Most torches have a standard lens that’s 2mm thick, but the AceBeam P20 boasts a 3mm tempered glass lens for extra strength.
It also comes with a lanyard and a carry/storage bag. There are no colour beam options, but you can opt to have a green filter supplied (for an extra $10), which is easy to attach to the outside of the lens (just like screwing a filter on an SLR camera).
The P20 comes with a 5000mAh 7.4v battery pack (rechargeable via a USBC port), but it can also be powered with two 21700 batteries.
Performance
(Image credit: Pat Kinsella)
I have been using the AceBeam P20 flashlight in a variety of outdoor scenarios over the last 6 months, ranging from after dark hikes and camping escapades to doing everyday tasks around the garden and using it while out and about in the car at night time.
The first thing to say is that it is a very easy torch to handle: the slimline stem fits nicely in the palm of my hand, and the textured pattern makes it simple to maintain a no-slip grip – even when you’re wearing thick winter gloves. Although the head of the torch is much wider than the handle, the unit is really nicely balanced.
The range of beam strengths is perfect – plenty for every conceivable circumstance, but not so many that things become complicated. It’s very easy to toggle between the modes too, using the side switch.
The Turbo setting is crazy bright, but useful if you want to see across a valley or look out across a moor, or far out to sea (this is a torch aimed at professionals working in fields such as security and rescue, as much as at outdoor enthusiasts, so there are myriad scenarios when having a beam range of over 1km might be useful – even potentially life saving).
The auto step-down function, which dims the beam and prevents you from leaving the torch on Turbo mode, is a good feature, both functionality (so you don’t blaze through your battery power) for safety and (this model doesn’t have a fan, and it can run pretty hot on the maximum setting – I wouldn’t leave it on the floor of a tent on full beam, for example).
At the other end of the scale, the UltraLow mode will give you a little bit of illumination (50 lumens, enough glow to reveal your surroundings and find your way around) for three entire days. In between these extremes are four very useful lighting modes, which are all most people will ever need.
(Image credit: Pat Kinsella)
The strobe setting is extremely bright (3000–3600 lumens), which is good for signalling across a large distance, but there is no pre-programmed S.O.S. mode. It’s also a bit of a shame there are no in-built colour settings, which are very useful for lots of things (from reading maps and star gazing without shattering your night vision to considerately observing wildlife and finding your way out of a shared tent or dorm without disturbing everyone else). You can, however, choose to get the green filter for an extra tenner – and that’s the one you need for looking at wildlife. It’s easy to attach the filter, but don’t over tighten it, otherwise it’s a nightmare to get off (as I discovered).
(Image credit: Pat Kinsella)
At nearly 27cm long, the P20 is obviously not intended as an everyday carry item, but its slim build and comparatively low weight does mean you can easily slip it into the pocket of a hiking backpack if you prefer a flashlight to a headtorch. Equally, it’s very easy to carry in a vehicle. Unlike some AceBeam lights, though, it doesn’t have a magnetic bottom, and it doesn’t stand up on its own either, so it’s not as easy to position as other models – a drawback if you’re trying to do a task that requires both hands. It can’t really be used as a camping lantern, for the same reason.
The Tactical rear button can be useful for boosting the light or turning the torch on in the pitch black, but it’s easy to activate by mistake, so be sure to lock the torch when it’s not in use (especially if you’re carrying it in a backpack or other bag).
There are a couple of anomalies in the performance. When you activate the light via the Tactical tail switch, you can’t moderate the strength of the beam with the side switch. Also, after bumping the beam from High to Turbo with the Tactical tail switch, the auto step-down doesn’t kick in after 15 seconds, which means you could easily burn through your battery life very quickly (and, as mentioned, it can get hot).
Lastly, while it’s great that the P20 can be powered with batteries (so you can carry back-up during longer trips), it’s not especially easy to buy 21700 batteries in the UK (they’re available online).
Verdict
(Image credit: Pat Kinsella)
Easy and comfortable to carry, simple to operate, and extraordinarily powerful, the AceBeam P20 is a very good choice of flashlight for people happy to have their light source in their hand rather than on their head. This low-weight light sabre throws a big beam a very long way – well over a kilometre – but it can be a more elegant weapon against the powerful dark side as well, with a range of more subtle settings. The battery life is every bit as impressive as the range, and it’s hard as nails – able to withstand both bashings and soakings if need be.
Some alternatives to consider
For a chunkier handheld flashlight, which is heavier to carry but much easier to position than the P20, check out the bazooka-like AceBeam X75.
If you’re into Everyday Carry, however, and you’re looking for something smaller, the Olight Baton 4 is a brilliant and very classy little torch – a proper pocket rocket.
Seven pitfalls MSPs should avoid when building a resilient IT organization
Managed service providers (MSPs) are always on high alert to avoid system outages. The CrowdStrike outage in July 2024 amped up that anxiety, testing many MSPs to the hilt. Successful channel players were the ones that could quickly identify failed systems, assess repercussions, and move fast to the recovery stage.
Backups and business continuity plans were activated on an unprecedented scale, emphasizing the critical importance of IT resilience to sustain operations amid failed updates, network outages, or cyber attacks.
Clearly, MSPs need to be more ready than ever to support resilient IT infrastructures. Merely recovering from outages is no longer sufficient; a forward-thinking, proactive IT approach is essential to prevent disruptions and ensure uninterrupted business operations. Against this backdrop, here are seven key mistakes to avoid when building a resilient IT strategy.
1. Waiting for things to happen instead of shifting your mindset to proactivity
Traditionally, IT monitoring and support has been a reactive process, addressing incidents post failure. But, in the face of complex digital transformation efforts and the surge of cyber threats, a reactive approach is no longer sufficient.
By moving away from a ‘break-fix’ model, particularly when it takes the form of ticket-by-ticket problem resolution, and embracing proactive monitoring, MSPs can identify and address potential issues before they escalate.
Many MSPs have recognized the value of a proactive approach and are partnering with digital experience monitoring and management vendors that gather data from a wide range of endpoints to arm them with the visibility they need to see around the corner.
According to Lakeside Software’s recent IT Resilience white paper, a proactive model helps MSPs cut costs, reduce downtime, and boost productivity by resolving potential issues before they impact end-users. For example, a proactive IT approach enabled a U.S.-based healthcare organisation to avoid nearly 270,000 service tickets, resulting in a significant cost saving of £6.84 million. MSPs can adopt this same approach for their clients to identify issues before they escalate.
2. Lacking anticipation and not using predictive IT to detect issues early
It’s worth repeating that traditional, reactive approaches simply do not work for IT environments on the verge of a widespread problem – one that could take down the entire IT estate and disrupt business continuity.
Fortunately, with the rise of machine learning (ML) and data-driven decision-making, proactive IT can mature to the point of being predictive. Rather than relying on predefined thresholds, anomaly detection identifies deviations in system performance, enabling IT teams to address problems before they impact the broader infrastructure.
This predictive IT approach gives tech teams the early-stage visibility they need to detect estate-wide trends and, in turn, contain a pending outbreak before an IT outage occurs. Using machine learning algorithms on robust data sets, AI can detect patterns that human analysts might miss, especially when faced with vast data environments.
For example, a gradual degradation in system performance could point to an impending hardware failure, or specific user behaviours might signal potential security threats. With real-time anomaly detection, AI provides IT teams with timely insights to take preventive measures before minor issues escalate into major disruptions.
One UK-based global law firm used this approach successfully. Thanks to ML-based anomaly detection, its IT team identified three sensors that impacted 800 machines – nearly 10% of the firm’s devices. The root cause was traced to a common video driver, which the team resolved before it affected the entire organization. This proactive intervention not only minimised disruptions but also exemplifies how predictive insights can protect business continuity.
3. Under using automation to streamline IT support
Automations can help MSPs build resilient systems that are less vulnerable to human error, minimizing response times and allowing faster recovery. Equipping lower-level support teams with automation tools and AI-powered diagnostics allows MSPs to streamline support processes and enhance efficiency.
AI-driven data management solutions help to detect deviations in device usage, application performance and network health, providing deeper insights into IT infrastructure and enabling IT support teams to resolve common issues, accelerating incident resolution, and reducing operational costs.
MSPs are still cautious about using AI, however, and should be even more so if they are not checking data quality. Poor-quality data can lead to inaccuracies, damaging trust in the reliability and utility of AI systems, and compromising outputs, which rely on meaningful patterns to provide relevant and explainable insights.
Tools that can automate remediation tasks, trigger alerts, and provide AI-driven insights assist MSPs in their management of complex IT environments without overextending their resources. In one notable case, an insurance provider achieved a £780,000 return on investment by enabling 45 automation scripts, reducing service tickets by 29% and mean time to repair by 40%. Automation scripts also minimize the human effort required for routine tasks, allowing MSPs to optimize their service delivery models while reducing operational costs.
But automation isn’t just about technology; it requires investment in training and upskilling IT staff. Level 1 engineers should be trained on how to manage these automations effectively, troubleshoot when needed, and understand the underlying systems well enough to recognize when a manual intervention is required. This level of empowerment will be critical for IT teams to succeed in a proactive operating environment.
4. Overlooking data quality, leading to hampered recovery efforts
As organizations progress towards proactive, predictive and one day fully autonomous IT, prioritizing high-quality data becomes essential. Without high-quality data, businesses risk flawed decisions that can hurt the bottom line, making data integrity vital for efficient operations and regulatory compliance. MSPs must prioritize data accuracy, consistency, and security, regularly auditing and cleaning data to spare customers the pitfalls of poor-quality data.
Reliable data is accurate, complete, well-organized, from trusted sources, and updated frequently to remain relevant. The stronger the data, the more effective the AI which will power self-healing systems of the future – since data quality directly influences the reliability, explainability, and trustworthiness of AI-driven insights and outputs.
5. Staying in the dark about what’s happening across the full IT estate
IT resilience is not only about preventing incidents but also about enabling swift recovery when disruptions occur, which requires comprehensive visibility across the IT estate. By gathering and interpreting insights into client systems, MSPs and IT teams can develop thorough incident response plans and prioritize data-driven recovery to minimize downtime and monitor the impact of outages and track recovery progress.
In large-scale IT disruptions, access to detailed data across an entire IT estate is essential for prioritizing recovery and swiftly restoring mission-critical services. For example, during the CrowdStrike outage, teams using digital experience platforms could assess affected devices, prioritize critical systems, and monitor remediation at scale, facilitating faster client recovery.
The effectiveness of IT recovery depends on the IT team’s ability to accurately assess events within the enterprise environment. Resilient IT requires visibility at all stages during an incident. Actionable insights help to address incidents effectively, making complete visibility across the IT estate indispensable with a granular view covering user activity, application performance, and device health. This detailed information is critical during an IT outage or cyber incident; for instance, in a network outage or ransomware attack, understanding which users and systems are affected enables the prioritization of recovery efforts and helps reduce downtime.
6. Not finding ways to simplify IT infrastructure especially in transformation projects
Resilience in IT infrastructure becomes harder to achieve as complexity increases, particularly during transformation projects. IT leaders face the challenge of maintaining performance and reliability across intricate, interdependent systems without inflating costs. A 2024 IT Leaders’ Survey found that 65% of respondents prioritized ‘doing more with less’, making efficient infrastructure management critical.
To build resilience, MSPs should focus on simplifying and streamlining both hardware and software environments. Regular audits of software licences and hardware usage help identify redundancies, extend device lifecycles, and reduce unnecessary layers of complexity. For example, a U.S.-based bank identified £3.34 million in savings by cutting unused software licences and shifting to a condition-based hardware refresh strategy, enhancing both budget efficiency and system manageability.
As the demand for high-performance computing grows, with advances such as TOPS (Trillions of Operations Per Second) enabling unprecedented levels of data processing, channel players must anticipate and address the strain that increasing complexity places on resilience. Integrating data monitoring and management across systems enables IT teams to maintain control and visibility, critical for responding to future disruptions effectively.
7. Underestimating impact of digital employee experience on IT resilience
A positive digital employee experience (DEX) is essential for supporting resilience, as it has a direct impact on productivity, retention, and employee satisfaction. DEX isn’t just about providing functional tools but ensuring they’re user-friendly, reliable, and reduce downtime. In fact, Unisys reports that 49% of employees lose one to five hours each week due to IT issues, costing employers over £3,000 per employee in lost productivity. By minimizing these disruptions, MSPs using DEX platforms can help channel customers boost productivity and reduce costly downtime.
DEX platforms offer valuable insights into how technology affects day-to-day work by monitoring application performance, device boot times, and other metrics. For MSPs, using these platforms to identify and resolve friction points enables faster recovery from disruptions and reduces downtime, directly contributing to resilience. Reducing tech-related frustrations not only boosts employee morale and engagement but also ensures a more stable and resilient IT environment for clients.
The path to long-term IT resilience
To minimize downtime and safeguard clients, MSPs are increasingly adopting proactive IT and security measures, using autonomous technologies to streamline operations, detect issues early, and respond swiftly. By embracing proactive management, automation, predictive analytics, AI insights, and (DEX) platforms, MSPs reduce friction, simplify infrastructure, and optimize resources, helping clients maintain stability and continuity amid disruptions.
They not only boost client resilience but also enhance their own reputations for reliability and strategic insight, strengthening any competitive position and delivering value in a dynamic IT landscape.
Best Chromebooks 2025: Best overall, best battery life, and more
If you’re looking for an inexpensive laptop that’s zippy enough for day-to-day tasks, you’ve come to the right place–as long as you don’t mind working in Google’s ecosystem.
Not only do Chromebooks offer reliable performance, but they’re also largely virus-free. You can even play the latest triple-A games on them with cloud gaming. But type the word “Chromebook” into any search bar and you’ll see countless choices. If you’re feeling overwhelmed, don’t worry. Below you’ll find a list of Chromebooks the experts at PCWorld recommend and have hands-on experience with.
If you still prefer Windows laptops, check out PCWorld’s roundup of the best laptops available today.
Why you should trust us: PCWorld has been going strong since 1983, back in the days when print magazines were more common. Now that we’ve made the leap to digital, we’ve been reviewing more than 100 laptops annually. Every laptop that passes through our doors goes through an arduous testing process, in which we evaluate everything from processor performance to display quality. We’re committed to reviewing laptops in every price range too.
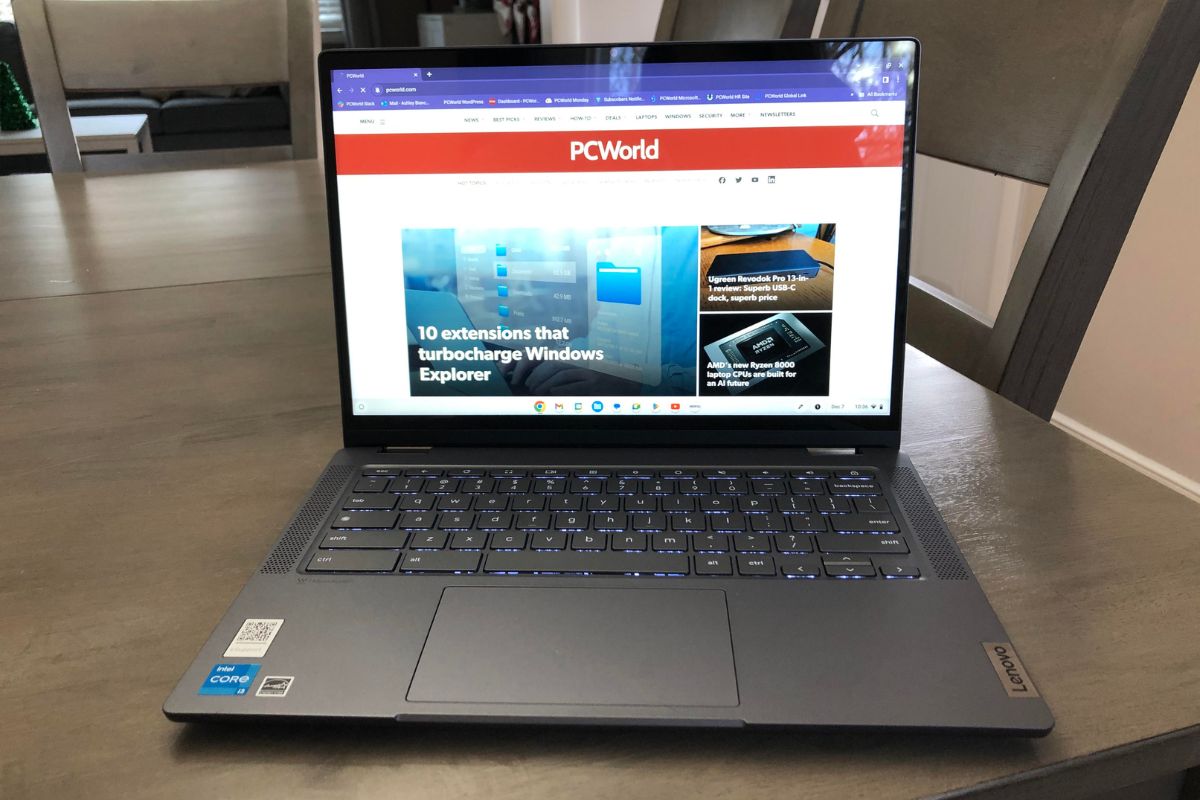
Lenovo Flex 5i – Best overall Chromebook
Pros
- Good build quality
- Fantastic typing experience
- Vibrant touchscreen display
Cons
- Average battery life for a Chromebook
- Stylus not included
Price When Reviewed:
$499Why we like the Lenovo Flex 5i
The Lenovo Flex 5i is the best overall choice because of its 2-in-1 design, peppy performance, exquisite typing experience, and so much more. The understated aluminum finished exterior helps make it feel like something three or four times as expensive. As for the convertible design, the 360-degree hinge feels incredibly sturdy, which is essential in a 2-in-1 laptop. Plus, the keyboard is a real joy to type on and the 1200p touch display produces crisp and vibrant visuals. The best part is that you’re getting all of these wonderful features for well under $500.
Who should buy the Lenovo Flex 5i
We feel as though the Lenovo Flex 5i is a good Chromebook for most people. The touchscreen and 2-in-1 design give it the edge, as you usually see these features in machines that cost much more. While the nine-hour battery life is considered just average for a Chromebook, it’s still a great all-day result. It’s just not the whopping 19 hours we got out of the Asus Chromebook CM34 Flip. That said, the Lenovo Flex 5i’s list of compromises is quite small.
Read our full
Lenovo Flex 5i Chromebook Plus review
Lenovo Ideapad Slim 3 Chromebook – Best budget Chromebook
Pros
- Lightweight design
- Great battery life
- Attractive color scheme
- 1080p display
Cons
- Only 4GB of RAM
- 720p webcam is disappointing
Price When Reviewed:
$319Why we like the Lenovo Ideapad Slim 3 Chromebook
For under $300, the Lenovo Ideapad Slim 3 Chromebook offers decent performance, fantastic battery life, and a lightweight form factor. Inside, you’ll find a MediaTek Kompanio 520 CPU, an ARM Mali-G52 2EE MC2 GPU, 4GB of RAM, and 64GB of eMMC storage. On paper, those specs may not look all that impressive. However, when it comes to real-world use, day-to-day performance is perfectly reliable. The 47 watt-hour battery also lasted 16 hours on a single charge and it weighs just under three pounds, making it a solid travel companion. Not bad for under $300, huh?
Who should buy the Lenovo Ideapad Slim 3 Chromebook
Anyone looking for a cheap, serviceable Chromebook. It’s not the most innovative Chromebook we’ve ever seen, but it doesn’t have to be. It has plenty of power for light use and the battery will keep you going long after your workday or school day ends. The inclusion of a 1080p touch display is a nice touch as well, especially given the low price of the machine. The 720p webcam is disappointing and you’re only getting 4GB of RAM, but if you’re willing to taper your expectations a bit, then this machine is well worth considering.
Alternative option: If you’re willing to spend a little extra on a Chromebook with better performance, we’d recommend checking out the $399 Acer Chromebook Plus 515. Bootup times are lightning fast and browser-based tasks feel appropriately snappy. The typing experience is also lovely and the battery can last up to 13 hours on a single charge. The only trade-offs are the boring aesthetics and the thick bezels on the display.
Read our full
Lenovo IdeaPad Slim 3 Chromebook review
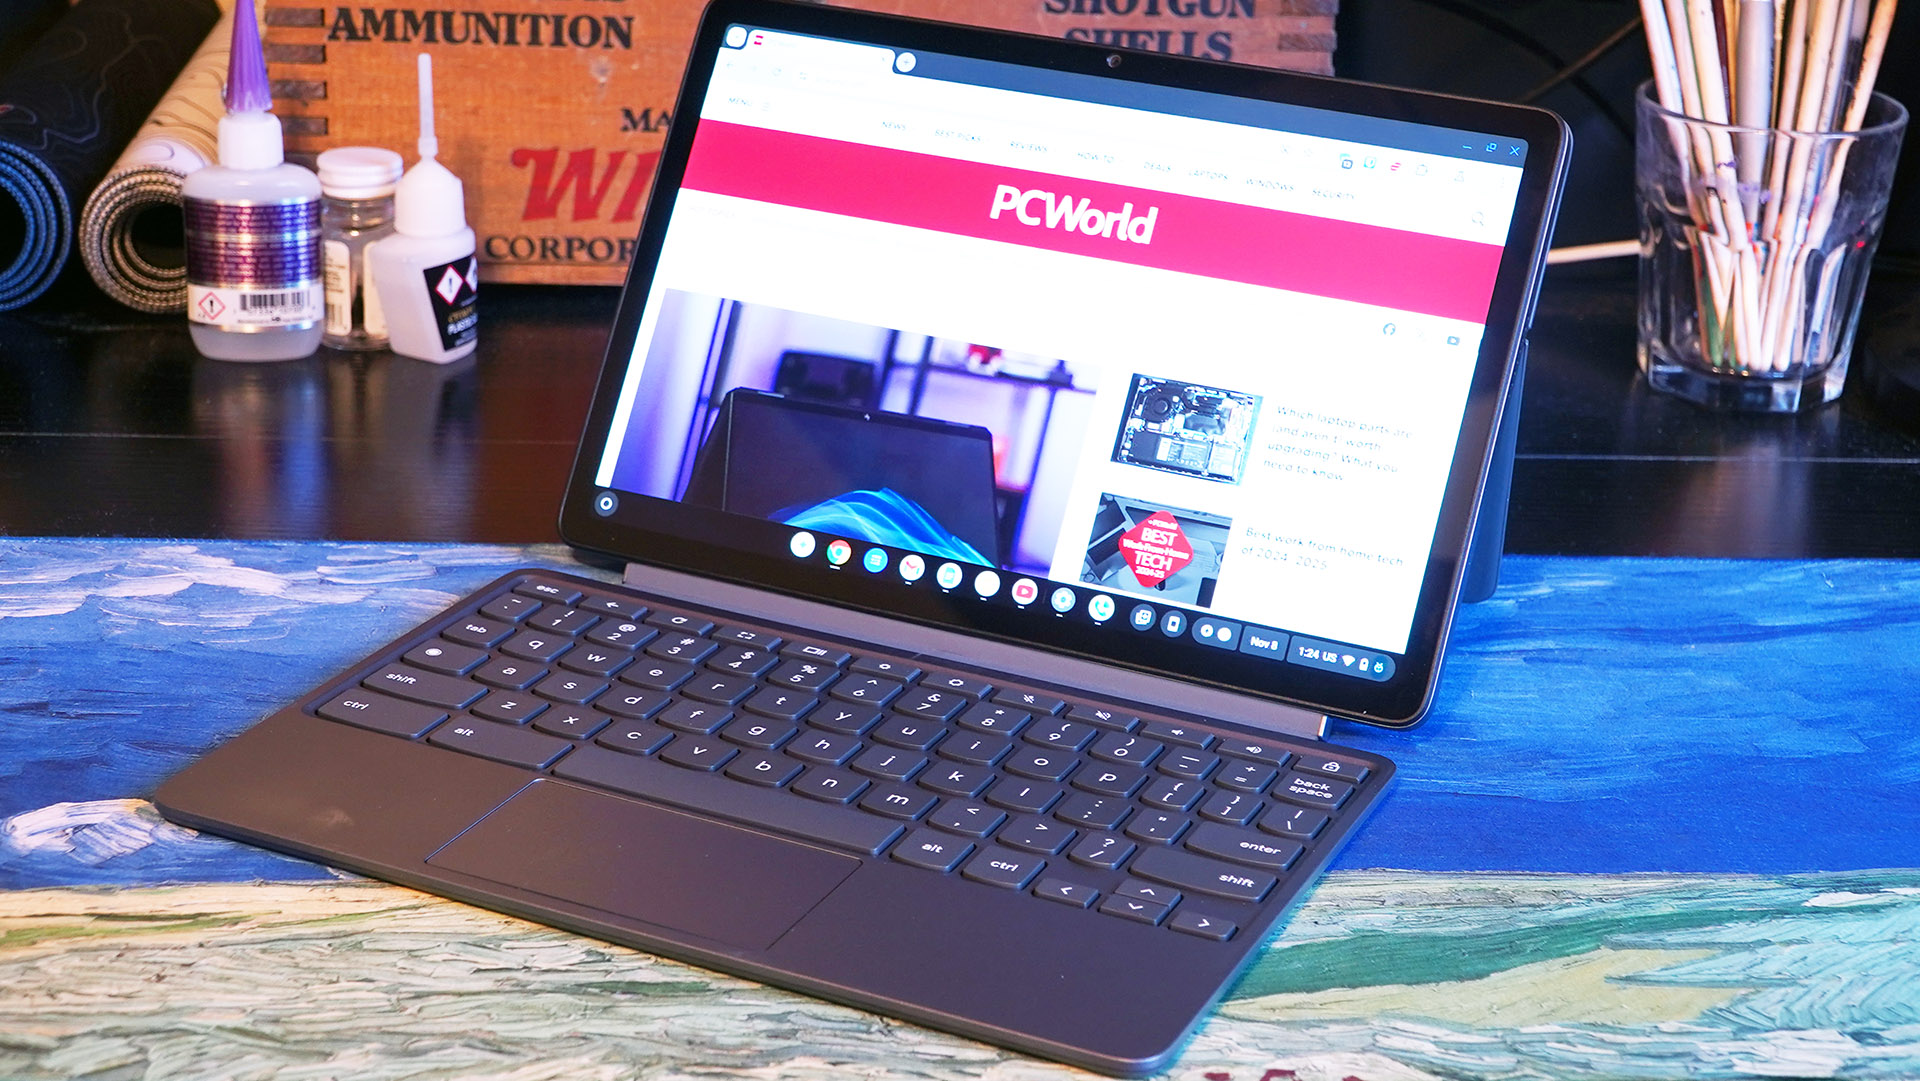
Lenovo Chromebook Duet – Most portable option
Pros
- Great value
- Flexible form factor
- Surprisingly good keyboard
- Amazing battery life
Cons
- Needs more RAM
- Android apps don’t run well
- Vertical kickstand reduces horizontal options
Price When Reviewed:
$399.99Why we like the Lenovo Chromebook Duet
The Lenovo Chromebook Duet is remarkably featherlight at just 2.09 pounds, and that’s with the keyboard and stand! Not only did the small form factor impress us, but also the long battery life. The 68 watt-hour battery can reach the 12 or 13-hour mark on a day of casual use, so searching the web and watching YouTube. That’s a good amount for such a tiny 2-in-1 laptop. It also charges very fast, which is impressive given the smaller battery size.
Who should buy the Lenovo Chromebook Duet
Anyone who’s looking for a lightweight laptop with good battery life. The keyboard is great too, even though it sits “flat as a pancake,” according to our review. Compared to the previous iteration, the keys have “increased travel distance” and the alphanumeric keys are full-size–these two factors lend to a more natural typing experience. You can also detach the keyboard and use the display like a tablet.
Read our full
Lenovo Chromebook Duet (2024) review
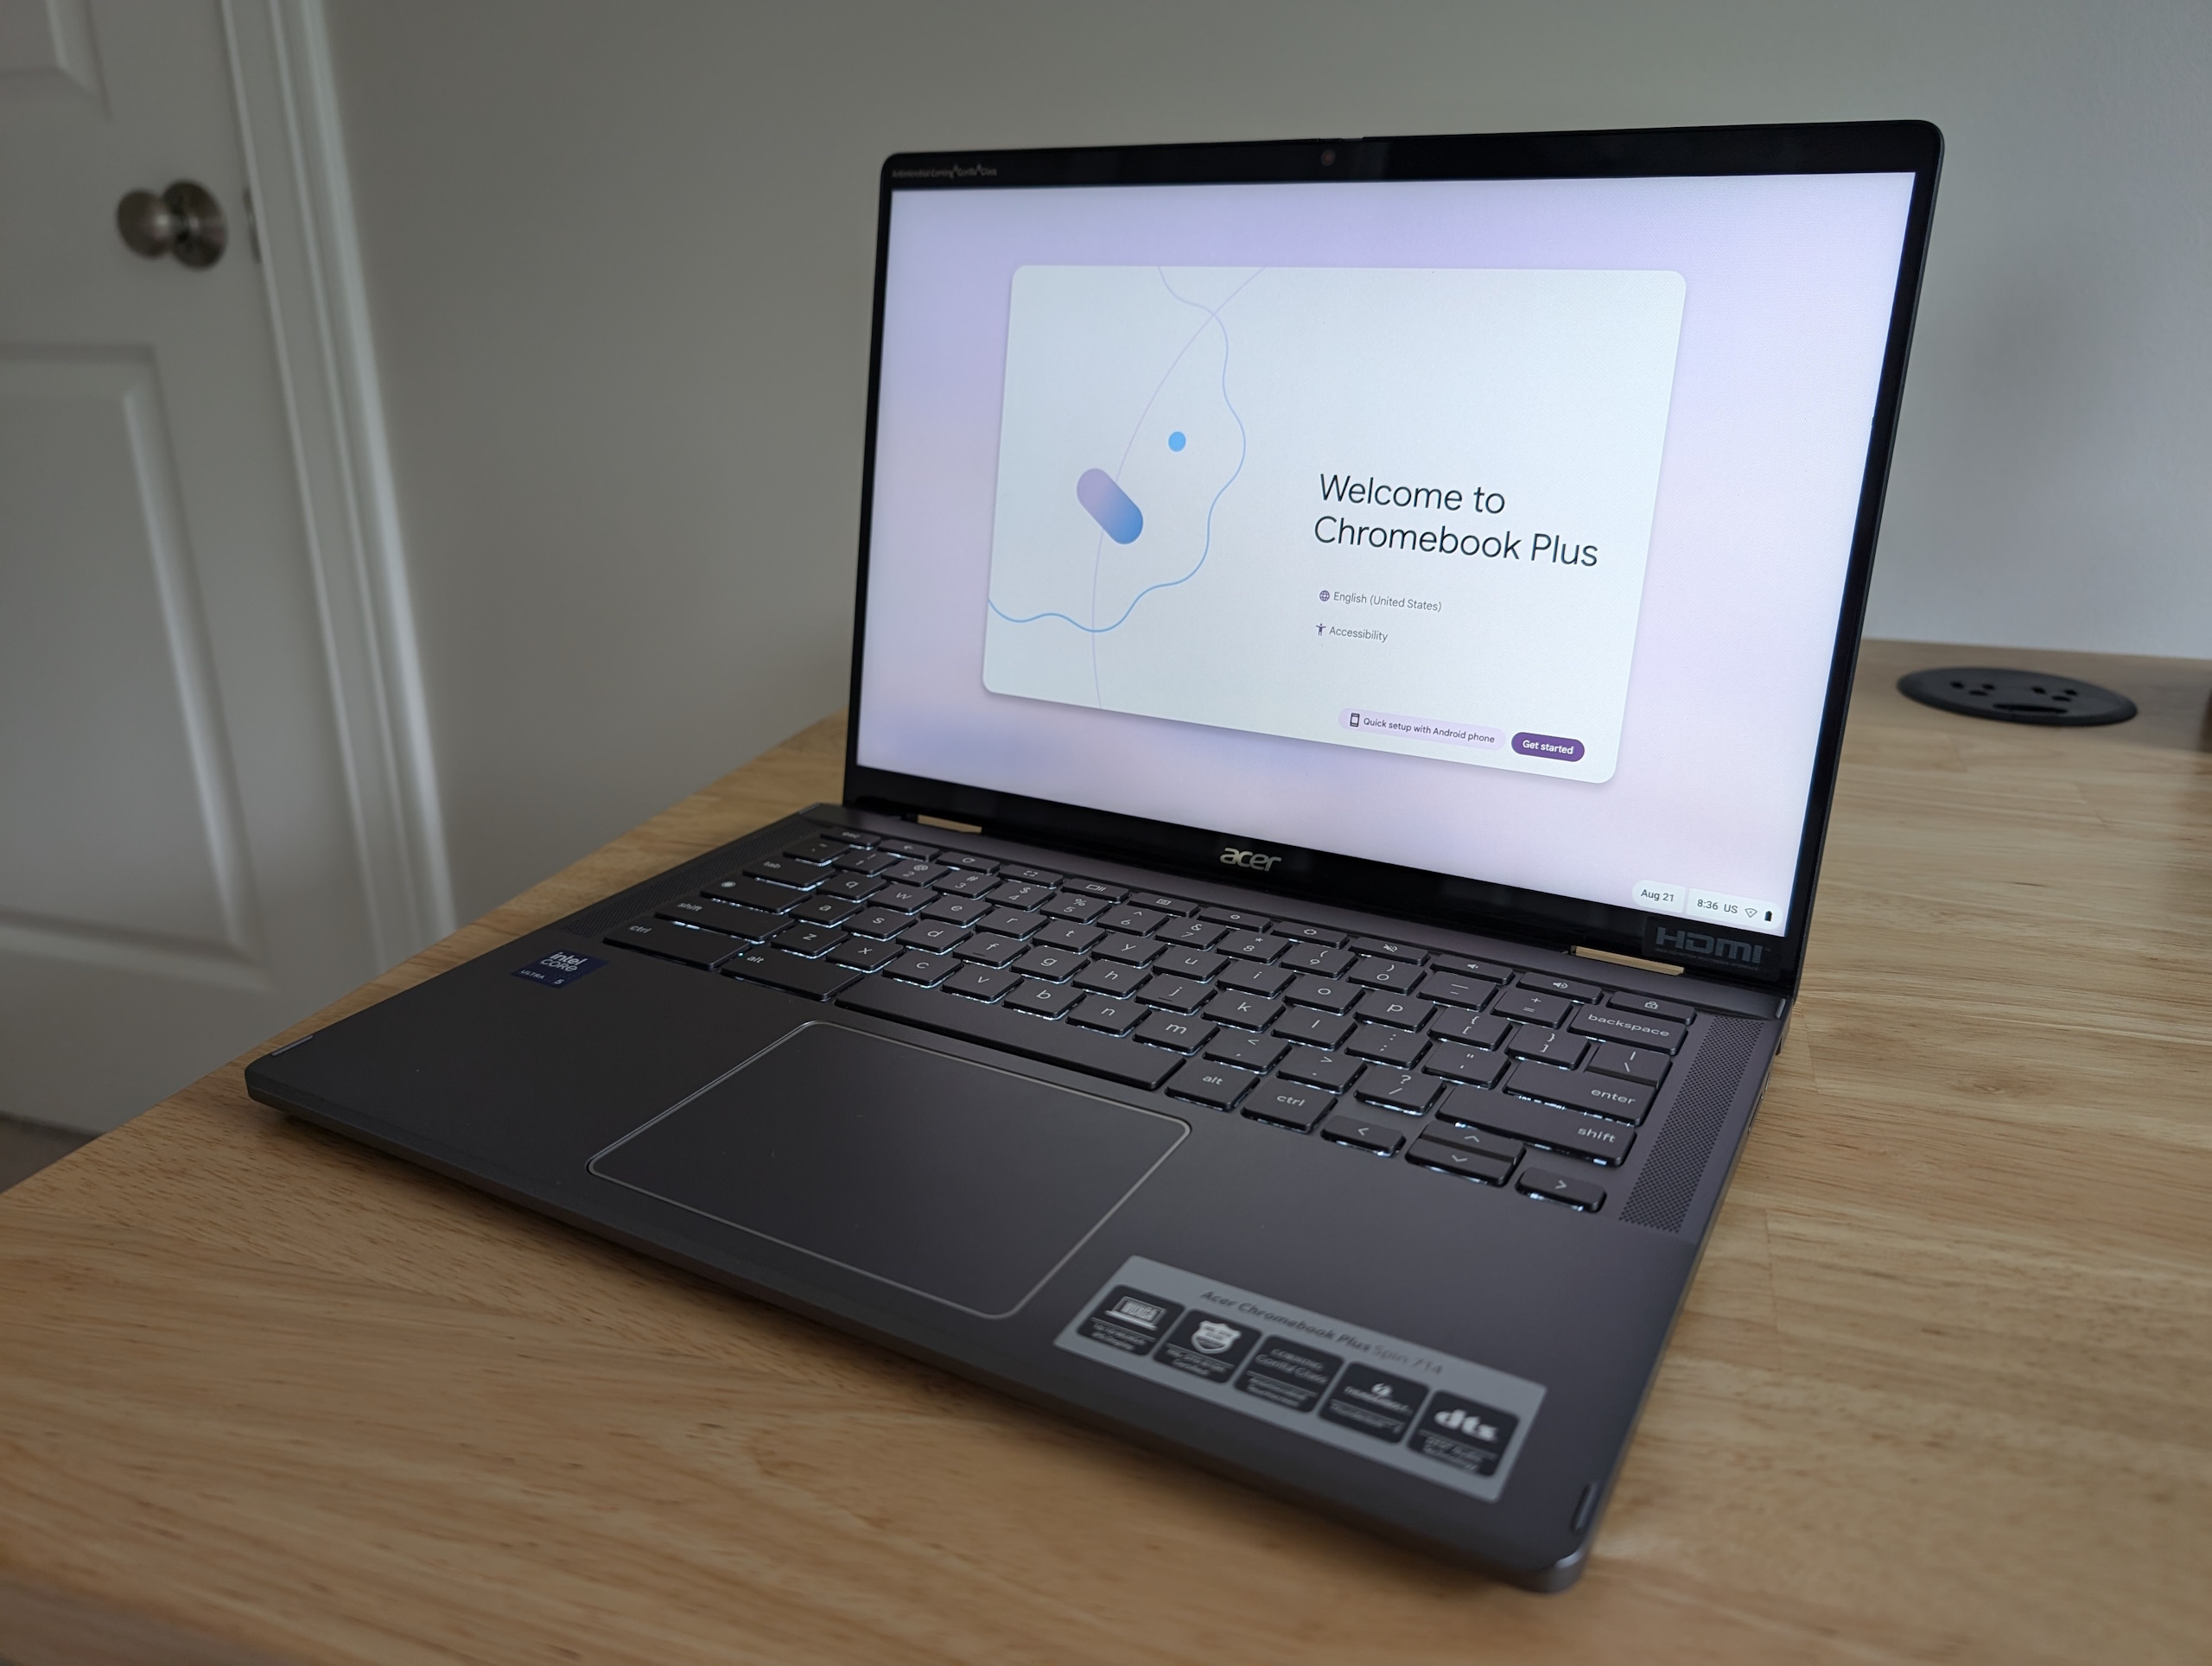
Acer Chromebook Plus Spin 714 – Best high-end Chromebook
Pros
- Great keyboard
- Solid battery life and performance
- Beautiful display
Cons
- Tinny speakers
- Pen sold separately
- No fingerprint reader
- More expensive than the average Chromebook
Price When Reviewed:
$699Why we like the Acer Chromebook Plus Spin 714
The Acer Chromebook Plus Spin 714 offers a convertible form factor, zippy day-to-day performance, and a keyboard with plenty of travel. The 14-inch IPS touch-enabled display also has a 1920×1200 resolution, a 16:10 aspect ratio, and 340 nits of brightness. It’s a great screen for media streaming, but it’s on the dimmer side and the glossy surface makes it difficult to use on a sunny day. That said, the multi-touch touchscreen works well.
Who should buy the Acer Chromebook Plus Spin 714
Anyone looking for a more premium Chromebook! The 2-in-1 form factor allows you to rotate the screen 360 degrees and use it like a tablet, which is great for those who like to take notes or doodle. Plus, many Android apps are optimized for tablet use, so using this Chromebook in tablet mode should be easy. The price tag ($699) may deter some folks, but if your budget knows no bounds, then the Acer Chromebook Plus Spin 714 is a fantastic choice.
Alternative option: The Samsung Galaxy Chromebook Plus ($699.99) is another good option to consider. The AMOLED display is absolutely gorgeous and it’s one of the thinnest Chromebooks out there right now, which is perfect if portability is at the top of your priority list.
Read our full
Acer Chromebook Plus Spin 714 review
Acer Chromebook 516 GE – Best Chromebook for gaming
Pros
- Attractive design
- Excellent CPU performance
- Loads of wired and wireless connectivity
- High-resolution 1600p display
Cons
- Mediocre keyboard and touchpad
- Disappointing speakers and microphone
- Display falls behind in contrast, color vibrancy
Price When Reviewed:
$649.99Why we like the Acer Chromebook 516 GE
The Acer Chromebook 516 GE is a good machine for gaming and day-to-day tasks. The Intel Core i5-1240P CPU is powerful enough for office work and everyday activities, and the display’s 120Hz refresh rate will produce smooth visuals. You can’t run games locally on this laptop, but you can use a cloud gaming service like Nvidia GeForce Now or Amazon Luna. According to our review, “gameplay felt perfectly smooth” and “Nvidia’s GeForce Now diagnostics panel flagged no problems.” Just make sure you’ve got a stable Internet connection! Fortunately, the Acer Chromebook 516 GE has an Ethernet port, which is about as stable as you can get.
Who should buy the Acer Chromebook 516 GE
Anyone who wants to game on a dependable Chromebook! The Acer Chromebook 516 GE is a joy to game on and it’s zippy enough for productivity and day-to-day. Additional features include a 1080p webcam, a 65 watt-hour battery, and an attractive design. With an MSRP of $650, it’s a little expensive for a Chromebook, but it punches above the usual Chrome OS machine and is tailor-made to deliver a high-quality cloud gaming experience.
Alternative option: If you’re looking for a Windows alternative that can run local games, you should check out the Asus TUF Gaming A16 Advantage Edition laptop. It’s currently our best budget gaming pick and for good reason! Our reviewer blitzed through the Rise of the Tomb Raider benchmark at 123 frames-per-second thanks to the Nvidia GeForce RTX RTX 4050 GPU. This laptop also managed an impressive 11 hours of battery life on a single charge, which is unheard of in gaming laptops.
Read our full
Acer Chromebook 516 GE review
Framework Laptop Chromebook – Best Chromebook for tinkerers
Pros
- Upgradeable
- Hot-swappable ports
- 1080p webcam
- Reliable performance
Cons
- Expensive
- No touchscreen display
Price When Reviewed:
$999Why we like the Framework Laptop Chromebook
The Framework Laptop Chromebook is one of the more unusual entries on this roundup because it’s a modular laptop, which means you can replace or upgrade any part of it. Our reviewer, who wasn’t confident in her disassembling abilities, was able to crack open the laptop in a few simple steps. The hardware inside is marked with QR codes, which you can scan with your phone and be directed to the right spot on Framework’s website. The 1080p display is also a big draw and the hot-swappable ports allow you to mix and match where the ports slot in the laptop.
Who should buy the Framework Laptop Chromebook
Anyone who likes to get in there and tinker or extend the life of their laptop. The Framework Laptop Chromebook is designed with the ultimate customization and upgradability in mind. I will say, it’s targeted to a specific niche of people, but that’s not necessarily a bad thing. Performance is strong due to the Intel Core i5 processor. Our benchmarks show that it handles everyday tasks like surfing the web and watching streams like a real pro. The only caveat is that it’s expensive for a Chromebook. The Acer Chromebook Vero 514, for example, is just as fast as the Framework Laptop Chromebook and is hundreds of dollars cheaper.
Read our full
Framework Laptop Chromebook review
Recent laptop reviews
- Acer Swift 16 AI: The Acer Swift 16 AI is a capable machine with a big, beautiful screen, but its AI chops are still unproven.
- Lenovo Legion 5i: The Lenovo Legion 5i is a great value — a 16-inch gaming laptop with a screaming-fast CPU that also squeezes a surprising amount of performance from its GPU.
- Lenovo ThinkPad X1 Carbon Gen 13 Aura Edition: The Lenovo ThinkPad X1 Carbon Gen 13 Aura Edition has elegance and feels great to use. But Lenovo should have stepped up its game, as the system lags behind in performance and battery next to a bunch of cheaper competitors, and Lenovo’s not the only brand making great-feeling systems.
- Lenovo LOQ 15: The Lenovo LOQ15 has better build quality than the average gaming laptop in this price range, but its performance is still on the low side.
How we test Chromebooks
The PCWorld team puts each and every laptop through a series of benchmarks that test GPU and CPU performance, battery life, and so on. The idea is to push the laptop to its limits and then compare it against others we’ve tested. Due to the cloud-based nature of Chromebooks, they go through a series of web-based tests. It wouldn’t be fair or possible to run the same kinds of tests on a Chromebook as we use on laptops because they exclusively run a completely different operating system.
Below, you’ll find a breakdown of each test and the reasons why we run them.
Chromebooks
- CrXPRT 2: The CrXPRT 2 benchmark tests a Chromebook’s battery life.
- Speedometer 2.0: This test determines a Chromebook’s web browser performance. It simulates this by adding, completing, and removing a to-do list.
- Basemark Web 3.0: This benchmark gauges how well a Chromebook can handle web-based applications.
- Kraken 1.1: Kraken 1.1 is a JavaScript performance benchmark that measures browser speed.
- Jetstream 2: Jetstream 2 is a combination of WebAssembly and JavaScript benchmarks. This is a way to gauge how well a Chromebook runs advanced workloads.
For a more thorough explanation of our testing procedures, check out how PCWorld tests laptops.
What should you look for in a Chromebook?
If you’re looking for a Windows or MacBook alternative, you may want to consider a Chromebook. Equipped with low-power processors, they typically have good battery life and are usually silent in operation. They make great productivity machines, as they’re specifically designed for lightweight tasks like browsing the web, watching Netflix, and so on. Plus, they’re largely virus-free. That said, most Chromebooks have minimal RAM and storage. If you’re a hardcore gamer or a video editor, you’re going to want something with a lot more power than a Chromebook is capable of providing.
Our guide to Chromebooks vs. Windows laptops can help you determine which operating system is best for your needs. For more options, you’ll want to check out our best laptops roundup.
- Operating system: Although every operating system has its pros and cons, I’d argue that Chrome OS is one of the most user-friendly ones out there. That said, with Chromebooks, you don’t have the option of picking another operating system, as they exclusively run Chrome OS. You’re stuck with it, bud.
- Processor: Shoot for a mid-range Chromebook if you can. They cost anywhere in the $400 to $600 range and many of them come equipped with Intel Pentium processors. These Chromebooks have better browser performance and are capable of running more intense gaming apps. It’s the best bang for your buck. Upper-end Chromebooks sometimes use Intel Core or AMD Ryzen processors, which pack more of a punch.
- RAM: Many Chromebooks have 4GB of RAM, which isn’t a lot. Chromebooks are web-based machines, so you need a fair amount of RAM to keep those tabs open and running smoothly. If you can spend a couple of hundred extra, you’ll be able to find a mid-range Chromebook with 8GB of RAM.
- Storage: I recommend at least 64GB of storage. Since you’ll mostly be storing things in the cloud, you don’t have a ton of local storage.
- Durability: Chromebooks are popular in the education market because they’re pretty darn robust. I’m not saying you should smack one around with a baseball bat or anything, but they’re durable enough to handle the daily abuses of life.
FAQ
1.What is the difference between a regular laptop and a Chromebook?
When people talk about regular laptops they usually mean a PC or Mac. A Chromebook is still a laptop, but it differentiates itself from either of those two by using a unique operating system called Chrome OS, which was created by Google. Think of it like this: All Chromebooks are laptops, but not all laptops are Chromebooks.
Unlike other operating systems such as Windows or macOS, Chrome OS is optimized to run Google apps such as Google Drive, Google Docs, YouTube, and other Google services. Because most Google apps are online, Chromebooks generally require an internet connection to use most of their important features.
Finally, Chromebooks have historically been designed with portability, ease of use, and affordability in mind rather than top performance. They typically forego the faster, high-end hardware that PCs or Macs can use for a more minimalist, lightweight approach to computing.
2.Can you use integrated graphics for gaming?
No, you can’t game a Chromebook because they can’t run local EXEs aside from Android apps. That said, you can play modern games on a Chromebook that supports cloud gaming, like the Lenovo IdeaPad 5 Gaming. You have to have an Ultimate membership with Nvidia’s GeForce Now to play the games, though. The Ultimate tier costs $19.99 a month or $99.99 for six months. It’s a pretty seamless experience, and Nvidia also offers an unlimited free tier so you can stream games with restrictions on session times.
3.What is the difference between a budget laptop and a tablet?
More and more, the line between what is a laptop and what is a tablet blurs as companies integrate the features of both into their latest devices. But there are still a few key distinctions between the two. Laptops generally are larger, come with more storage, and have better performance and productivity features. Tablets on the other hand are smaller and more portable, have longer battery life, and are usually a bit more affordable.
When choosing between a budget laptop and a tablet you should first ask yourself what the primary use of the device will be. Do you need something for productivity with lots of storage? Then a laptop—even a budget model—will probably be the way to go. Or do you need something small, travels well, and has a long battery life? Then you might consider a tablet.
4.What are the disadvantages of a Chromebook?
Chromebooks are designed for day-to-day tasks, which is fine if all you’re doing is browsing the web and checking e-mail. They can’t handle resource-heavy design work, video editing, and so on. You’ll also need a strong Internet connection because if you’re not online, there are only so many things you can do with a Chromebook. Chromebooks cannot install local programs like Windows PCs can. You also can’t install Microsoft Office and that might be a huge deal-breaker for some folks, especially those who rely on those programs for work.
5.What is a Chromebook good for?
Chromebooks are good laptops for those who require the basics. If all you need is a reliable Internet connection to get your work done and nothing else (like no resource-hungry programs), then you’re golden. I use my own Chromebook for writing and editing as well as checking out social media and watching YouTube. You can even game on them with a cloud gaming service like GeForce Now, if that’s how you like to spend your evenings (no judgments here).
Prusa CORE One Review: Better in a Box
Josef Prusa finally gave his customers what they wanted: a fast CORE XY 3D printer to compete with Bambu Lab and all the Voron Design clones on the market. The new CORE One has a brilliant design that’s shares parts with the familiar MK4S to the point that a conversion kit is being made available for $450.
Prusa fans have been begging the European manufacturer to produce a Core XY ever since the reveal of the industrial Pro AFS (Automatic Farm System) several years ago. That machine is a bank of nine Core XY printers, proving that the company could indeed make more than bedslingers.
The CORE One is designed with easy maintenance in mind: nothing is welded or glued in place, and the whole thing can be built with a screwdriver. The steel case serves as an exoskeleton, which the company claims is nearly indestructible. We’ll cover more on the design later in this review.
The CORE One is not intended to replace the MK4S, but rather provide a better option for makers who need an enclosed 3D printer. This machine has a similar footprint and build volume of the classic bed slinger, but takes up much less space than an enclosure for a MK4S. It’s also about 20% faster and has a vented chamber that can be heated to 55 degrees C for printing engineering filaments or kept under 30 degrees C, which is cool enough for PLA. This means the door can remain closed for safety around children in a home or school environment.
The CORE One is retailing at $1,199, only $200 more than the MK4S. You can save a little money by building the kit version for $949, or converting a MK4S for $449. The Prusa CORE One lives up to its reputation and is one of the best 3D printers we’ve tested to date.
Specifications: Original Prusa MK4S
Swipe to scroll horizontallyBuild Volume 250 x 210 x 270 mm (9.84 x 8.3 x 10.6in) Material PLA/PETG/TPU/ABS/ASA /PC (up to 300 degrees) Extruder Type Direct drive Nozzle .4mm (Highflow CHT) Build Platform PEI spring steel flex plate Bed Leveling Automatic Filament Runout Sensor Yes Connectivity USB, LAN, Wi-Fi, App Interface Color touch screen with knob Machine Footprint 415 x 444 x 555 mm (16.3 x 17.5 x 21.8 in) Machine Weight 22.5 KG (49.6 lbs) Prusa CORE One: Included in the Box
(Image credit: Tom’s Hardware) The Prusa CORE One we received was pre-assembled. It only needed to be unpacked and have its screen mounted. Besides tools, the printer comes with a full spool of Galaxy Black Prusament PLA, a USB Stick, a handbook on 3D printing with your new machine, and a bag of Gummy Bears. The USB stick contains several models, while PrusaSlicer is available for free download from the website.
We also received extra build plates, a Buddy Camera, magnets, and a rubber fish for the review.
(Image credit: Tom’s Hardware) Design of the Prusa CORE One
(Image credit: Tom’s Hardware) The CORE One is the first consumer Core XY 3D printer by Prusa Research. It has a slim, steel exoskeleton with indents on either side to conceal the spool holder and customizable storage space. The door and upper parts of the side panels are translucent black polymer. The top panel is semi-permanent, held in place by plastic rivets, and has a vent you can open and close. The top panel is not difficult to remove for maintenance, and Prusa sends along a bag of extra rivets if you need them. I didn’t bother putting the rivets back in and just let the panel rest on the top. Since the shell is made of folded steel, it’s not exactly airtight, with many gaps at the seems – a few empty screw holes isn’t going to spoil the system.
(Image credit: Tom’s Hardware) The exoskeleton is an interesting concept. It provides a strong, stiff frame for the printer while also minimizing materials and avoiding that cheap plastic feel that plagues many other designs. The indented sides do more than slim down the printer’s silhouette, it also reduces the interior space of the printer, allowing the chamber to be sufficiently heated (when needed) by only the heater bed.
Like every other Prusa printer before it, several of the CORE One parts are 3D printed. The factory uses PETG for some older bedslinger parts, but the CORE One parts are made with PC Blend Carbon Fiber. I contacted the factory and found that enclosed MK4S printers still dominate the farm, with CORE One machines slowing joining the mix. Prusa Research also does its own injection molding, which you can see on the LCD case.
At Prusa’s print farm (Image credit: Tom’s Hardware) Another thoughtful touch is the door hinge, which can be flipped if you rather have it open on the other side. The door can completely open 180 degrees, but Prusa encourages users to go ahead and keep it closed for any material, thanks to their active cooling system. The door has a sensor that will warn you to keep it shut and stop the print when the door is opened. This is a nice safety feature for schools, parents of small children, and pet owners. Thankfully, the sensor can be switched off if you want the freedom to poke your nose or a camera in there.
I found all the plastic panels to be quite staticky and eager to attract dust, but a spritz of Static Guard on a lint-free cloth solved that problem.
The CORE One specs don’t include acceleration rates, as the company puts quality over speed. I had to check out the PrusaSlicer settings to find any stats on speed, which are most likely very conservative. The CORE One is about 15 to 20% faster than the MK4S with the same default speed settings due to a few higher acceleration rates, mostly with travel and infill.
(Image credit: Tom’s Hardware) The CORE One uses about 70% of the same parts as the MK4S, making many consumable parts and upgrades compatible between the two printer lines. If you have a stash of nozzles from an MK3, they can be used on a CORE One (with an adapter). Prusa is famous for continuing to support old machines and leaving a path to upgrade open, which continues with the new Core XY design.
One thing that didn’t carry over is the styling of the MK4S fan, a chunky protrusion hanging out in front of the nozzle. The CORE One gets a more svelte look with a 360 wrap-around fan shroud, and the fan itself is hidden in the back. During our tests, the cooling was a bit better and had a more pleasing aesthetic.
Green printed on MK4S, red on CORE One. Model by Lost in Tech. (Image credit: Tom’s Hardware) The motion system on the CORE One is a little louder than the MK4S, but its fans produce only a soft hum.
A few of the CORE One upgrades are optional, and will need to be purchased separately. There’s a GPIO hackerboard for tinkering with the machine’s code to do tricks, a new Buddy Camera for monitoring the chamber and an advanced filtration system coming soon. We received a camera for testing, and its not as good as other systems. The camera needs extra light to produce a color image and it’s stuck in an old school one frame every 10 seconds. It’s good enough to see if the plate is clear, but not very exciting to watch. Prusa Research has promised an upcoming firmware fix, but I have no idea when that would be.
This printer also doesn’t have the optional accelerometer we could get for the MK4S. It would seem Prusa has doubled down on his factory settings being all that you need.
The CORE One also has the new NFC antenna that makes getting your Prusa online a simple task. The app is entirely optional for those who wish to keep their printers offline.
Like the MK4, bed leveling is fully automatic, with no manual adjustments. First layers go down perfectly smooth thanks to a load cell sensor that has replaced the old PINDA probe. The sensor is connected to the nozzle, which allows the CORE One to physically tap the print surface for a more precise measurement. The sensor is also used to calculate Z height, and it does it so well that there is no need for human intervention. Of course, there’s still a live Z adjustment available in the menu should you need it. During testing, we did not.
Prusa’s recently introduced and completely optional app is a huge improvement over the previously neglected Prusa Connect system. The system was initially developed for print farms, and was clunky to set up and use. The app makes getting online easier for the average user and allows you to monitor prints away from your workshop.
You can download gcode directly from Printables.com, but there is no slicer attached to the app.
Assembling the Prusa CORE One
(Image credit: Tom’s Hardware) The Prusa CORE One we reviewed came fully assembled and only needed to be unpacked. Simply pull it out of the box, snap the screen on and plug it in.
Once the machine is turned on, you’ll see a cartoon version of Josef Prusa to guide you through setup. The CORE One will run a few hardware checks, then walk you through loading the filament. Once the material is loaded, you can pick your first print from the USB stick. It will perform a bed level check and set the Z height before printing (and without asking you for help).
(Image credit: Tom’s Hardware) Leveling the Prusa CORE One
Bed leveling is a no-brainer, as the Prusa CORE One is fully automatic. There are no manual adjustments and no need to adjust the Z offset. The printer uses a load cell sensor connected to the nozzle, which physically taps the print surface for precise measurement.
The printer trams the bed and calculates the required z height before each print.
Loading Filament on the Prusa CORE One
(Image credit: Tom’s Hardware) Loading filament is very simple. Simply place the spool into side mounted rack and feed the plastic into the reverse bowden tube until it reaches the hotend. The printer will automatically detect it and pull it in the rest of the way. The screen will then ask what kind of material you’re using to set the temperature. Once it gets hot enough, it will pull the filament into the hotend and ask if the color has changed. If it has, you can say yes and move on. If the answer is no, it will purge more material.
To remove material, go to the Filament menu from the main screen and click unload. It will remember what material was last installed, determine if the filament is still there, and then heat it to the appropriate temperature. Once hot, it will retract the plastic until you can easily remove it.
Preparing Files / Software for Prusa CORE One
(Image credit: Tom’s Hardware) The Prusa CORE One comes with a copy of its native slicer, PrusaSlicer. This open source slicer is developed by Prusa Research and serves as the foundation for many other slicers. It comes with dozens of profiles for every material and nozzle size that Prusa Research makes.
Printing on the Prusa CORE One
The fully assembled CORE One comes with a full 1 KG roll of Prusament PLA Galaxy Black. If you want more colors and materials like silks and multicolor filaments, you should check out our guide to the best filaments for 3D printing for suggestions.
We used the sample material to print a Benchy to see what the CORE One can do with its fastest default slicer settings. We used Speed Benchy rules for fairness: 2 walls, 3 top and bottom layers, 10% infill, a .25 layer height and .5 layer width. Using these settings, we got a very nice benchy in 28 minutes.
3D Benchy (Image credit: Tom’s Hardware) Since I was working on Valentine’s Day prints, I whipped up a vase using Maker World’s Vase Maker. This is a handy little app by Bambu Lab that, yes, works for all printers. The vase was printed to get the most out of CookieCad’s clear Funfetti PLA. To keep the print as clear as possible, I pushed the printer to overextrude, printed slowly and bumped up the heat. This was printed at 235 degrees C, using a .8mm line width (with the standard .4 nozzle) and a .28mm line height in vase mode. This setting gives me a single wall that’s as thick as two “normal” walls and also speeds up the print. The vase completed in 2 hours and 10 minutes. It’s more translucent than clear, and the glitter really stands out.
Image 1 of 2
For PETG, I printed one of my favorite roses from Thingiverse. This is using Prusament PETG in Carmine Red Transparent, with a .2 layer height and default settings for Prusament PETG. This print only took 2 hours – PrusaSlicer set the volumetric flow at 26 mm/s³ which didn’t slow the printer’s speed much at all. The resulting print is super smooth, with layer lines that melt away.
Image 1 of 2
For TPU, I printed a tennis ball-sized Voronoi ball in Fiberlogy FiberFlex 40D, which really stress out the printer’s capabilities. The ball bounced extremely well until my puppy got a hold of it and ate it. This was printed at a .25mm layer height using PrusaSlicer’s default settings for FiberFlex in one hour and 20 minutes. The slicer slowed the print to about 30mm/s, which still resulted in a somewhat stringy print – not too surprising for TPU. The top and bottom printed very clean and the middle parts were easy to clean up. Best of all, the supports were easy to remove. It had excellent layer adhesion, though not enough to hold up to 40 pound puppy’s destructive urges.
Voronoi Ball by Marko (Image credit: Tom’s Hardware) For higher-temperature filaments, I loaded the CORE One with Prusament ASA Natural and printed a variety of things. The printer doesn’t have a separate heater for the chamber – instead, it warms up the interior by cranking the bed to 115 degrees C for a few minutes until the desired temperature is met. In my chilly basement, it had a hard time preheating all the way to 55 degrees C, but it did get to 47 degrees C on the preheat cycle and eventually got to 55 degrees C in the first 30 minutes of printing. None of my test prints showed signs of warping, so it must be working.
This fishing lure from Thingiverse turned out very smooth, with no visible layer lines. Four lures printed in one hour and 17 minutes, with a .2 layer high and PrusaSlicer’s default settings for ASA.
Walk the Dog Topwater fishing lure by Domi1988 (Image credit: Tom’s Hardware) I also wanted to show off this frame for the popular Dummy 13 action figure, printed in the same ASA at 200%. Each part printed without a brim and stuck down perfectly. This is using the designer’s suggested .15mm layer height and took 3 hours and 37 minutes to print. The parts are silky smooth, and since I didn’t need to use the supporting runnings, snap together without problem.
Part of a Dummy 13 action figure by Soozafone (Image credit: Tom’s Hardware) Bottom Line
(Image credit: Tom’s Hardware) The Prusa CORE One is an outstanding machine and just what Prusa Research needs to compete in the modern marketplace. It’s still lacking a few creature comforts, like a built-in camera, but the company’s reputation for reliability and continued support through the years makes it a safe splurge.
Retailing at $1,199 for a pre-assembled machine and $949 for a DIY kit, the Prusa CORE One is not a budget machine, but it is definitely the best machine a beginner could start on. The enclosure and easy to reach spool holder, combined with Prusa Connect, make it a perfect machine for print farms that run high temperature filament. It’s also a reliable machine for schools, especially with a door that can keep little fingers out while printing basic PLA.
If you’re a tinkerer and already own an MK4S, the CORE One upgrade looks like a fun project that will net you the latest printer at half the cost. This machine will also be compatible with the Prusa MMU3 for five-color printing sometime in the near future.
If a Prusa machine seems just a bit too spendy for your budget, the Bambu Lab P1S Combo is still my favorite pick for easy and affordable color printing, with a price tag of $829 for the printer with AMS. The Creality K2 Plus Combo is also a solid choice for Core XY speed with four colors and a bit more elbow room. It’s currently $1,499.
MORE: Best 3D Printers
MORE: Best Budget 3D Printers
MORE: Best Resin 3D Printers
Guide to AMD Ryzen AM5 Motherboard Chipsets
When selecting a motherboard for your newly purchased Ryzen CPU, you will encounter many options: X870, X670, B650, A620, and the newest additions, B850 and B840. But what do these names mean? How do X870E, X670E and B650E boards differ from their non-E counterparts? Which should you choose for your system? This guide will provide all the answers and more.
The biggest difference between motherboard types is the chipset – the chip (or two chips) that connects the CPU to other components in the system. In the past, the chipset consisted of a northbridge chip, which connected the CPU to the RAM and graphics card, and a southbridge chip, which connected the northbridge to the rest of the components. Nowadays, however, the functionality formerly attributed to the northbridge is integrated into the CPU, which connects directly to many components.
Chipset Processor PCIe lanes Graphics card NVMe SSD & additional GPP lanes Total PCIe lanes Max usable PCIe 5 lanes USB 5 Gbps USB 10 Gbps USB 20 Gbps USB4 Max PCIe 3.0 or SATA ports X870E PCIe 5.0
(1×16 slot or
2×8 slots)PCIe 5.0 1 x4 PCIe 5.0
4x PCIe GPP44 24 2 12 2 Yes 8 X870 PCIe 5.0
(1×16 slot or
2×8 slots)PCIe 5.0 1 x4 PCIe 5.0
4x PCIe GPP36 24 1 6 1 Yes 4 B850 PCIe 4.0
(1×16 slot or
2×8 slots)PCIe 4.0 1 x4 PCIe 5.0 36 4 1 6 1 opt 4 B840 PCIe 4.0
(1×16 slot)PCIe 4.0 1 x4 PCIe 4.0 34 0 2 2 0 opt 4 X670E PCIe 5.0
(1×16 slot or
2×8 slots)PCIe 5.0 1 x4 PCIe 5.0
4x PCIe GPP44 24 2 12 2 opt 8 X670 PCIe 4.0
(1×16 slot or
2×8 slots)PCIe 4.0 1 x4 PCIe 5.0
4x PCIe GPP44 8 2 12 2 opt 8 B650E PCIe 5.0
(1×16 slot or
2×8 slots)PCIe 5.0 1 x4 PCIe 5.0
4x PCIe GPP36 24 1 6 1 opt 4 B650 PCIe 4.0
(1×16 slot or
2×8 slots)PCIe 4.0 1 x4 PCIe 4.0
[PCIe 5.0 opt]36 0 1 6 1 opt 4 A620 / A620A PCIe 4.0
(1×16 slot)PCIe 4.0 1 x4 PCIe 4.0 32 0 2 2 0 opt 4 Ryzen 7000 and 9000 processors connect to high-bandwidth components through 28 PCIe lanes and support PCIe 5.0 speeds. Of these lanes, 16 are reserved for a graphics card (or two, with each utilizing eight lanes), and four are designated for an M.2 drive. Another four lanes are used to connect to the chipset. The remaining four lanes can be employed for elements such as another M.2 slot or a USB4 adapter that also connects to the CPU’s integrated graphics to enable DisplayPort tunneling.
Ryzen 8000G processors only have eight PCIe lanes for a graphics card (20 in total), and support PCIe 4.0 speeds. Additionally, Ryzen CPUs support four USB 3.1 (or “3.2 Gen 2”) ports and a single USB 2.0 connector.
Take a shortcut to your next Ryzen build…
The current chipsets on the AM5 platform support either PCIe 4.0 speeds, which limits the total bandwidth of the devices connected to them at approximately 7GB/s, or PCIe 3.0 speeds, which sets the bandwidth at about 3.5GB/s. These devices may comprise storage drives utilizing either the NVMe or SATA interface, USB devices, network cards, and other internal components such as soundcards.
Some motherboards feature more connectors than their CPU and chipset support, either to allow you to choose between some of them or because they employ splitters to share their bandwidth. With the basics covered, let’s move on to the chipsets themselves…
Old Is New Again: B840
AMD B840 motherboards use the same Promontory 19 chip that was previously used on B550 motherboards with AM4 processors. Unlike the Promontory 21 used in other AM5 motherboards, it only supports PCIe 3.0 speeds, but it adds 10 PCIe lanes, and supports four SATA, two USB 3.1, two USB 3.0 (or “3.2 Gen 1”), and six USB 2.0 ports.

In addition to the slower chipset, B840 motherboards omit several enthusiast-oriented features. They don’t support PCIe 5.0 speeds, even for devices connected directly to the CPU. They don’t allow CPU overclocking, although with today’s CPUs it’s more of an enthusiast hobby than a recommended practice. They also only support a single graphics card, but the era of multi-GPU gaming has essentially come to an end so that’s not a big one.
Only a few B840 motherboards are available at the time of writing, and quite surprisingly, they aren’t cheap. Despite their limitations, they are quality boards with several heatsinks and many slots. That raises the question: whom are they meant for?
If you want to upgrade an old system with PCIe 3.0 devices, then B840 motherboards may offer a good value, as they are cheaper than otherwise comparable B850 boards. Otherwise, feel free to ignore them.
A Needless Compromise: A620
A620 motherboards use the same Promontory 21 chip used in B650, B850 and X870 motherboards, but with some of its connectors disabled or limited. Like the Promontory 19, it adds support for two USB 3.1, two USB 3.0 (or “3.2 Gen 1”), and six USB 2.0 ports. It also incorporates eight PCIe 3.0 lanes, of which two or four can be employed for SATA ports.
The real issue with A620 motherboards isn’t the chipset itself; rather, it’s that they are designed to be affordable boards with inexpensive voltage regulator modules (VRM) and like B840 boards, do not support PCIe 5.0 speeds. Worse, A620 boards not only disallow CPU overclocking, but they may also officially support CPUs with a TDP of up to only 120W, or even 65W.
On paper, A620 motherboards are a good fit for Ryzen 8000G processors, which are meant for compact systems with fewer components and lower power consumption. In practice, decent A620 boards cost about the same as B650 ones, so we can only recommend them when they are on sale.
The Best Value: X870 vs. B650E vs. B850 vs. B650
B650, B650E, B850 and X870 motherboards all use a single, fully enabled Promontory 21 chip. It adds eight PCIe 4.0 lanes, allowing an M.2 drive to fully utilize the chipset’s bandwidth on its own. Like in A620 boards, it also includes four PCIe 3.0 lanes that can be used for up to four SATA ports.
The chipset provides support for six USB 2.0 and four USB 3.1 ports, as well as bandwidth that can be allocated for an additional two USB 3.1 ports or a single USB 3.2 (“Gen 2 x 2”).
Read our review: Most Affordable AMD B650 Boards Tested
If you were wondering about the difference between B650 and B650E motherboards, the answer is that B650E boards (E = short for “Extreme”) support PCIe 5.0 for both the graphics card and at least one M.2 drive. X870 motherboards are basically the same as B650E, except they are required to use four PCIe lanes for USB4. However, because they are newer, the Wi-Fi cards they come with support Wi-Fi 7 rather than 6E.
While B850 motherboards are required to support PCIe 5.0 on at least one M.2 drive, regular B650 boards may still have a PCIe 5.0 M.2 slot. Other than that, these boards don’t limit the CPU in any way and will support any Ryzen processor until 2027.
We recommend B650, B850, B650E and X870 motherboards for gamers and others who want to get everything that AM5 motherboards have to offer, but don’t need to connect many drives to their PC simultaneously. Another advantage of these boards is their ability to fit all connectors into a compact micro-ATX form factor, which is useful if you’re seeking a compact case to place on your desk.
More is More: X870E vs. X670E vs. X670
X670, X670E and X870E motherboards feature a Promontory 21 chip connected to another one through four PCIe 4.0 lanes, providing the second chip with the same bandwidth as the one connected to the CPU.
Combined, the chipset adds twelve PCIe 4.0 lanes, allowing each M.2 drive to saturate the chipset’s bandwidth individually, and eight PCIe 3.0 lanes for up to eight SATA ports. With SATA now becoming a legacy connector, it’s common for some of those lanes to be allocated to network cards, freeing up all PCIe 4.0 lanes for faster interfaces.
The chipset also offers support for twelve USB 2.0 ports and one of three options: twelve USB 3.1 ports; ten USB 3.1 ports and one USB 3.2 port, or eight USB 3.1 ports and two USB 3.2 ports.
Read our full reviews: The Best AMD X670E Motherboards: 22 Board Roundup & AMD X870/X870E Motherboard Roundup: 21 Motherboards Tested
Unlike B650, all X670 motherboards feature a PCIe 5.0 M.2 slot, and of course, X670E boards support PCIe 5.0 graphics cards. If you purchase such a card when they become available, it probably won’t even require all 16 lanes. So, if your board has another 16-lane PCIe 5.0 slot, you’ll be able to use it for up to two M.2 drives with an adapter (some boards actually come with one). With X870E you can be sure you’ll get USB4 and Wi-Fi 7.
X670, X670E and X870E motherboards are the ideal choice for content creators who constantly feel the need to add another drive to their system. With numerous ways to utilize the dual chipset, particularly, you shouldn’t buy a motherboard based solely on its name; instead, make sure it has all the connectors you require.
Have an old Kindle? How to add new books – and one thing you should never do
David Gewirtz/ZDNET As a tech professional, there are many things I know because I know things. But there are also things I learn about because it’s my job to fix the tech problems around the house.
In this case, my wife had performed a factory reset on her cherished Kindle DX, which she purchased almost exactly ten years ago. After the reset, she couldn’t get any of her books to download.
Also: The best Kindles of 2025: Expert tested and reviewed
She wanted to clean the Kindle of all its cruft. Every book she ever bought, up until the last time she powered up the machine, had been on that device before the reset. She thought a factory reset would be the fastest way to start with a clean slate.
It was indeed a clean slate. All that was left was a dictionary and user guide, both installed as part of the reset process. And she couldn’t download anything else she wanted on there.
I am not an active Kindle device user. I enjoy reading Kindle books on my iPhone, but I’ve never really bonded with Kindle devices. So I haven’t spent too much time tracking all their ins and outs.
It took a bit of Googling to figure out that the reason my wife couldn’t download books over Wi-Fi to her Kindle DX is that the DX never supported Wi-Fi. The device did, however, come with full-time 3G cellular support, which is the mechanism by which she had loaded books on the thing throughout the years.
Also: How to trade in your old devices for Amazon gift cards
Read that last paragraph and recognize that I’m writing this article in 2025, not 2014. In 2014, we had 3G. By 2025, most of the major carriers in the US have shut down their 3G networks. Amazon has also phased out support of 3G for the Kindle Generation 1, Kindle Generation 2, and Kindle DX.
That left us with the question of how to get books back on her cherished DX. The Kindle DX has a 9.7-inch display. While she does have a more modern Kindle she could use, it’s not that big. Amazon does make the 10.2 inch Scribe, but at $419, she’d rather keep using the DX, especially since it’s in perfectly workable condition.
Do not unregister your old Kindle
In the process of finding out how to put books back on that discontinued device, I learned some things that people with older devices may need to know. I also learned about one thing that, if you do it, you can’t really recover from.
Here’s a quick summary of what I found out:
- You can’t transfer books wirelessly to the Kindle 1, Kindle 2, and DX anymore.
- You can download books to your computer and then upload them to the discontinued devices via USB.
- If you unregister your obsolete Kindle, you can’t re-register it. This is the big “what not to do” because you need a registered device to download books. I confirmed this through a long and friendly discussion with Kindle tech support. Old devices are banned from registering anymore.
- If you unregister your older Kindle and try to download books, you must have a more modern Kindle on your account to get the download option.
- If you still have the obsolete Kindle registered to your device, any Kindle books you download should be compatible.
- But if you have to download Kindle books using a more modern device registration, newer books will only download in a more modern file format that is incompatible with older Kindles.
So, if you ever want to use an older Kindle, never, ever unregister it. Likewise, you won’t be able to gift that older Kindle to someone else, because they won’t be able to register it.
How to add books to old Kindles
For those Kindles where wireless connectivity is no longer supported, you’ll need to turn to USB. All Kindles, from Generation 1 on, can be turned into mountable USB drives via their USB connection.
My wife’s Kindle DX uses a micro-USB connector, as does the Generation 2 Kindle. The Generation 1 Kindle uses a mini-USB connector. To mount the device to your computer as a drive, connect the Kindle to your computer over USB.
Also: Also: The best reading tablets of 2025: Expert tested and recommended
We found out that not all cables will work. We tried two cables that were known to work with other devices, but the Kindle didn’t respond. It wasn’t until we tried a third cable that it properly responded. Here are cables that should work, one made by Monoprice and one from Amazon Basics. Beyond that, I don’t have any guidance here for how to pick a cable, but if at first it doesn’t work, try, try again with different cables. My other big tip is to check for the “Free Returns” mention right under the price.
We tested the connection on both a Windows 11 machine and her M2 MacBook Air. Once we found the right cable, this process worked in both environments. I’m going to show you screenshots from a Mac because that’s her daily driver.
Once the cable is connected, you’ll get a permissions request on your computer like this:
Show more
Screenshot by David Gewirtz/ZDNET At this point, your Kindle becomes a glorified USB drive.
Next, download your Kindle books from your Amazon web account. On Amazon, navigate to Kindle, then Manage Your Content and Devices, and choose the Content tab.
Show more
Screenshot by David Gewirtz/ZDNET Here, you’ll see your book library. My wife and I have our libraries shared, so I decided she needed one of my favorite Star Trek book series, Starfleet Corps of Engineers. Technically, she should have started with Book 1, Have Tech Will Travel, but I gave her Book 2 because it was easier to get the menu screenshot.
Also: The beginner’s guide to Star Trek: What to watch first
Notice below that there are three dots to the right of each book. Clicking those dots within her Kindle account on her computer dropped down this menu. We downloaded the book to her Downloads folder, although you can choose any folder.
Screenshot by David Gewirtz/ZDNET I wanted to see what would happen if you don’t have a Kindle device registered, so I switched over to my machine for that test. If you don’t have a registered Kindle, you’ll get this error message and be denied download permission.
Screenshot by David Gewirtz/ZDNET I tried to follow the suggestion of getting the free Kindle app, and I did install it. I could read the books on the app, but I couldn’t download the individual Kindle book files to my computer. Choosing the download option from the Manage Your Content and Devices screen still resulted in the denied error message above. This is why I so strongly recommend you never, ever unregister your device unless you’re permanently parting ways with it.
Also: How to get (great) free books on Kindle
Jumping back to Denise’s computer and her Kindle account, we were able to download the book, because her Kindle DX is still registered to her account.
Screenshot by David Gewirtz/ZDNET Go ahead and click download and save the file to your computer. Because Denise still has her DX registered, the file she downloaded was in .azw format. This was the original Kindle file format. Once you download the file, you’ll see this happy message.
Screenshot by David Gewirtz/ZDNET More modern devices use the .azw3 format. If your DX or other older-gen product is no longer registered, and you have a more modern Kindle registered to your account, you can still download Kindle files.
Unfortunately, any books published in roughly the last seven or eight years will be in .azw3 format, which older Kindles can’t read. The option to download the format that works on the older devices will not appear, since you won’t have one registered to your account any longer.
Note: After I published this piece originally, a couple of commenters mentioned that Calibre can convert later formats to plain old .azw. I haven’t tested this option yet, but since Calibre is free, it’s worth checking out. Thanks, commenters!
Now, let’s move those books to your Kindle. Because you connected your Kindle to your computer via USB, the device is mounted as a drive. Click the Kindle device (shown at 1) and then open the documents folder (shown at 2).
Show more
Screenshot by David Gewirtz/ZDNET Now, all you need to do is drag and drop your Kindle book files (those .azw files) into the documents folder. Here, you can see the Star Trek Starfleet Corps of Engineers book has been moved into the folder.
Screenshot by David Gewirtz/ZDNET Finally, you should unmount the Kindle and disconnect the USB cable. Once you do, you’ll see your books on your Kindle. Here, my wife has a great Star Trek story that she can read on her Kindle.
Show more
David Gewirtz/ZDNET I’m guessing that book isn’t long for the world on her Kindle, but she’s planning on following these steps to repopulate her cherished Kindle DX.
What about you? Do you have an old Kindle you’d like to resurrect? How many Kindle books do you have? What’s your favorite Kindle book or book series? In what Star Trek TV series’ did Commander Sonya Gomez first appear, and at what ranks? Let us know in the comments below.
You can follow my day-to-day project updates on social media. Be sure to subscribe to my weekly update newsletter, and follow me on Twitter/X at @DavidGewirtz, on Facebook at Facebook.com/DavidGewirtz, on Instagram at Instagram.com/DavidGewirtz, and on YouTube at YouTube.com/DavidGewirtzTV.
The best turntables of 2025: Tested and reviewed by our tech experts
I don’t know if you’ve noticed, but being the vinyl and turntable nerd that I am, I can’t stop seeing and (to my wife’s chagrin) pointing out every record player I see cropping up in seemingly every TV show or movie I’ve watched over the last little while. They’re everywhere — from Mr. Milchick rewarding Helly R. with a dance party from a Thorens-like deck in Severance to Agatha All Along trashing a perfectly good TEAC TN-280BT — it’s official: turntables are cool again, and you should get one.
Whether you’re rediscovering the satisfying ritual of putting on a record, are new to the world of vinyl, or you’re already neck-deep in LPs, having a decent turntable or record player is essential. But there are so many to choose from that it can get confusing. Many come ready to go out of the box, with built-in phono preamps for easy connection to powered speakers or receivers and integrated amplifiers, and a range of features that make them easy to get the hang of. If you’re curious and want to dip your toes in slowly, one of our favorite entry-level turntables is the Audio-Technica AT-LP70X, a budget-priced basic deck that looks great, too.
But if you’ve already taken a few spins around the vinyl world and are looking to upgrade or get into something a little more advanced, like one with a better phono cartridge, external phono preamps, higher-quality tonearms, and anti-resonant components that can make for a beautifully clear and sonic experience, we’ve checked out a bunch and also put them on our list of the best turntables.
The best turntable we can recommend right now is the U-Turn Audio Orbit Special (Gen 2), which has been given a nice little refresh and upgrade since it launched in 2012. Its top-notch Ortofon cartridge and solid acrylic platter help ensure dynamic and clear sound, while its updated speed select switch make it a breeze to use. We also still love the stalwart Pro-Ject Debut Carbon Evo, so check that out, too.
But we’ve got several other turntables on our list to help you decide, and once you do, why not check out our roundup of the best turntable accessories, too. Let’s go.
Derek Malcolm / Digital Trends
Best turntable overall
U-Turn Orbit Special (Gen 2)
Pros
- Excellent sound
- Dynamic Ortofon 2M Red cartridge
- New speed selection dial
- Solid acrylic platter
- Optional built-in preamp
- Seven finishes
Specification: Motor Belt drive Built-in preamp Yes, optional Wi-Fi No Cartridge Ortofon 2M Red, upgradable The original U-Turn Orbit Special was a really good turntable. I bought one in 2018, and it was one of my daily-use decks for years — it had an Ortofon 2M Red cartridge, a solid acrylic platter, and no-nonsense, simple belt-driven operation. But in 2023, U-Turn gave its entire Orbit lineup an update, and when I got my hands on the Gen 2 Special for review, all my gripes had been obliterated, landing it at the top of my list of favorite turntables.
The Gen 2 Orbit Special is still as reliable as ever, but the Woburn, Massachusetts company has made some key upgrades that make it a no-brainer for a mid-range turntable. Chief among them is a redesigned, quieter motor and a new tonearm that’s now a single pice of molded magnesium that reduces resonance and vibration transfer when compared to the first gen’s aluminum version. Additionally, the acrylic platter now has a machined groove around its edge to keep the belt in place (the old model used to fall off constantly), and there’s now an automatic speed selection dial — no more manual belt switching!
Assembly and setup is still simple (takes about 10 minutes out of the box), and while I would have liked to see the numbered counterweight dial like on U-Turn’s premium Orbit Theory make its way to the Special, adjusting it is still easy. However, I’d still recommend using a force scale gauge for simplicity.
Once it’s up and running, though, the U-Turn Orbit Special is a dream to use and punches above its weight when it comes to sound, which, thanks to the 2M Red, is crystal clear, balanced across the frequency range, and has depth and height favorable to all kinds of music. If you want to improve things even more, the Ortofon cartridge can be upgraded to the more premium 2M Blue, and you can get the turntable with or without a built-in phono preamp.
The second-gen Special is available in black, white, red, blue, and green, as well as in real oak or walnut finishes for an extra $170, but damn they look sharp.
U-Turn Orbit Special (Gen 2)
Best turntable overall
Audio-Technica
Best budget turntable
Audio-Technica AT-LP70X
Pros
- Great-sounding turntable
- Excellent quality for the price
- Upgradable, replaceable stylus
- Fully automatic operation
- Easy to set up and use
Cons
- Made of plastic
- Aluminum platter
- Nonadjustable feet
Specification: Motor Belt drive Built-in preamp Yes Wi-Fi Available Cartridge Audio-Technica AT-VM95C, upgradable stylus Operation Fully automatic Many a vinyl beginner has turned to Audio-Technica for their first turntables because the well-established company (they also make world-class headphones and microphones) produces reliable, easy to use, and affordable turntables for pretty much every level and budget.
At one time, the AT-LP60X sat in this sport as my pick for the best budget turntable, and to be clear, I still recommend it as another fantastic beginner turntable at just $150. But last year, Audio-Technica introduced the AT-LP70X, a slight evolution of the LP60X, and even though it’s slightly more expensive, it replaced my pick mainly for a few important reasons, but one main one.
First, the LP70X keeps all the great bones of the LP60X — easy automatic operation with push-button start and stop, built-in switchable phono preamp for multiple connection options no matter what your sound system is (powered speakers or full amp and speaker combos), and even a Bluetooth-capable model should you want it.
But where the extra money is well worth it is with the AT-LP70X’s newly designed AT-VM95C Integral Moving Magnet phono cartridge, which is not only a step-up in sound quality, soundstage, and dynamics from that of the LP60X, but A-T also created a whole new series of VM95 interchangeable styli that allow you to upgrade them as your vinyl-listening ear develops and you want more from your turntable.
For $200, the AT-LP70X offers great value and excellent performance, and could now potentially be the only turntable you’ll ever need, even if you graduate from beginner vinyl nerd status.
Audio-Technica AT-LP70X
Best budget turntable
Pro-Ject
The best mid-range turntable
Pro-Ject Debut Carbon Evo
Pros
- Warm, defined sound
- high-quality components for the money
- No more manual speed change
- Available in nine finishes
Specification: Motor Belt drive Built-in preamp No Wi-Fi No Cartridge Sumiko Rainier, upgradable If you’re just starting your turntable hunting you’ve likely already come across the Pro-Ject brand (heck, we mention two of them in our intro). The stalwart company is up there with Rega as a standout in the industry, its decorated Debut Carbon lineup has helped keep it there for more than a decade. Its latest version, the Debut Carbon Evo, doesn’t falter either, proving that you don’t need to spend a grand or more for high-end features.
Pro-Ject’s best-selling turntable model got a few key upgrades in this latest version that have put it over the top, including a redesigned motor with improved suspension, new height-adjustable sound-dampening aluminum feet, and a heavier 3.7-pound, steel platter with a thermoplastic dampening ring that Pro-Ject says reduces wow and flutter (tiny distortions that can be caused by vibrations and other factors). While I haven’t thoroughly reviewed this model myself, I’ve spent some time with it and can vouch for at least some of the sound quality and usability features that have garnered the many positive reviews it’s gotten over the years.
The best upgrade, though, is the addition of a new three-speed selector switch that has been discretely mounted on the underside of the plinth. Previously, you’d have to remove the platter to physically move the rubber belt underneath to switch between 33 and 45 RMP records. The new switch is a godsend, and also offers 78 RPM as well.
You also get the Evo’s single-piece carbon fiber tonearm, which looks cool and contributes to the turntable’s rich, balanced, and quiet sound, but not quite as much as its excellent, re-mounted Sumiko Rainier moving magnet (MM) cartridge, which is punchy, balanced, and full-bodied (like a good beer, I guess). Outside the U.S., the Evo comes with the also-great Ortofon 2M Red installed, but, if you’re at the stage where you’re experimenting with cartridges, you can easily swap them; it’s not hard.
The only obvious thing that the Pro-Ject Debut Carbon Evo doesn’t come with is a built-in phono preamp, so you will have to get one (unless you have one already). I really like the Schiit Mani 2 phono preamp, I have two of them and they sound great. You might think is a deal breaker, but I would argue that if you’re looking to up your entry-level game with a Carbon Evo, a good external phono preamp will be better than most built-ins if you can stomach the extra few hundred dollars.
The Debut Carbon Evo comes with a semi-balanced RCA cable and is available in nine colors and finishes.
Pro-Ject Debut Carbon Evo
The best mid-range turntable
Derek Malcolm/Digital Trends
Best features-for-price turntable
Fluance RT85N
Pros
- Full sound that stays true to the source
- Outstanding Nagaoka MP-110 cartridge
- Solid, anti-resonant build quality
- Fuss-free RPM speed control dial
- Automatic stop feature
Cons
- No built-in phono preamp
- No Bluetooth or USB connectivity
- Glossy finish prone to fingerprints
Specification: Motor Belt drive Built-in preamp Yes Wi-Fi No Cartridge Nagaoka MP-110, upgradable The midrange Fluance RT85N blew us away when I reviewed it last year for its more than reasonable $500 price, superb Nagaoka MP-110 cartridge, quality components, and rock-solid build, which, in my opinion, puts it neck-and-neck with the Pro-Ject Debut Evo as an even more affordable option that will do the job just as well.
The star of the RT85N is Nagaoka MP-110, which on its own is a $150 cartridge, but its sound is well regarded as being balanced, and forgiving of a wide range of music styles (it really likes older vinyl, too), with excellent separation between the lows, mids, and high frequencies. In my review, I said of the MP-110 that “vocals sound natural across the board, while the highs stay sharp and clean with a marked reduction in sibilance when compared to cheaper cartridges.” All that and, if you wanted to, you could easily switch out the MP-110 for another cartridge of your choosing, making the RT85N upgradeable and future-proof.
Helping that Nagaoka cartridge do its thing is all the anti-resonance happening in the RT85N. The thing is a beast at 17.7 pounds, much of that accounted for in its solid MDF plinth. A 0.62-inch (16mm) thick, high-density clear acrylic platter also helps dampen vibrations, along with its aluminum S-shaped tonearm, and adjustable rubber isolation feet, making the RT85N “one of the quietest, most stable turntables I’ve tested,” my review says.
There’s no Bluetooth or USB connectivity here, and like the Debut Evo, the RT85N does not have a built-in preamp, but they tend to not sound great anyway, so if you’re moving up from a budget or entry-level deck, you’re probably better off exploring the word of phono preamps now anyway. The RT85N also has a handy auto-stop feature for those who like to putter around the house while listening to records — it automatically stops at the end of the record, which also saves wear and tear on the stylus.
Setting up the RTN85 is pretty easy, too. Everything you need is in the box, and the instructions are clear. Setup should only take you about 10 or 15 minutes, but in case you’re expecting to plug it in and go, there is a higher level of precision required with turntables compared to cheaper decks — it’s not a bad thing for you to learn how to attach a headshell and balance a tonearm, and the sweet sounds you’ll get will make it all worth it.
Fluance RT85N
Best features-for-price turntable
Derek Malcolm/Digital Trends
Best turnable around $1,000
U-Turn Orbit Theory
Pros
- Ortofon 2M Blue or Bronze cartridge
- New antiresonant tonearm design
- Easy to set up
- Electronic speed switch dial
- Built-in preamp option
- Fantastic sound for price
Cons
- Only two finish options
- No auto stop
Specification: Motor Belt drive Built-in preamp Yes, optional Wi-Fi No Cartridge Ortofon 2M Blue or Bronze, upgradeable As a long-time owner and fan of the original U-Turn Orbit Custom, when I finally got my hands on the Woburn, Massachusetts company’s first foray into the premium turntable realm, I was pretty excited. I’ve always liked U-Turn’s scrappy spirit and that it offers high-quality turntables that are a little different than the big players for a reasonable price. The Orbit Theory is easily U-Turn’s best turntable yet, and a fantastic next step for vinyl enthusiasts ready to jump up out of the mid-range.
The rethought Orbit Theory is a strikingly beautiful, hardwood-based turntable that comes in walnut and a new black Ebonized Oak finish. But it’s not just easy on the eyes. Building off of the 10-year lineage of the Orbit brand, the upgrades are substantial, including a newly developed molded magnesium tonearm that combines the headshell, arm tube, and pivot housing in one to reduce resonance. The belt drive system is all-new as well. It’s more powerful, has a new silicone belt that runs in a machined groove around the side of the platter, and it gets up to speed faster. Plus, I can confirm that it’s virtually silent. And, my favorite part is that U-Turn has finally added a speed switch — no more manual belt changing between 33 and 45 RMP. A set of three anti-resonant and height-adjustable feet are also new to the Theory, further solidifying its quiet properties.
But where we start getting into the real premium territory with the Orbit Theory is with its choice of two excellent cartridges from world-class cartridge makers, Ortofon: the 2M Blue (which comes with the base-model Theory at $999) and the even better 2M Bronze that adds $180 to the price. Either way, you’re laughing with how good these cartridges are — they consistently produce big, brilliant, and stable sound that is forgiving for all kinds of music and you can’t go wrong with either. If you do go for the Bronze, you add even more opportunity to upgrade further, as the Bronze’s cartridge is compatible with two of Ortofon’s best styluses, the Black ($575) and Black LVB ($800), pushing you into audiophile territory, should you like.
In true U-Turn fashion, the Orbit Theory is customizable and ranges from $999 with the 2M Blue and without a built-in preamp to the top-of-the-line at $1,249 with the preamp and the 2M Bronze. Whichever way you configure it, the Orbit Theory is an excellent turntable, worthy of our Editor’s Choice pick.
U-Turn Orbit Theory
Best turnable around $1,000
Rega
Best audiophile turntable
Rega Planar 3
Pros
- Uncompromising quality
- Best-in-class tonearm
- Choice of two high-quality cartridges
- Bright, full, detailed sound
Cons
- Can get expensive
- Only available in three colors
Specification: Motor Belt drive Built-in preamp No Wi-Fi No Cartridge Elys 2 MM or Ortofon 2M Blue, or no cartridge Many turntable nerds count the Rega Planar 3 as the pinnacle, their Holy Grail turntable; the one they’d get if they found a wad of cash in the couch cushions. And they wouldn’t be wrong. The Rega name is often the first that comes to mind when you think of audiophile turntables and gear (the Planar 3, while excellent, is actually their mid-range), and the Planar 3 is arguably their most popular, for its reachable price and legendary quality.
With 40 years under its belt, the Planar 3’s lightweight, anti-resonant plinth was the mold for many modern turntables that have come after (including several on this list). It’s, of course, come a long way since then, having undergone several iterations and upgrades, and it’s this design expertise that few can compete with. The current Planar 3 features the latest version of their iconic RB330 tonearm that offers amazing balance, stability, and industry-leading anti-resonance. It’s a belt-driven turntable, of course, with a new 24-volt low-vibration motor that’s nearly silent and that drives the Planar 3’s eye-catching glass platter.
While there is no built-in preamp (turntables at this level rarely have them) and no speed selector switch, when coupled with the Rega Neo power supply, you can bypass the finicky manual belt switching and get precise 33 or 45 RMP speed control with a button push.
The Planar 3 comes in a few different configurations, including on its own without a cartridge that runs around $1,125, with Rega’s own outstanding Elys 2 MM cartridge ($1,395), and another with the also excellent Ortofon 2M Blue ($1,364). You can, of course, upgrade to a multitude of other cartridges out there, too. The turntable is as quiet as it gets, sounds gorgeous, and looks it too. Rega also does a good job at making the Planar 3 customizable with upgradeable parts, such as belts, platters, and more. The Rega Planar 3 is available in three glossy finishes: black, white, and red.
Rega Planar 3
Best audiophile turntable
Audio-Technica
Best turntable for DJs
Audio-Technica AT-LP140XP
Pros
- Rock-solid build
- Heavy and stable
- Affordable
- Instant speed, pitch control
Specification: Motor Direct drive Built-in preamp No Wi-Fi No Cartridge AT-XP3 DJ cartridge, upgradable All the turntables on our list, so far, have been belt-drive turntables, which are best for most people because of their simple operation and the fact that they tend to be quieter because the motors that spin are usually off to the side and do not directly contact the platter.
Direct drive turntables, however, are a different beast, as their motors usually sit directly under the platter and often drive them, er, directly. While there is much debate over which is better, DJs favor direct drive decks because they can get up to speed almost instantly, can spin records in both directions without damaging the motor, and often have tempo control sliders for mixing.
One of, if not the best DJ turntables ever made, is arguably the Technics SL-1200, but they are hard to come by and even the new versions of them can get expensive. Enter Audio-Technica, whose SL-1200-inspired LP140XP direct-drive turntable is tailor-made for DJs, but at a way more manageable $500 price.
Similar to Audio-Technica’s massively popular AT-LP120, the LP140XP is a beast of a 22-pound turntable that is stable as hell with four sure-footed adjustable feet and a die-cast aluminum platter that is damped underneath with a dense, felt-like material for anti-resonance. Where the LP140XP differs from its LP120 cousin is that it does not come with a built-in phono preamp (most DJs will have some form of amplification anyway), and it trades out the standard workhorse AT-VM95E cartridge for the hotter, more DJ-friendly AT-XP3 cartridge instead. The headshell comes pre-mounted, so all you have to do is balance the tonearm with the included instructions and you’ll be spinning in no time. A-T’s solid anti-skate mechanism is here, too, to keep the stylus tracking in the groove properly.
Speaking of spinning, the DJ controls include a pitch-control slider, pitch lock, forward/reverse buttons, and the classic pop-up platter strobe light. It doesn’t have Bluetooth or USB connectivity (for that look to the LP120XBT-USB), but the AT-LP140XP will spin at 33, 45, and 78 RPM, and is an easy-to-use, straightforward DJ’s dream.
Audio-Technica AT-LP140XP
Best turntable for DJs
Derek Malcolm/Digital Trends
Best for Sonos integration
Victrola Stream Carbon
Pros
- Sound is excellent
- Quality Ortofon 2M Red cartridge
- Easy wireless setup
- Connects to any Sonos in your house
- Big, universal volume dial
- Clean, modern look
Cons
- Expensive
- Basic app
- Motor is a bit noisy
Specification: Motor Belt drive Built-in preamp Yes Wi-Fi Yes, Works with Sonos certified Cartridge Ortofon 2M Red, upgradable Sonos makes some of the finest network music streaming speakers and audio products out there. And whether you’ve already invested your hard-earned cash into one or two Sonos speakers or a whole-home Sonos setup, it makes sense that if you’re going to start getting in to vinyl that you might want to utilize those speakers, if you can, instead of shelling out for a whole new sound system.
There are several ways to integrate a turntable with a Sonos system, but Victrola is one of the first companies to come forth with a “Works with Sonos” certified turntable that can connect directly to any Sonos speaker or system without the use of another Sonos connectivity product like the Port, Amp, or one of Sonos’ line-in speakers like the Era lineup. And it’s dead simple for pretty much anyone.
The Victrola Stream Carbon (there’s also a slightly cheaper version, the Stream Onyx) is a modern-looking, solidly built turntable (it weighs a stable 13 pounds) with some high-end components, such as its Ortofon 2M Red cartridge, dense MDF plinth, cast aluminum platter, and anti-resonant carbon fiber tonearm. It has a built-in analog-to-digital converter that translates the analog signal from your records into a 24-bit/48kHz digital signal that sounds sweet when streamed out over your Sonos system.
Setup is easy with the bare-bones, but functional Victrola Stream app, and once the turntable is connected, all the rest is done via the easy-to-use Sonos app. Simply choose the speakers or groups of speakers you want your record to play on. The Stream Carbon can also be played through a traditional analog setup, like a receiver and set of passive speakers.
Victrola Stream Carbon
Best for Sonos integration
Frequently Asked Questions
How we test turntables and record players
Like many things we review at Digital Trends, we test turntables and record players from differing points of view — those with little experience with the tech and those familiar with it — so we can relay the details in a way that’s meaningful to both. From unboxing and setup to explaining all its features, we use each turntable we get just as you would, by using and evaluating everything it can do and how easy and fun/frustrating it is to do it. We do this all while playing a lot of records to examine the most important thing: how it sounds. We play a wide range of music to test out the lows, mids, highs, and everything in-between, while listening for clarity, distortion, soundstage, and any anomalies that might appear.
Check out our full rundown on how we test turntables.
What’s the difference between a belt-drive and direct-drive turntable?
A belt-driven turntable uses a thin rubber or silicone belt that is wrapped around the platter (either on the outside edge or underneath, for example) that is, in turn, wrapped around a spindle connected to a motor that is usually set off to the side of the platter. A direct-drive turntable’s motor usually sits directly beneath the platter and the two are, er, directly connected. There are advantages and disadvantages to both.
Belt-drive turntables tend to be preferred by audiophiles because, due to the offset and isolated nature of the motor and the use of the rubber belt, vibrations and resonance are kept to a minimum, therefore they are much quieter. Direct-drive turntables, on the other hand, are preferred by DJs because the platter’s direct connection to the motor means they can get up to speed much quicker. Because there’s no belt getting in the way, direct-drive decks can also be played backwards, stopped more easily, and are generally more forgiving of all the cueing and syncing uses of DJs. The trade-off is that the vibrations from the motor can be directly transferred to the cartridge and hence through the audio system.
Are Bluetooth turntables any good?
Yes, they can be. Without getting too into the weeds about hi-res audio and Bluetooth codecs, a turntable streaming music over Bluetooth to a Bluetooth speaker or set of headphones must do two things. First, it must convert the analog sound form the record’s grooves into a digital signal and then it must compress that signal to a reasonable amount of information that can be sent wirelessly over Bluetooth.
Often, this can strip music of some of its detail and resolution, and some vinyl purists think that this defeats the whole purpose of vinyl records, which typically have excellent audio fidelity. Will most people notice? No. Will most people care? Also no. As long as it sounds good to you, that’s all that matters.
There are, however, Bluetooth codecs, such as Qualcomm’s aptX HD, that are allowing for much better sound quality over Bluetooth, making it a better experience and more convenient option. This also has its caveats, though. For this to work, both the turntable and the receiving Bluetooth speaker must support the aptX HD codec.
Alternatively, a Wi-Fi or LAN network-based system, such as Sonos with a compatible turntable (see the Stream Carbon turntable above), can convert vinyl records at a much higher sound quality than Bluetooth and can stream much higher amounts of digital data for high-resolution sound.
What is a phono preamp and do I need one?
A phono preamp (also known as a phono stage) can be either an internal component in a turntable or an external unit that a turntable is connected to. Either way, it’s job is to take the generally weak signal that comes from a turntable’s stylus (needle) and cartridge and prepare it to be amplified by either a receiver, integrated amplifier, powered speaker, or other amplification device.
Many modern turntables come with phono preamps built-in, generally giving users everything they need to get their records amplified and booming out a pair of speakers. However, some built-in phono preamps (especially those in budget turntables) aren’t very good, and many higher-end turntables still do not even have preamps built-in. For these reasons, you may need to purchase an external phono preamp. And that’s not necessarily a bad thing, as adding an external phono stage is a great way to improve the stability and sound quality of your turntable’s signal, so you might want to consider it.
And if you happen to have a receiver or amplifier that has a phono input, that will act as your preamp, so you don’t need one if you like how it sounds. You can always opt to use a phono stage anyway and connect through the amp’s AUX input, like many people do.