It’s Friday, and the weekend is knocking at the door! You’re likely excited about your plans—maybe hitting a local concert or meeting up with friends. If you prefer staying in, you might be looking forward to binge-watching a favorite sitcom, diving into a fantasy book, or playing Call of Duty: Black Ops 6 on your console.While all the things we mentioned are great for unwinding after a busy week, another exciting option is scoring massive savings on a new phone, tablet, smartwatch, or pair of headphones.
Yep, that’s right! It’s time for PhoneArena’s Weekly Deals Roundup, a quick overview of the best mobile tech offers we found this week. Be sure to act fast and take advantage of the promo that catches your eye, as you never know when these amazing deals might expire. So, let’s not waste time and check out the top deals this week!
Here are the top three deals of the week!
Google Pixel Tablet 256GB: Save $120!
$120 off (24%)
The Pixel Tablet without a charging speaker dock is now on sale for $120 off its price. Thanks to this, you can grab one with 256GB of storage for just under $380. The tablet delivers smooth performance and offers great value. Save while the offer lasts!
Buy at Amazon
Pixel 9 Pro 128GB: Save $200!
$200 off (20%)
Grab the powerful Pixel 9 Pro with 128GB of storage for $200 off its price. The phone delivers incredible performance thanks to its high-end Tensor G4 chipset and 16GB of RAM. Additionally, takes gorgeous photos and comes with a plethora of AI-powered features. Act fast and save today!
Buy at Amazon
Save $130 on the Galaxy Watch 7, 40mm
$169 99
$299 99
$130 off (43%)
The Galaxy Watch 7 is an epic bargain in its smaller 40mm variant. Currently, Woot lets you buy the timepiece with Bluetooth connectivity in Cream for only $169.99, saving you an epic $130. The smartwatch comes with a 90-day warranty. This promo won’t last for long, so act fast.
Buy at Woot
If you’re looking for an unmissable promo on a capable slate, Amazon’s deal on the Pixel Tablet is definitely worth considering. The retailer has discounted the device by $120, allowing you to grab the 256GB model for just under $380. However, this is the version without the charging speaker dock.Those in the market for a new high-end phone can score the powerful Pixel 9 Pro with 128GB of storage for $200 off. That’s an incredible offer, as this sleek device is among the best smartphones on the market, delivering fast performance with its Tensor G4 chipset and 16GB of RAM.On the other hand, Galaxy users wanting to score a new smartwatch at a fantastic discount can get the 40mm Galaxy Watch 7 for just $169.99 at Woot. That’s a whopping $130 off the watch’s usual price of around $300.
Be sure to check out these unmissable phone offers, too!
Motorola Razr+ (2024): Now a whopping $420 OFF!
$420 off (42%)
The sleek Motorola Razr+ (2024) is now on sale at a bonkers $420 discount, allowing you to score one for just under $580! This is an insanely-good deal, as the phone usually goes for around $1,000. Don’t hesitate, as this bad boy delivers fast performance, takes beautiful photos and is a steal right now!
Buy at Amazon
The Moto G Power 5G (2024) is 40% off at Amazon
$120 off (40%)
The budget Moto G Power 5G (2024) is on sale for $120 off on Amazon, allowing you to grab one for just below the $180 mark. This is a great price, as the phone delivers decent performance and has great battery life. Don’t miss out—score one at a bargain price now!
Buy at Amazon
Google Pixel 8a 128GB: Save $100!
$100 off (20%)
Get the 128GB version of the capable Pixel 8a at a $100 discount on Amazon. The phone boasts top-tier performance thanks to its powerful Tensor G3 chipset. In addition, it takes gorgeous photos, rocking a 64 MP main camera. It’s a true bargain at its current price, so don’t hesitate and save now!
Buy at Amazon
Pixel 7 Pro 512GB: Save $700 at Woot!
$399 99
$1099 99
$700 off (64%)
Grab the Pixel 7 Pro with 512GB of storage $700 off at Woot and score a unit for just under $400! The phone is worth every penny, offering top-tier performance, a gorgeous display and incredible camera capabilities. Don’t miss out—grab one at a bargain price now!
Buy at Woot
Galaxy S24+ 512GB: Save $271 on Amazon!
$271 off (24%)
Grab the Galaxy S24+ with 512GB of storage at a generous $271 discount at Amazon. The phone offers top-notch performance thanks to its powerful Snapdragon 8 Gen 3 chipset. What’s more, it takes beautiful photos and has great battery life. Don’t miss out and score one at an unbeatable price today!
Buy at Amazon
This week, we have awesome deals on phones from Motorola, Google, and Samsung. The sleek Motorola Razr+ (2024) is an absolute steal at $420 off on Amazon. Those on a budget can score the affordable Moto G Power 5G (2024) at a sweet $120 discount.
Pixel fans can get the Pixel 8a 128GB for $100 off. However, if rocking an older phone isn’t an issue, the Pixel 7 Pro with 512GB of storage is a bargain at a whopping $700 off at Woot.
As for those on team Samsung, they can score the Galaxy S24+ with 512GB of storage at a jaw-dropping $271 discount on Amazon!
Here are a few sweet tablet promos as well
Galaxy Tab S9 FE+ 128GB: Save $150!
$150 off (25%)
Save a whopping $150 on the Galaxy Tab S9 FE+ with 128GB of storage and score one of the best mid-range tablets on the market for just under $450. The tablet offers fast performance thanks to its capable Exynos 1380 chipset. In addition, its 12.4-inch display offers a great watching experience. Act fast and save while this limited-time deal lasts!
Buy at Amazon
Lenovo Tab P12: Save 22% on Amazon!
$80 off (22%)
The Lenovo Tab P12 is discounted by $80 on Amazon and can be yours for just under $280. The slate offers decent performance and features a large screen, making it a top choice for entertainment on a budget. So, act fast and score one at a sweet discount now!
Buy at Amazon
Save $300 on the Galaxy Tab S9+ at Best Buy
$699 99
$999 99
$300 off (30%)
Looking to buy a brand-new Galaxy Tab S9+ model without breaking the bank? Pick Best Buy’s ongoing sale that lets you save $300 on the 256GB model. The device has been offered at that price for some time, meaning the deal could expire soon.
Buy at BestBuy
The Wi-Fi+cellular iPad 10th Gen is now $100 off!
$100 off (20%)
If you’re looking for an affordable iPad model with 5G on deck, the iPad 10th Gen should be on your radar. The unit in Blue with 64GB is $100 off at Amazon right now, making it a lovely pick.
Buy at Amazon
Microsoft Surface Pro (2024) 16GB/256GB: Save $217!
$217 off (22%)
Get the Microsoft Surface Pro (2024) with a Snapdragon X Plus processor, 16GB of RAM, and 256GB of storage. This tablet is perfect for work and is the one to get if you want a more PC-like experience. Act fast and save!
Buy at Amazon
In addition to awesome phone deals, we have found unmissable offers on tablets from top brands like Samsung, Lenovo, Apple, and Microsoft!
You can save $150 on the Samsung Galaxy Tab S9 FE+ 128GB, making it one of the best mid-range tablets on the market for just under $450.
For those on a budget, the Lenovo Tab P12 is now selling for just under $280, saving you $80. This tablet offers decent performance and a large screen, making it great for entertainment.If you’re looking for a high-end slate at a bargain price, the Samsung Galaxy Tab S9+ 256GB is available for $300 off at Best Buy, bringing the price down to $699.99.
Apple fans can get the LTE-enabled iPad 10th Gen with 64GB of storage for $100 off at Amazon. And for those wanting a workhorse tablet with a PC-like experience, the Microsoft Surface Pro (2024) is now on sale for $217 off. This model comes with a Snapdragon X Plus processor, 16GB of RAM, and 256GB of storage.
Score a stylish smartwatch at a discounted price while you’re at it
Garmin Vivoactive 5: Now $71 off at Amazon
$71 off (24%)
The Garmin Vivoactive 5 in Navy has received its first substantial discount of 2025. At the time of writing, Amazon sells the unit in that particular coating for $71 off, making it a must-have. This is a feature-rich smartwatch, so we encourage you to act quickly and score one for less now!
Buy at Amazon
Galaxy Watch 4 (40mm): Now for just under $100!
$99 99
$249 99
$150 off (60%)
The Galaxy Watch 4 can now be yours for just under $100, making it an absolute steal. True, it’s an older device, but it still offers a plethora of features and is a top choice for Galaxy users on a budget. Don’t miss out, as this offer likely won’t be available for long!
Buy at Woot
Galaxy Watch Ultra: Save a whopping $230!
$419 99
$649 99
$230 off (35%)
The best Samsung smartwatch right now, the Galaxy Watch Ultra, is available for a whopping $230 off at Samsung—no trade-in required. Just tap the button below and select the option to purchase the smartwatch without a trade-in once you’re on Samsung.com. Act quickly, though—it would be a shame to miss this chance to save big on the best Galaxy Watch!
Buy at Samsung
Pixel Watch 3 41mm, Wi-Fi: Save $50!
$50 off (14%)
Amazon has knocked $50 off the Wi-Fi model of the Pixel Watch 3. This deal applies to the 41mm variant, but the 45mm version is also available at the same discount—at least for now. Packed with features and offering great value, this smartwatch is a steal, so grab yours while the deal lasts!
Buy at Amazon
If you already have a fancy phone and don’t need a new tablet but are looking for a new smartwatch instead, be sure to take advantage of one or more of this week’s top smartwatch offers.
You can save $71 on the feature-rich Garmin Vivoactive 5 in Navy and score this bad boy at its first major discount of 2025. If you’re on a budget, the Galaxy Watch 4 (40mm) is a steal at just under $100. Despite being an older model, it still offers plenty of features, so don’t be quick to dismiss this deal.
For those seeking the best Samsung smartwatch, the Galaxy Watch Ultra is now $230 off on Samsung.com, and no trade-in is required. On the other hand, Pixel users can score the best Google watch, the Pixel Watch 3, for $50 off on Amazon.
Enhance your listening experience on the cheap with these awesome deals!
Sennheiser CX Plus: 69% off their original price
$54 99
$179 99
$125 off (69%)
Woot is selling the Sennheiser CX Plus at an unbeatable $125 discount. That returns them to a dirt-cheap price of only $54.99. The promo will only stay for another four days or less, so act fast.
Buy at Woot
Galaxy Buds FE (Graphite): 50% off at Woot
$49 99
$99 99
$50 off (50%)
Woot sells a brand-new pair of the affordable Galaxy Buds FE for 50% off their original price. That makes them an absolute must-have for Samsung phone users on a tight budget. The wireless earbuds come with a 90-day Woot Limited warranty.
Buy at Woot
Sony WH-1000XM5: Save $74 at Walmart!
$289 90
$363 99
$74 off (20%)
Get the Sony WH-1000XM5 at Walmart and save $74 in the process. The headphones rank among the best on the market, delivering top-quality sound and incredible ANC. Don’t hesitate and score a pair for just under $290 now!
Buy at Walmart
Sony LinkBuds S: Save 36% at Amazon!
$72 off (36%)
The Sony LinkBuds S are back to their Black Friday 2024 price. You can buy these buddies for 36% off their original price on Amazon. Get a pair and enjoy premium sound and noise cancellation at a discount.
Buy at Amazon
This week, you can score some incredible deals on high-quality earbuds and headphones, enhancing your listening experience on the cheap.
For instance, at Woot, the Sennheiser CX Plus is now available for just $54.99—a jaw-dropping $125 discount that’s too good to miss. Samsung fans can also take advantage of a 50% price cut on the affordable Galaxy Buds FE in Graphite, bringing the price down to $49.99.
Over at Walmart, the top-rated Sony WH-1000XM5 headphones are now $74 off, letting you score these flagship cans for just under $290. And on Amazon, the Sony LinkBuds S with AirPods-level ANC are back to their Black Friday price.
Yoto Mini is a tiny, pocketable music player for kids and toddlers that shuns screens. While staying kid-friendly, it adds a surprising amount of tech for endless entertainment.
As music lovers, we want our children to experience it as we did. But options are a bit limited.
You can go with a smart speaker, but that isn’t easily controllable for little ones. You can go vintage with a cassette or CD player to stay more low-tech, but they’re breakable and also not kid-friendly.
The two common choices are music players designed for kids or parents just giving kids their phones. The Yoto Mini fits more into the former.
There’s no touchscreen. No ads. No camera. No mic. Just a simple, small, music player designed for kids of all ages.
Yoto Mini review: Music player design
The Yoto Mini is a tiny box, roughly two and a half by two and a half inches square. There’s a speaker in the lower-left corner, a small pixelated screen, and two controls.
Users twist the large, easily grabbed knobs to control the playback. The left one adjusts the volume while the right navigates through the tracks.
There’s also a power button on the right side to turn it off. On the left, there is a 3.5mm headphone jack for connecting wired headphones.
It charges up over USB-C and a color-matched orange USB cable is included in the box. More on this in a few.
Yoto Mini review: The Yoto Mini is very durable, even with grubby kiddo hands
The way it works is you insert one of the Yoto cards into the top slot. The box reads an NFC chip embedded in the card.
Your Yoto Mini will then recognize the card and start downloading the playlist of tracks from the Yoto servers via Wi-Fi. The box has a total of 32GB of storage available on it.
Yoto Mini review: App control and settings
Setup, as well as checking the status, is all done in the Yoto app. You’ll want to have it because aside from adjusting settings, it also is home to plenty of free content.
Yoto Mini review: Playing Queen on the Yoto Mini, adding various content and timers to our library, and our library of Yoto cards
Yoto offers stories, songs, white noise, and more that you can play from the app to the player. There are also various timers, which is a nice touch.
These timers can be for homework for brushing teeth and play sounds, music, or stories for that duration.
Yoto Mini review: There are a lot of settings to tinker with in the Yoto app
Outside of setup and free content, you can also see your library. It’s broken down between your playlists, your purchased cards, sleep sounds, podcasts, and radio.
Podcasts are added via RSS feeds and there are almost two dozen radio stations that can be tuned into too. The Now Playing screen has music controls, volume, and a sleep timer.
When you dig into settings, you’ll be shocked at how much control you have over such a little player. Yoto has gotten very granular.
For example, you can set up completely separate day and night profiles for the player. You can choose when they go into effect, the display brightness, the volume limit, and even the button shortcuts.
Advanced settings let you adjust the battery-saver timer, auto-off timer, Bluetooth pairing, headphone volume limit, and more.
Yoto Mini review: Playing music and stories
Similar to how the popular Tonie box works via NFC and little hand-painted characters, the Yoto Mini works with NFC plastic cards. They’re credit card-sized with fun artwork on the front and color-coded on the back based on if they’re stories or music.
Every kid is going to be different. Whether they connect with stories or music and then the various genres within each of those.
It’s important for Yoto to have a fairly massive library for buyers to choose from. Without content, it makes it a lot harder to convince people to buy into the ecosystem.
Not only that, but the cards have to be a recurring source of revenue versus the one-time purchase of the boxes themselves.
After several months with the Yoto Mini and multiple new card purchases, we’re both impressed and underwhelmed at the same time.
Our test subject, Harrison, was much more interested in the music cards. While he loves reading books, he doesn’t have the desire to sit through a book or story being read to him via a speaker.
Yoto Mini review: Just some of the Yoto cards we have on hand
So most all the cards we listen to are the music ones and Yoto offers a diverse selection from Queen, to Sesame Street, to Disney.
There are also a lot of other cards, possibly produced by Yoto, that were just collections of songs, nursery rhymes, or covers of popular songs.
The issue we ran into was there weren’t many actual artists. You have Elton John Diamonds, Spice Girls’ greatest hits, Queen Vol. 1, Beatles 1962-1966, and Beatles 1967-1970.
It would seem there are a lot of other widely popular musicians out there that would be perfect here. Even of the ones available, we wish that there was an option for a Queen Vol. 2 or a third Beatles card.
Harrison’s favorite cards have so far been the first volume of Beatles, the Queen card, and Elmo. Quite the selections!
We’re sure this catalog will grow and it has to be hard for Yoto to nail down licensing for bigger artists, but we’re crossing all our fingers that they do.
Yoto Mini review: Tinker, tinker, tinker…
One of the things that drew us to the Yoto Mini was, on one hand, it’s decidedly low-tech. Yet on the other, it was ripe for tinkering.
It’s a Bluetooth speaker with an NFC reader that can download tracks from the internet. We had to see what we could do with it.
Yoto Mini review: We created playlists for Elvis songs and our own cards
Yoto does offer blank cards where you can create your own. This is a great starting point.
We took some of our own music, like a bunch of Elvis songs, and created a playlist with them through the app. We saved the songs on our Mac into iCloud, then opened them from the Files app via the Yoto app.
Just like that, we had a custom card with our own music on it. To go further, we found out you could create your own graphics for the tracks.
Yoto Mini review: We used Yotoicons to create graphics for our playlists
We played around making some low-res artwork in Affinity Photo, which worked well enough. Not long after, we ended up stumbling on a whole website dedicated to already-created Yoto icons.
This made our card look even better when Harrison played it. But we were sure we could do more…
Buying the blank cards from Yoto was $14.99 for a five-pack. Since they just seemed to be NFC cards, we wondered what would prevent us from buying generic blank NFC cards and programming them ourselves.
After a bit of research, we found some compatible cards on Amazon that we snatched up for $8.99. And that was for a 10-pack — less than a dollar per card.
They weren’t as easy as we hoped to create, but using NFC Tools and some Google knowledge, we got there. We created additional blank cards with us talking, more songs, and anything else we wanted.
In reality, this was way too much work. It’s not feasible for your average person to do this, but for a techy bunch like us, it was just a fun experiment to see if we could, not necessarily that we should.
Still, if you want to experiment with yourself or even something to try with your older kid, it may be worth learning some new skills.
Yoto Mini review: Durability and playtime
We can wholeheartedly confirm that our tester has put the Yoto Mini through its paces. It has been tossed, dragged, kicked, and dropped.
Repeatedly.
It has largely faired extremely well. There are two failure points that we’ve isolated though in our testing.
Yoto Mini review: The USB port is one of the few points of failure for this box
First is the USB-C port. Having an exposed port on a child’s toy should be a no-no.
Dirt, dust, debris, food, and who knows what else can easily get on this port as children aren’t particularly known for their cleanliness. Shockingly, Harrison did not damage the port.
It ended up breaking on its own after a couple of months of use just when being plugged in. We could see with a flashlight that the pins on the inside of the port had gotten bent and when plugging it in to charge, it pushed them back more until it no longer drew power.
For the next iteration of the Yoto box, we implore them to go with something like Qi2 on the bottom. According to our power meter, the Yoto Mini only draws 5W of power so Qi2 would easily be enough.
Plus, the magnetic alignment would make it more kid-friendly. And of course, you’d have one less point of failure.
Yoto did replace the box under warranty and we’ve had no issues with the second one.
Yoto Mini review: The edges of the cards have started to peel up after lots of use
The second issue we saw was with the cards themselves. They are plastic cards with the artwork on the front and colors on the back.
They aren’t printed directly onto the card, but are some sort of matte lamination. After copious use, the artwork is starting to peel off the cards for us.
Maybe this is just superficial and obviously wouldn’t impact playback at all, but if they all peel off, we’ll have to start labeling the blank cards with Sharpie.
Yoto Mini review: Big versus small
Aside from the Yoto Mini, there is also a full-sized Yoto player. Besides just being bigger, it has a few other benefits to it.
The larger size allows for louder, stereo sound versus mono. It can also be used as a nightlight with a soft glow around the screen when tilted.
Yoto Mini review: The full size Yoto box
It has longer battery life, up to 24 hours, and even supports wireless charging. As an extra touch, it can monitor room temperature, which some parents may like to use.
In our testing, the larger model just felt awkward. Perhaps it’s better suited for even older children, but Harrison was never drawn to it like the mini.
It’s hard to carry around and is much better placed in a fixed position. It would be perfectly at home on a nightstand or bookshelf.
For older kids who want a nightstand speaker that they can use as Bluetooth output, a nightlight, and a way to listen to stories, the big one does great.
Yoto Mini review: The small and full size Yoto players
But for any kid who wants to run around with it, take it with them, play outside with it, or otherwise just not leave it in their bedroom, the Yoto Mini wins out. Plus, it’s cheaper.
Yoto Mini review: Should you buy the Yoto Mini?
Yes. The answer to the question “should I buy the Yoto Mini?” is an emphatic “yes.”
It has been the single most-used item that Harrison has owned. We’re aware that it won’t resonate with every child the same way, but it’s got a wide enough appeal that there’s a good chance they’ll like either.
Maybe it’s a good way to record yourself reading stories for when you’re out of town or maybe it’s a way for your kiddo to wind down at the end of the day, or maybe something to keep them busy in the car.
There are a lot of uses for it, as well as a ton of content. All the purchasable cards, the “create your own” cards, or the free content on the app.
We’ve started getting into the little “Yoto Daily” broadcast too that plays when you turn it on without a card.
Yoto Mini review: The Yoto Mini is fun, versatile, and screen-free
Wireless charging would make this better, but that’s not a strong enough reason to put off buying one. Maybe just a chance to upgrade should a new model ever launch.
In a world where a lot of time is spent watching habit-forming television, this little box has brought so much joy. It’s durable, fun, and can be educational to boot.
Yoto Mini review: Pros
Lengthy, 14-hour battery life
Can be used as Bluetooth speaker
Durable and easy to use for toddlers
Expansive catalog of music, stories, & licensed content
Cheaper and more portable than larger model
Fun to tinker with when making your own cards
Yoto Mini review: Cons
Even more licensed music should be added
USB-C port can be damaged
Yoto Mini review: 4.5 out of 5
Where to buy Yoto Mini
You can find the Yoto Mini on Amazon for $62.99, as well as various other accessories like lanyards, headphones, and silicone covers.
By default, iCloud data is secure while in transit. This data is stored in an encrypted format, while the encryption keys are housed in Apple data centers. 15 particularly sensitive data types, like passwords, Health data, and Journal data, use end-to-end encryption as standard. This sensitive data is encrypted with keys derived from your devices and device passcode, which are only accessible by the end user, and thus this data remains secure even in the case of a data breach in the cloud.
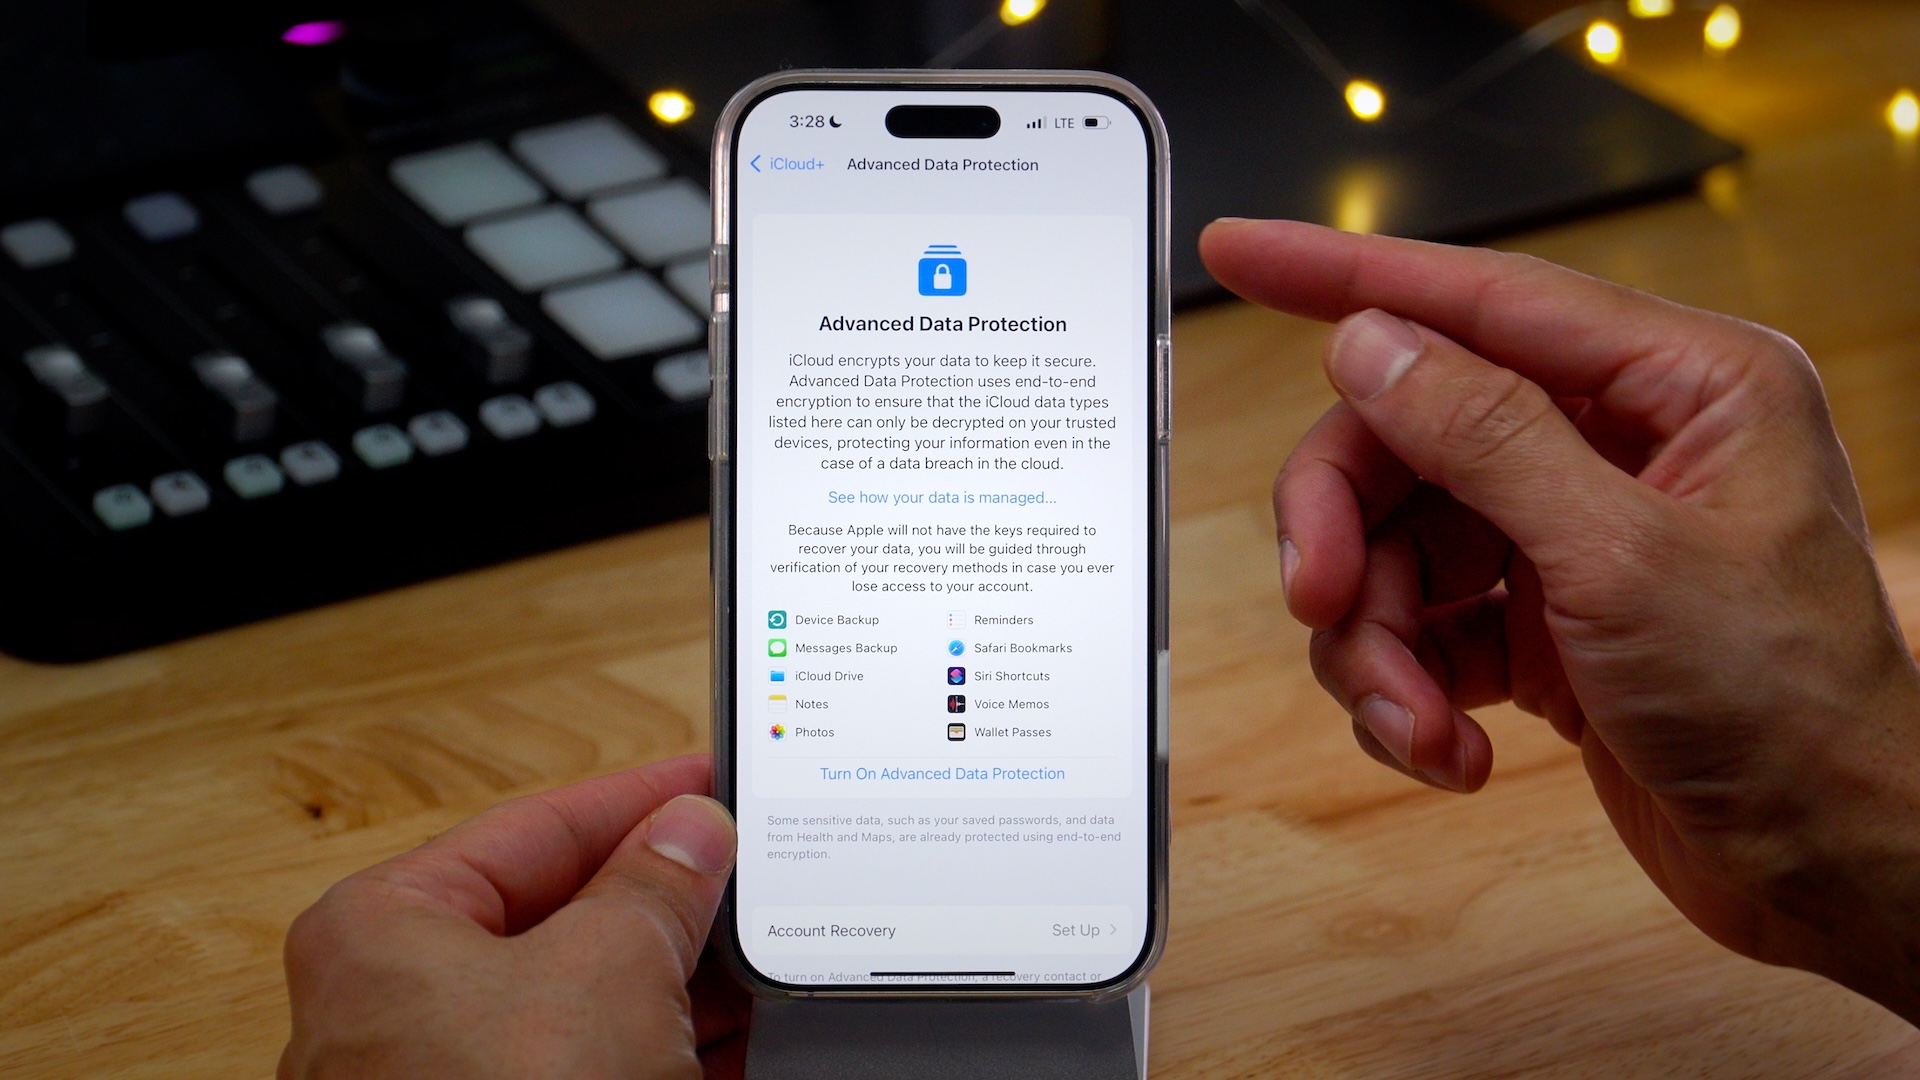
Advanced Data Protection, which is opt-in, provides end-to-end encryption for 10 additional iCloud data categories like Photos, Notes, and Reminders, meaning that Apple no longer possesses the keys to decrypt these categories as well.
It’s been couple of years since Advanced Data Protection rolled out. Are you using it? If not, should you consider using it? In this full tutorial and video walkthrough, I discuss what Advanced Data Protection is, how to enable it, and best practices for protecting your precious data. Be sure to subscribe to 9to5Mac on YouTube for more in-depth video walkthroughs.
Video: iOS Advanced Data Protection for iCloud explained
Subscribe to 9to5Mac on YouTube for more videos
What is Advanced Data Protection?
Standard Data Protection includes end-to-end encryption for 15 data types, including Passwords and Keychain data, Health data, Home data, etc. Advanced Data Protection offers this same type of protection for an additional 10 data types stored in iCloud, bringing the total to 25 end-to-end encrypted iCloud data categories. Here’s a look at what both Standard and Advance Data Protection include:
Standard Data Protection includes…
Advanced Data Protection adds…
Passwords and Keychain
iCloud Backups (Device and Messages)
Health data
iCloud Drive
Journal data
Photos
Home data
Notes
Messages in iCloud
Reminders
Payment information
Safari Bookmarks
Apple Card transactions
Siri Shortcuts
Maps
Voice Memo
QuickType Keyboard learned vocabulary
Wallet Passes
Safari
Freeform
Screen Time
Siri information
Wi-Fi passwords
W1 and H1 Bluetooth keys
Memoji
Of course, there exist categories that cannot be protected using end-to-end encryption due to the nature of the data. For example, iCloud Mail must communicate and interoperate with the global email system as a whole, and Contacts and Calendars are built on standards that do not support end-to-end encryption.
One of the most notable new changes that Advanced Data Protection brings to the table is the end-to-end encryption of iCloud Backups. This is notable because, prior to Advanced Data Protection, Apple could access your data, in the case of a court ordered subpoena, via the iCloud backups stored on its servers.
This was particularly useful for law enforcement investigations, because although iMessage on the iPhone has long been protected end-to-end via Standard Data Protection, messages data stored in iCloud Backups served as a workaround or loophole. With Advanced Data Protection enabled, even Messages data stored in iCloud Backups and via Messages Backups are now inaccessible by Apple, because the iCloud Backup itself is now end-to-end encrypted.
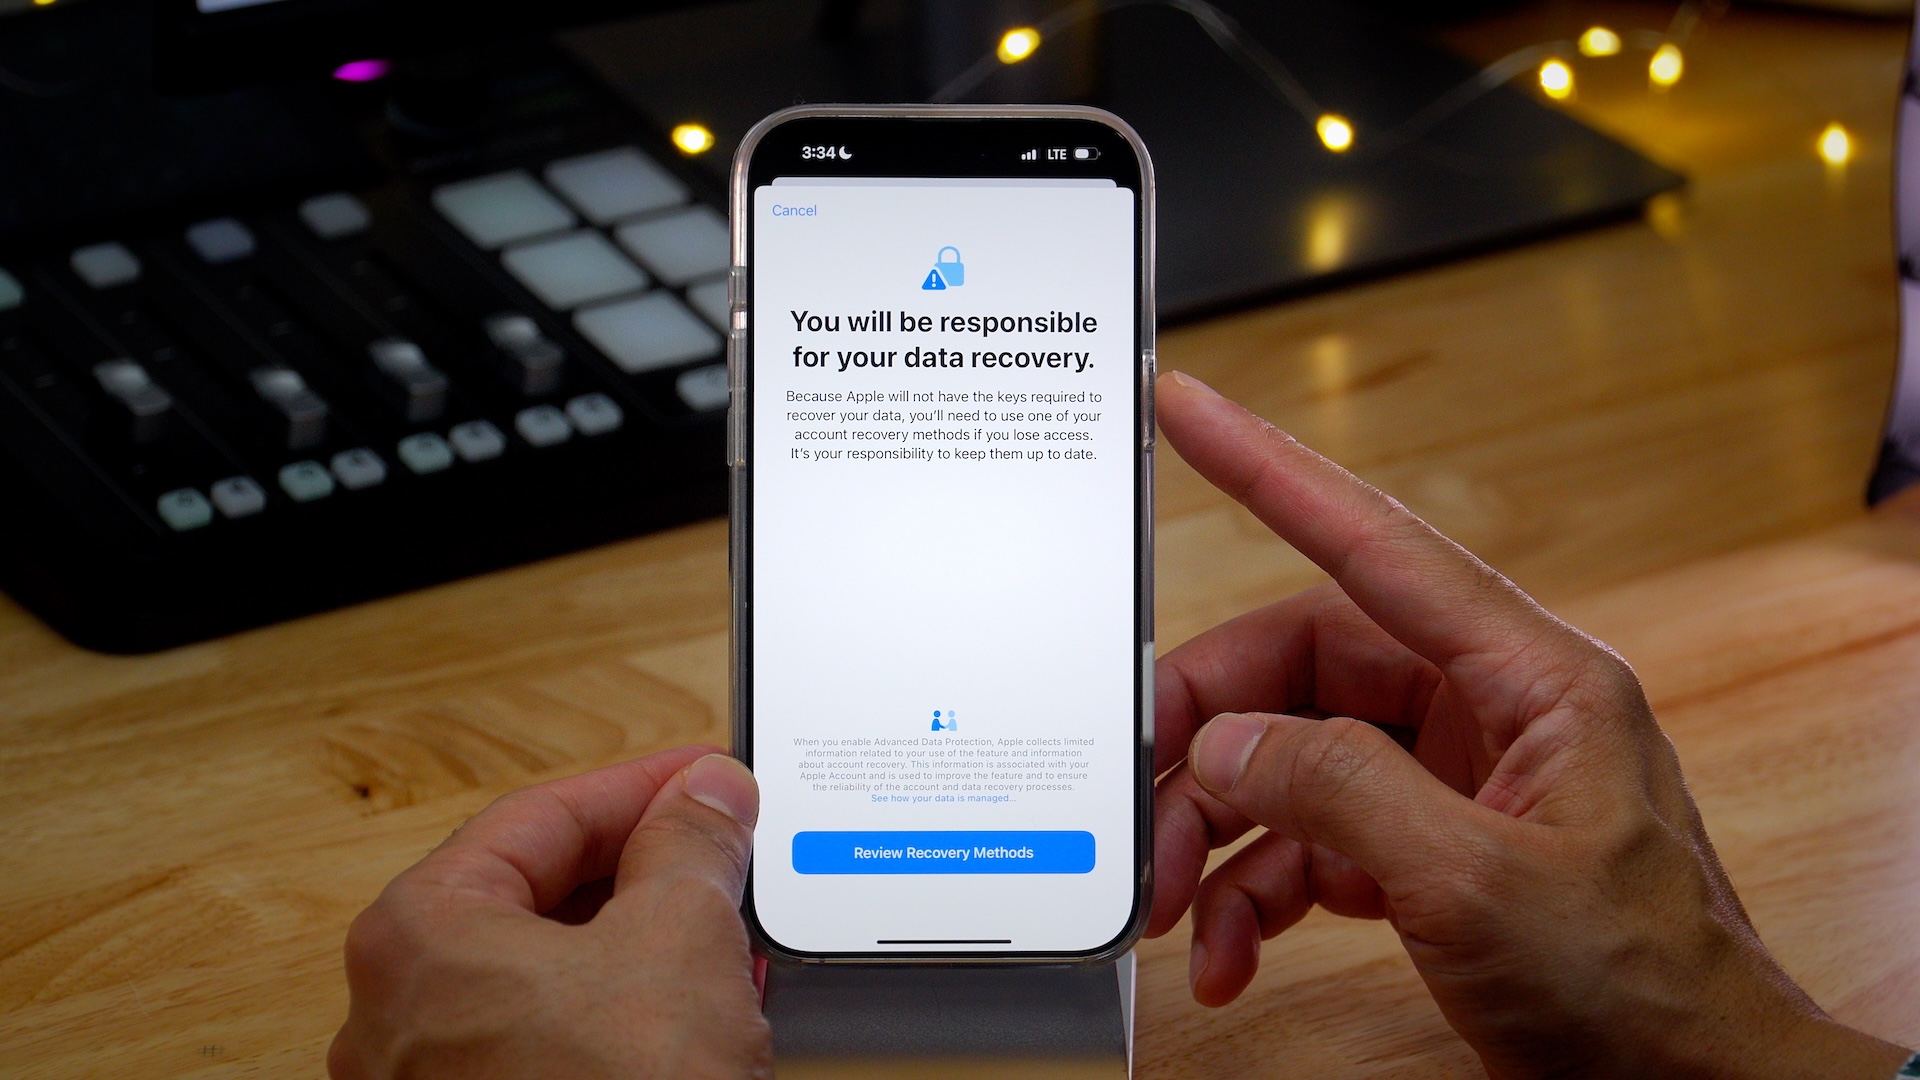
You are responsible for data recovery…
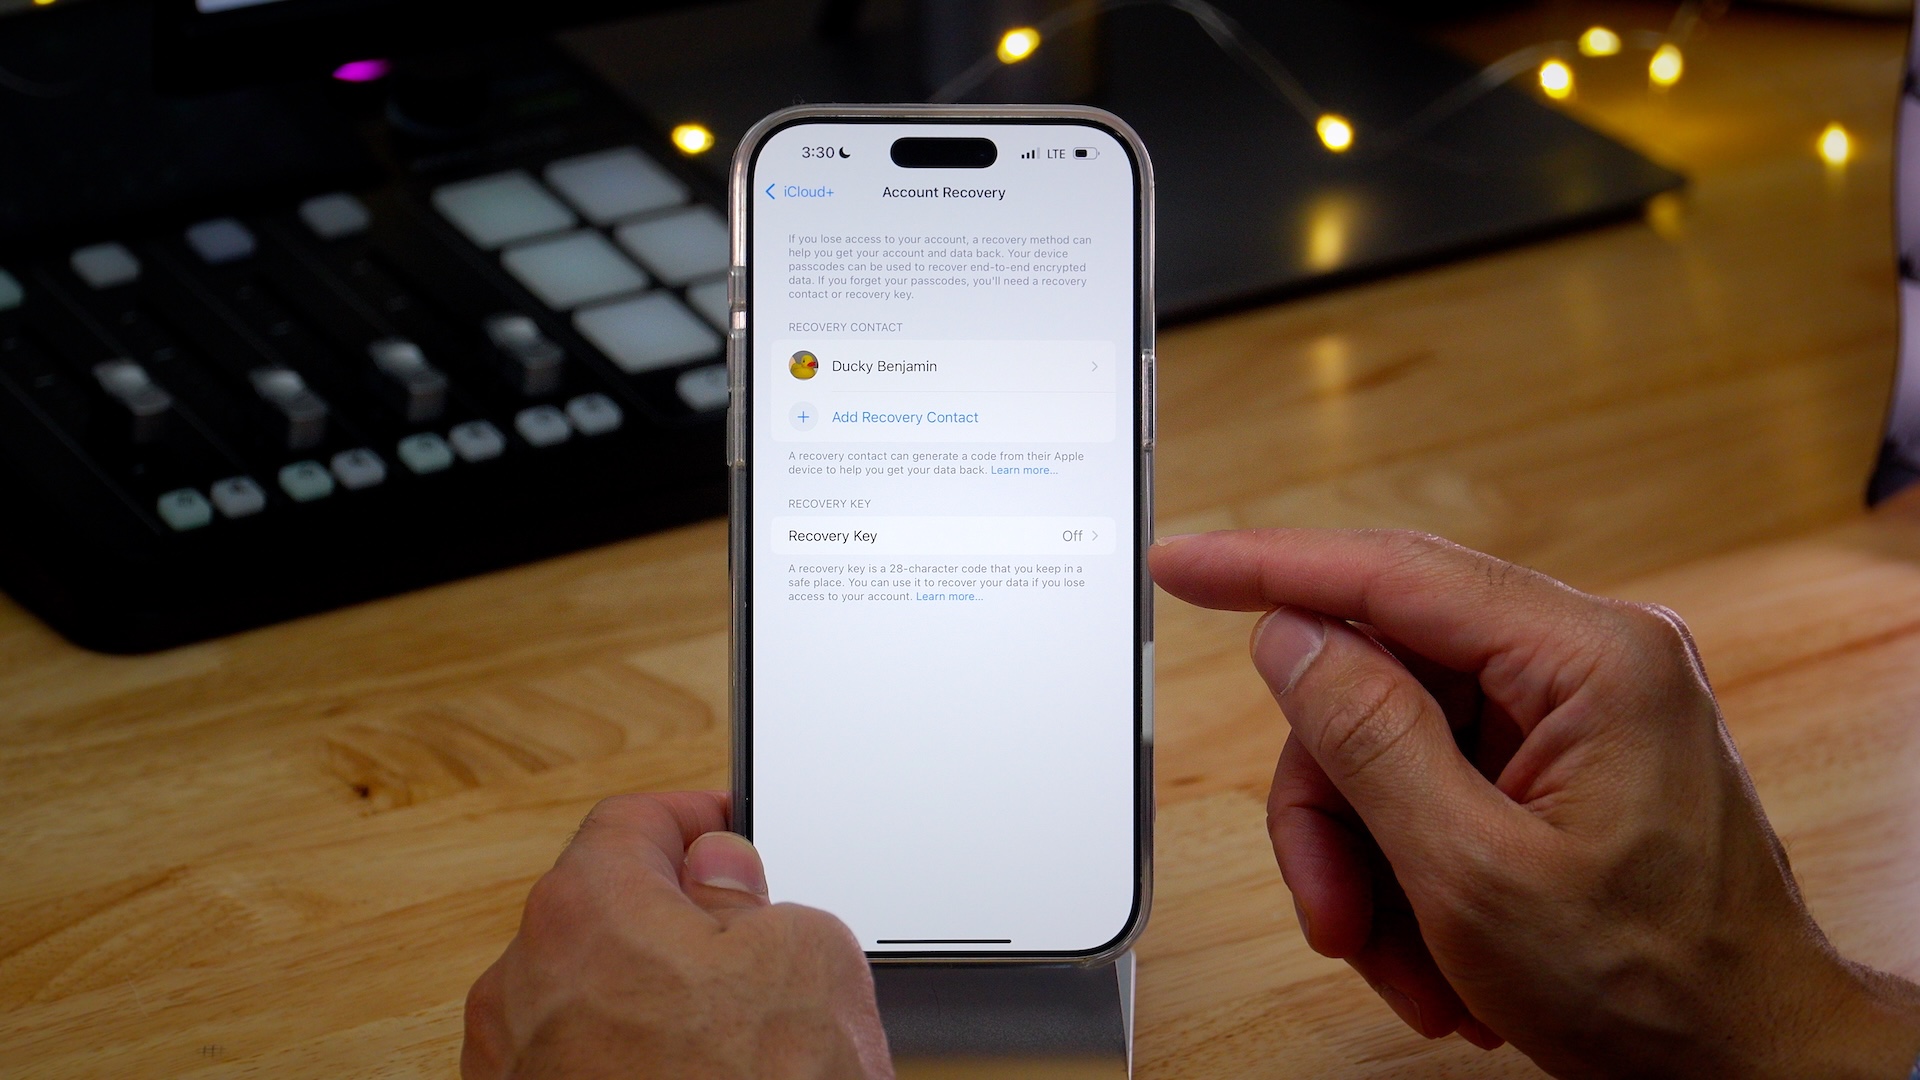
With Advanced Data Protection enabled, Apple no longer has access to decryption keys for your Photos, Notes, Reminders, iCloud Backups, etc. Hence, If you lose access to your account, only you can recover this data by using your device passcode or password, a recovery contact, or a recovery key. Along with setting up one or more trusted recovery contacts, it’s important that you print your 28-character recovery key on something like a physical hardware wallet that can be engraved with your recovery key and can’t be easily damaged or lost.
Before enabling Advanced Data Protection, you’ll be prompted to remove any devices from your iCloud account running older versions of software (anything below iOS 16.2 and macOS 13.1). While Advanced Data Protection is enabled for your iCloud account, you won’t be able to sign in to your account using your Apple ID for devices running older software versions. You’ll need to update the software on those devices first, or disable Advanced Data Protection, before they’re able to be used with your iCloud account.
Once Advanced Data Protection is enabled, it is enabled for all devices linked to your iCloud account.
Advanced Data Protection prerequisites
Before enabling Advanced Data Protection for iCloud, ensure all of the following are true:
Your Apple ID has two-factor authentication enabled.
A passcode/password is enabled for your device.
You’re running the latest version of software on all of your devices:
iPhone with iOS 16.2 or later
iPad with iPadOS 16.2 or later
Mac with macOS 13.1 or later
Apple Watch with watchOS 9.2 or later
Apple TV with tvOS 16.2 or later
HomePod with software version 16.2 or later
Windows computer with iCloud for Windows 14.1 or later
You have at least one account recovery key and/or recovery contact set. The Advanced Data Protection setup will prompt you to do this if you have not.
You cannot enable Advanced Data Protection on new device until a time threshold elapses. You’ll need to setup Advanced Data Protection on an older device instead.
Older devices that can’t be updated to iOS 16.2 or later must be removed from iCloud before enabling Advanced Data Protection
Setting up Account Recovery
Add Recovery Contact
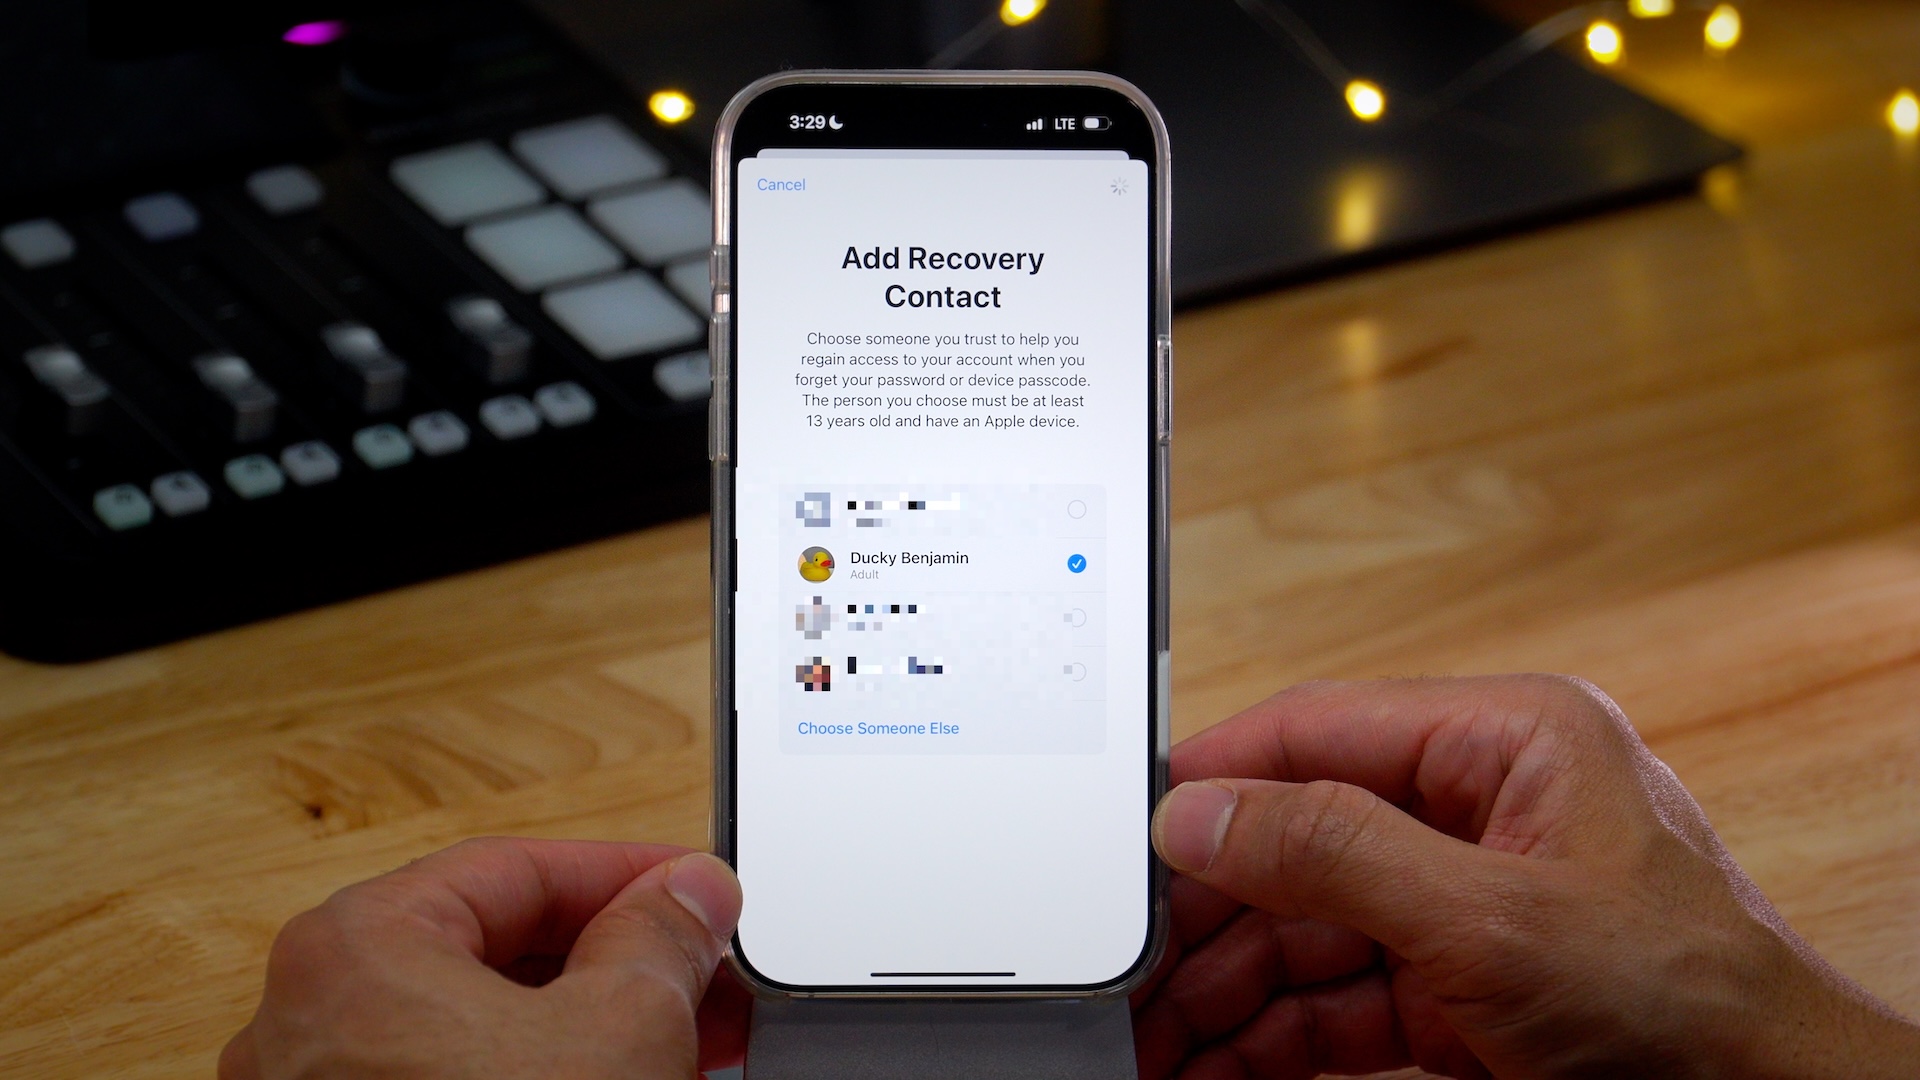
Your recovery contact will never be able to access your data, but will be able to generate a code from their Apple device to help you regain access to your data.
A recovery contact should be a friend or family member over the age of 13 that you trust. Your recovery contact must have an Apple Device. If you forget your password or passcode, you can contact your recovery contact in person or by phone to help.
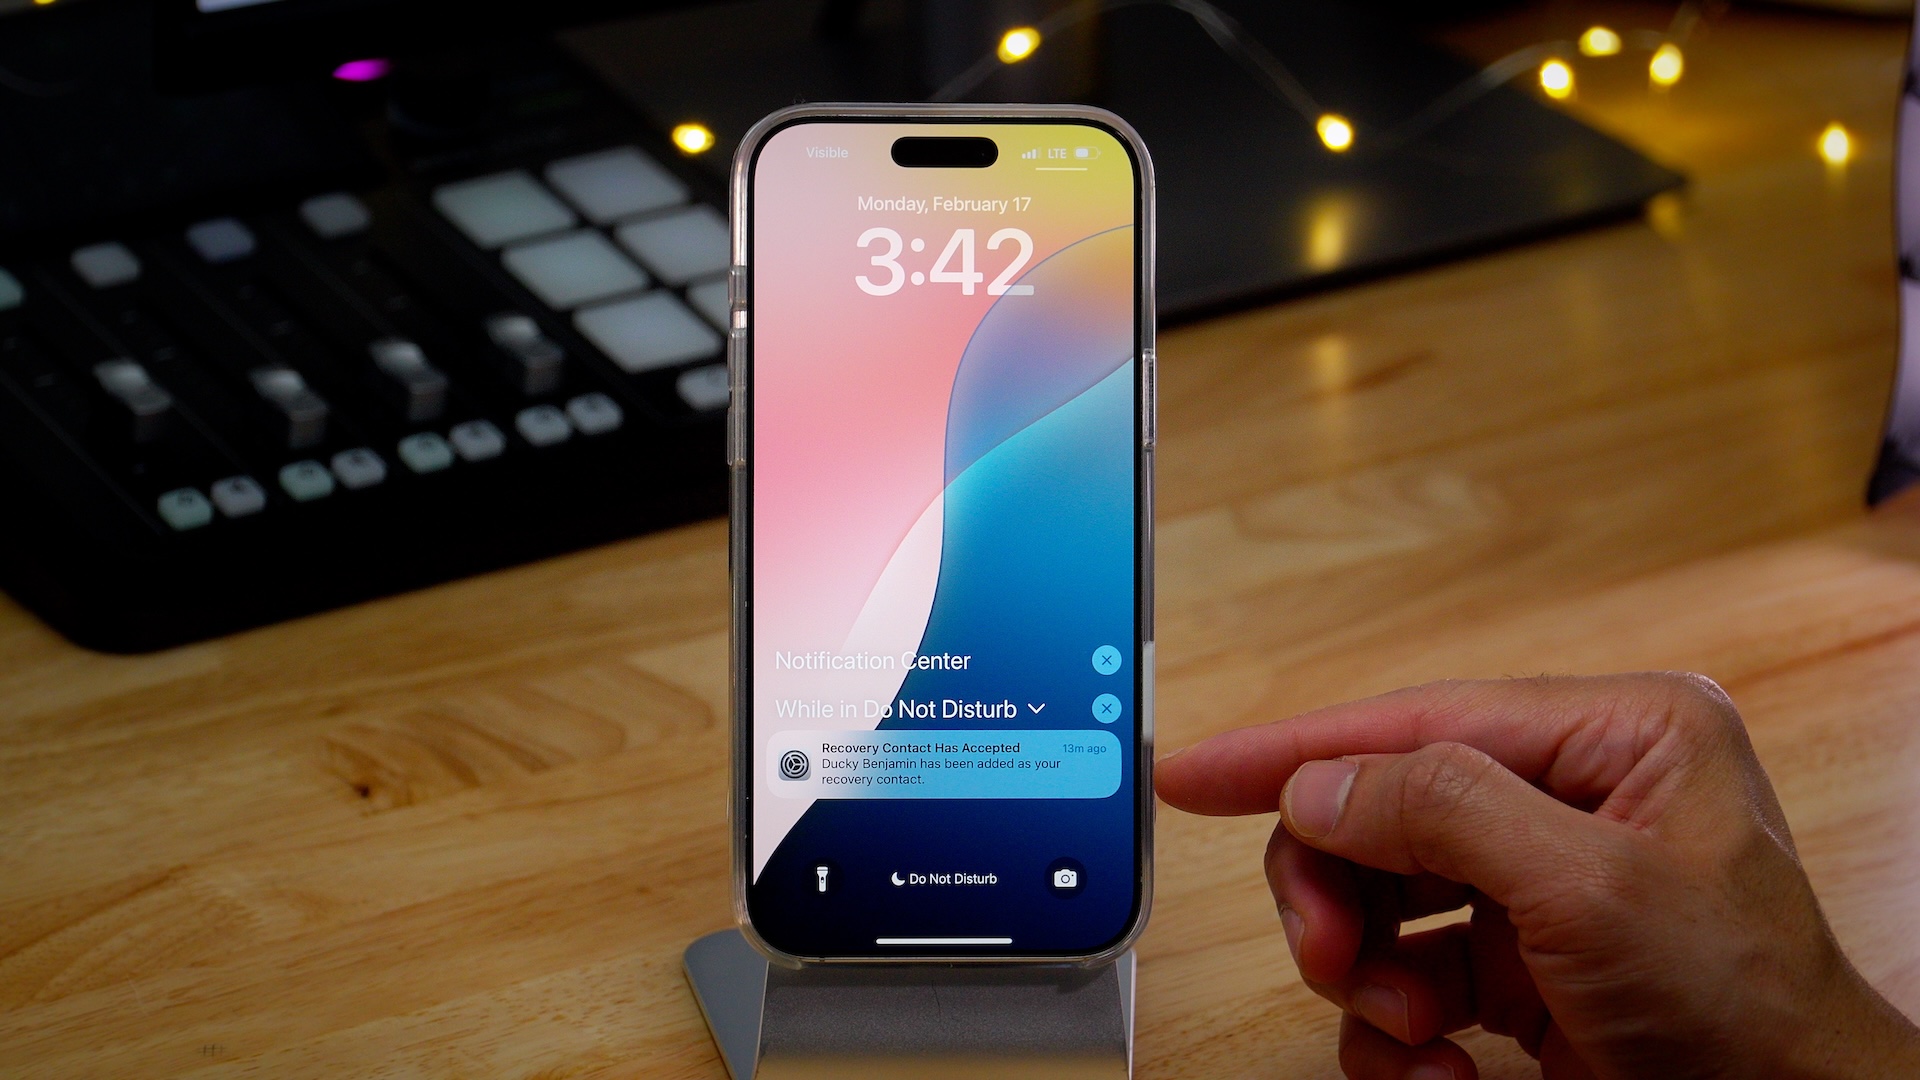
Step 1: Go to Settings → → Sign-In & Security → Recovery Contacts.
Step 2: Tap Add Recovery Contact and you’ll be asked to verify with Face ID or device passcode.
Step 3: iOS will suggest contacts from your family sharing list if applicable, but you can choose someone else from your contacts as well. Select a contact and then tap the Next button in the upper right-hand corner.
Step 4: You’ll next be prompted to let your contact know that you’ve added them as a recovery contact. You can send the canned message that Apple provides by tapping the Send button at the bottom of the screen, or customize the message by tapping Edit Message before sending.
Step 5: After the recipient receives the message, they’ll need to tap the Account Recovery Contact link and tap the Accept button to confirm. Whether or not the user accepts or declines, the requester will be notified.
Add Recovery Key
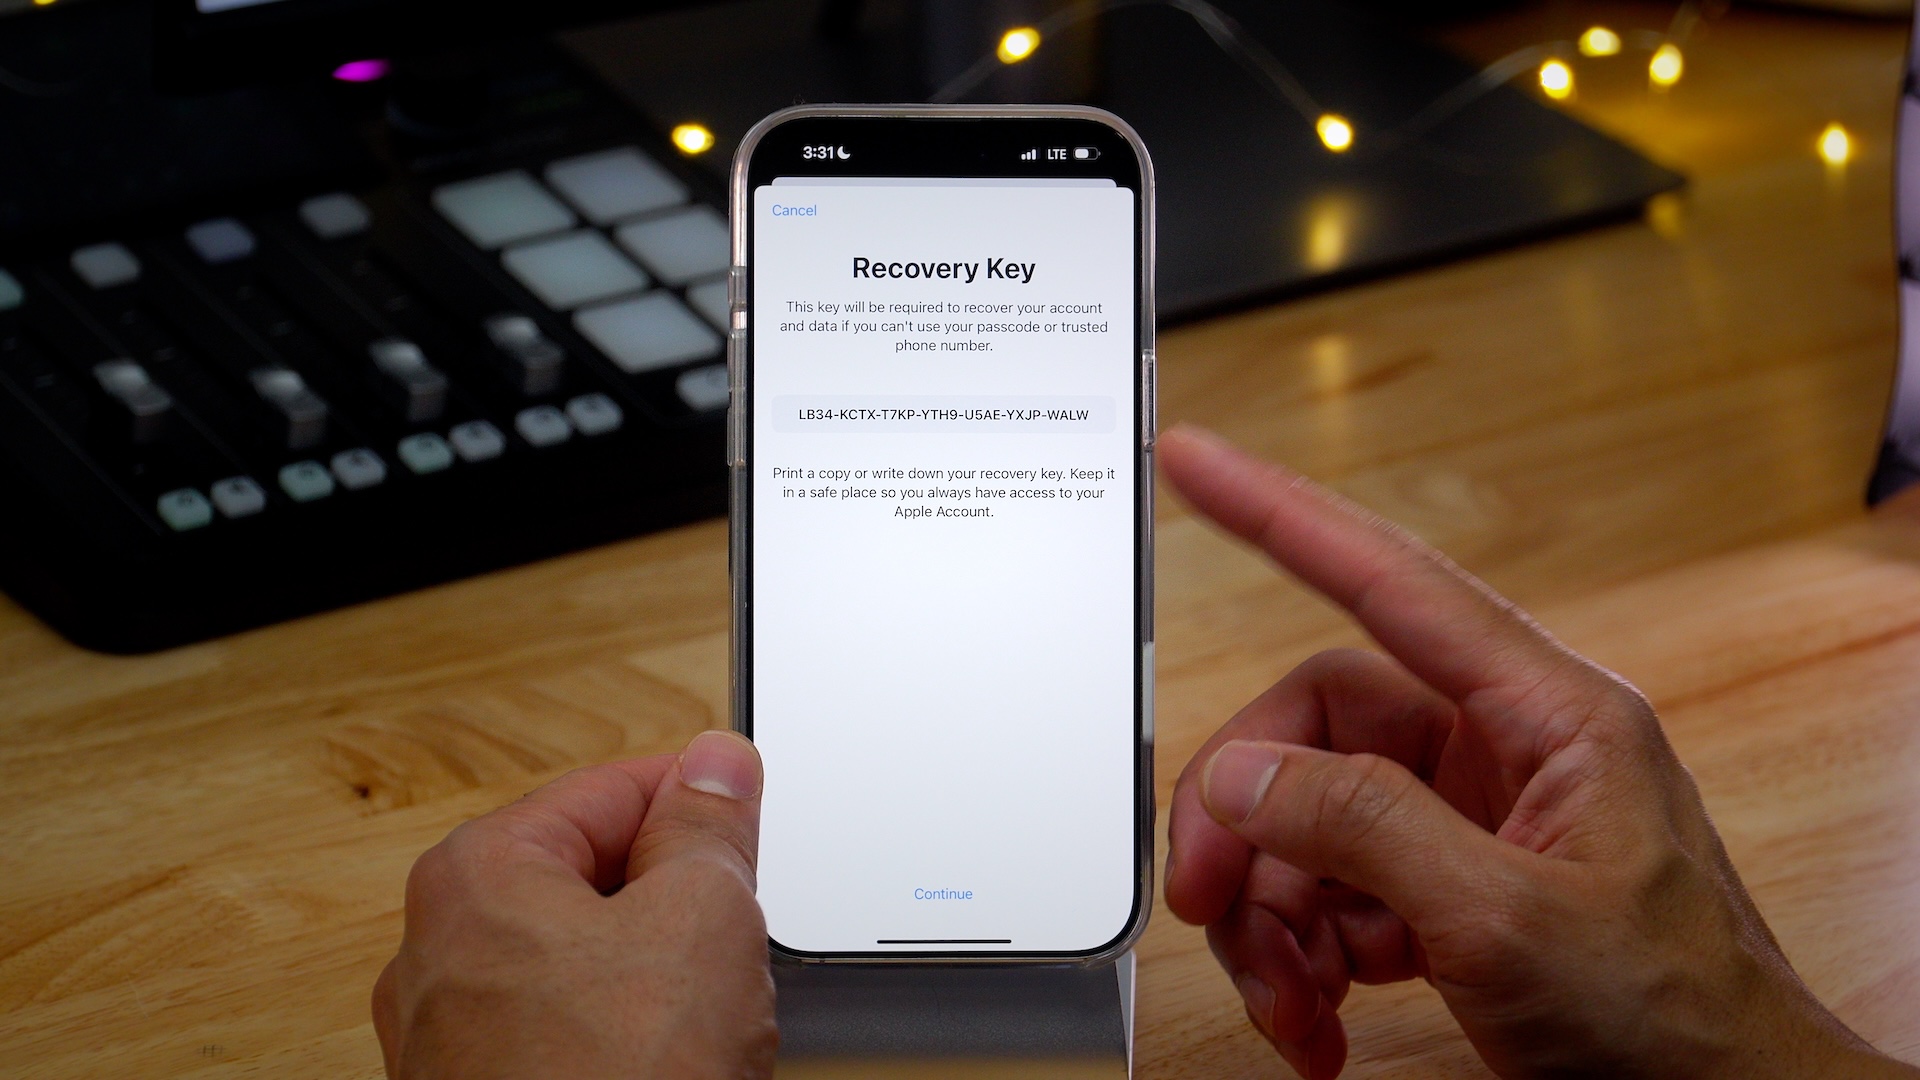
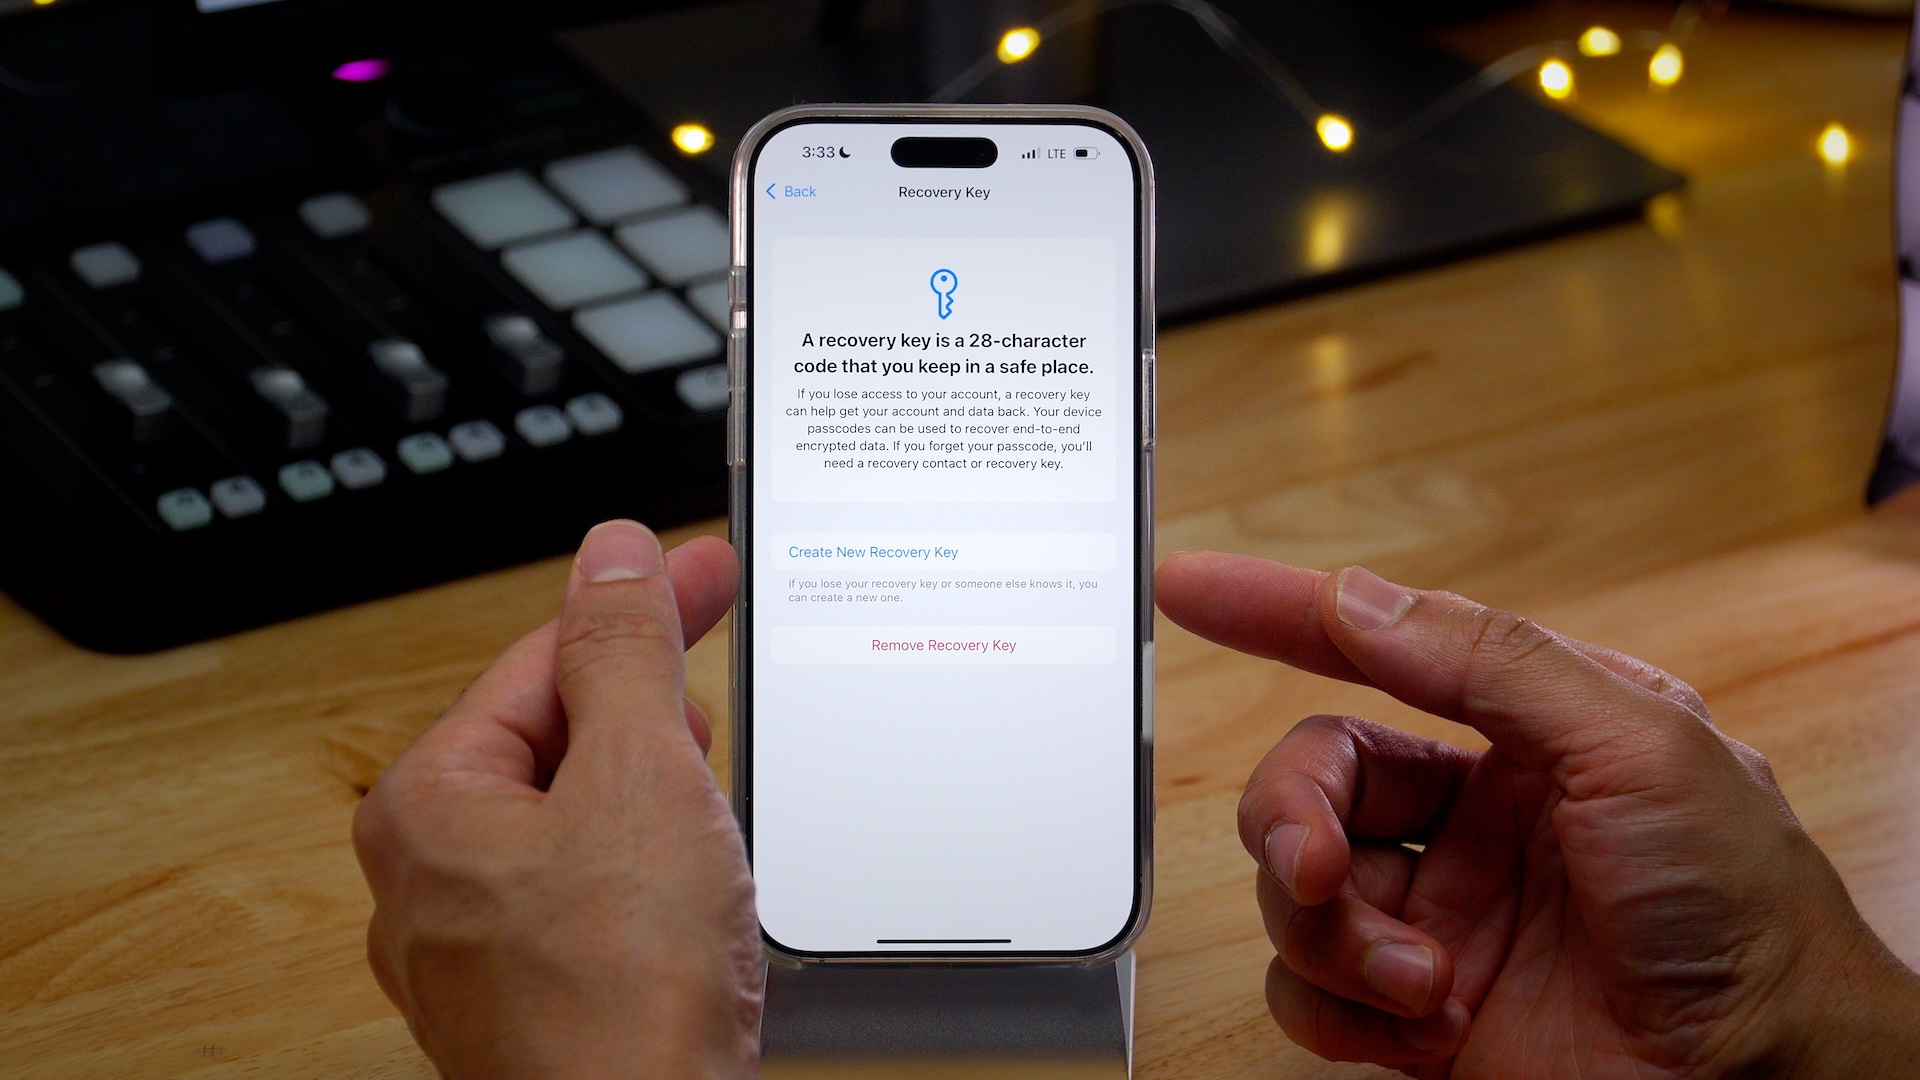
Step 1: Go to Settings → → Password & Security → Recovery Key.
Step 2: Tap Recovery Key → Turn On Recovery Key → Use Recovery Key.
Step 3: Enter your iPhone’s passcode to turn on the recovery key.
Step 4: Your 28-alphanumeric recovery key will now be displayed. Print a copy or write down your recovery key. I suggest employing a cold storage solution for more secure and permanent safekeeping.
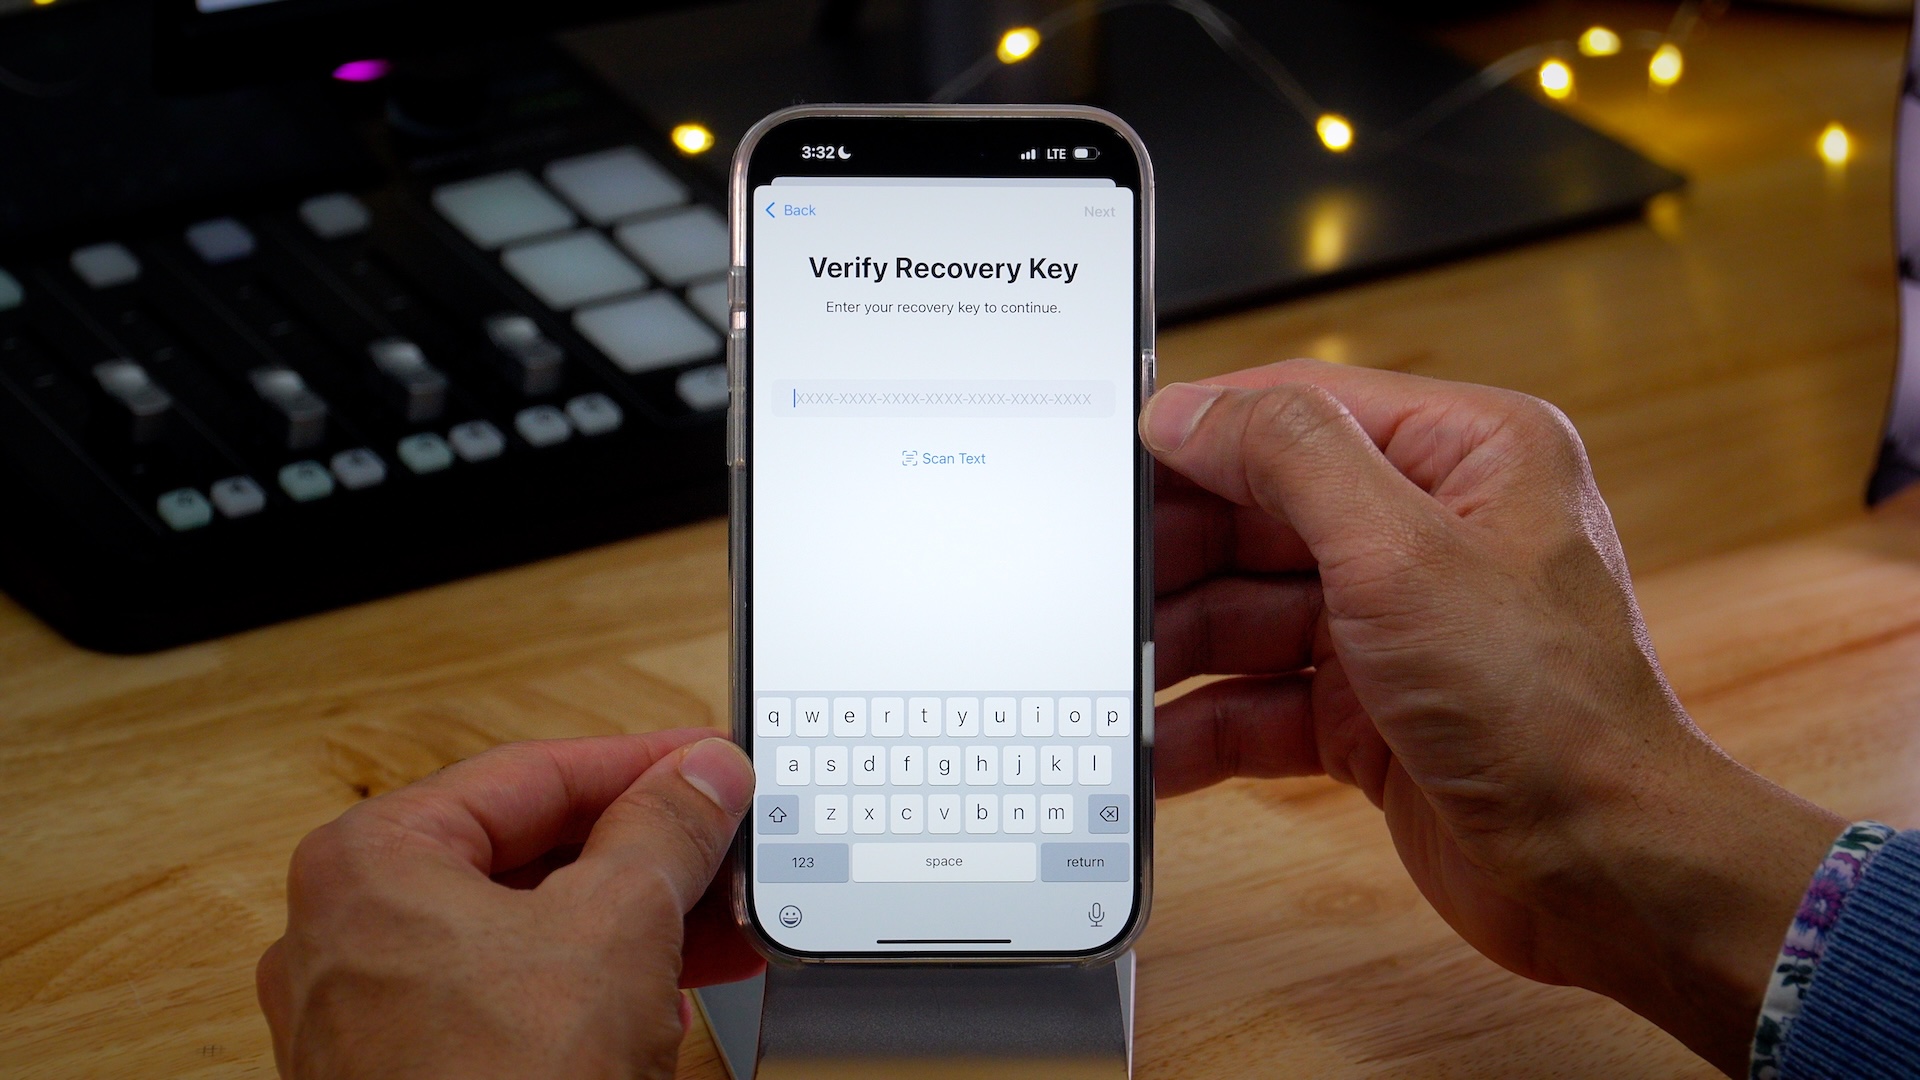
Step 5: Tap Continue, and you’ll be prompted to enter the 28-digit recovery key to prove that you wrote it down correctly. Tap Next once the key is entered.
Step 6: If the recovery key was entered correctly, you’ll be taken back to the Sign-In & Security page with the Recovery key parameter set to On. If you choose to ever create a new recovery key because you lost it or someone else knows it, the new key will replace the old key.
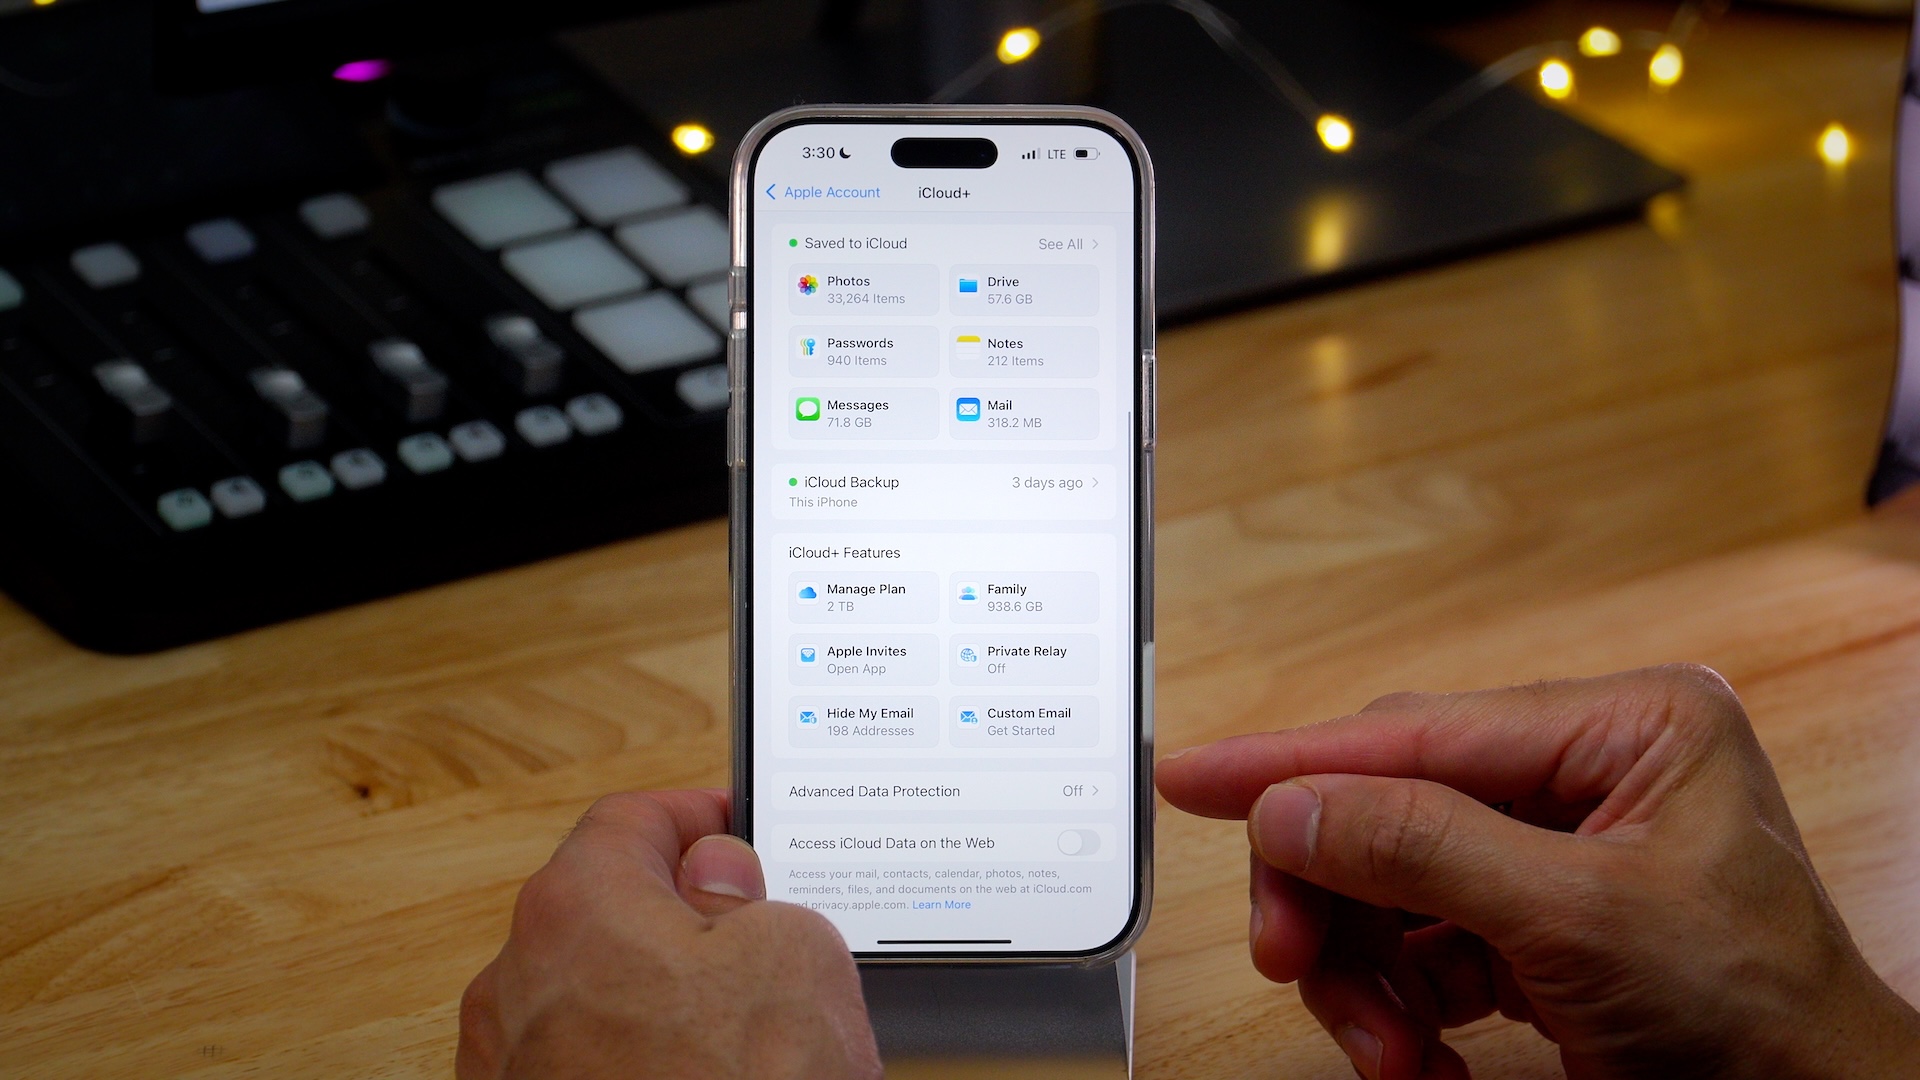
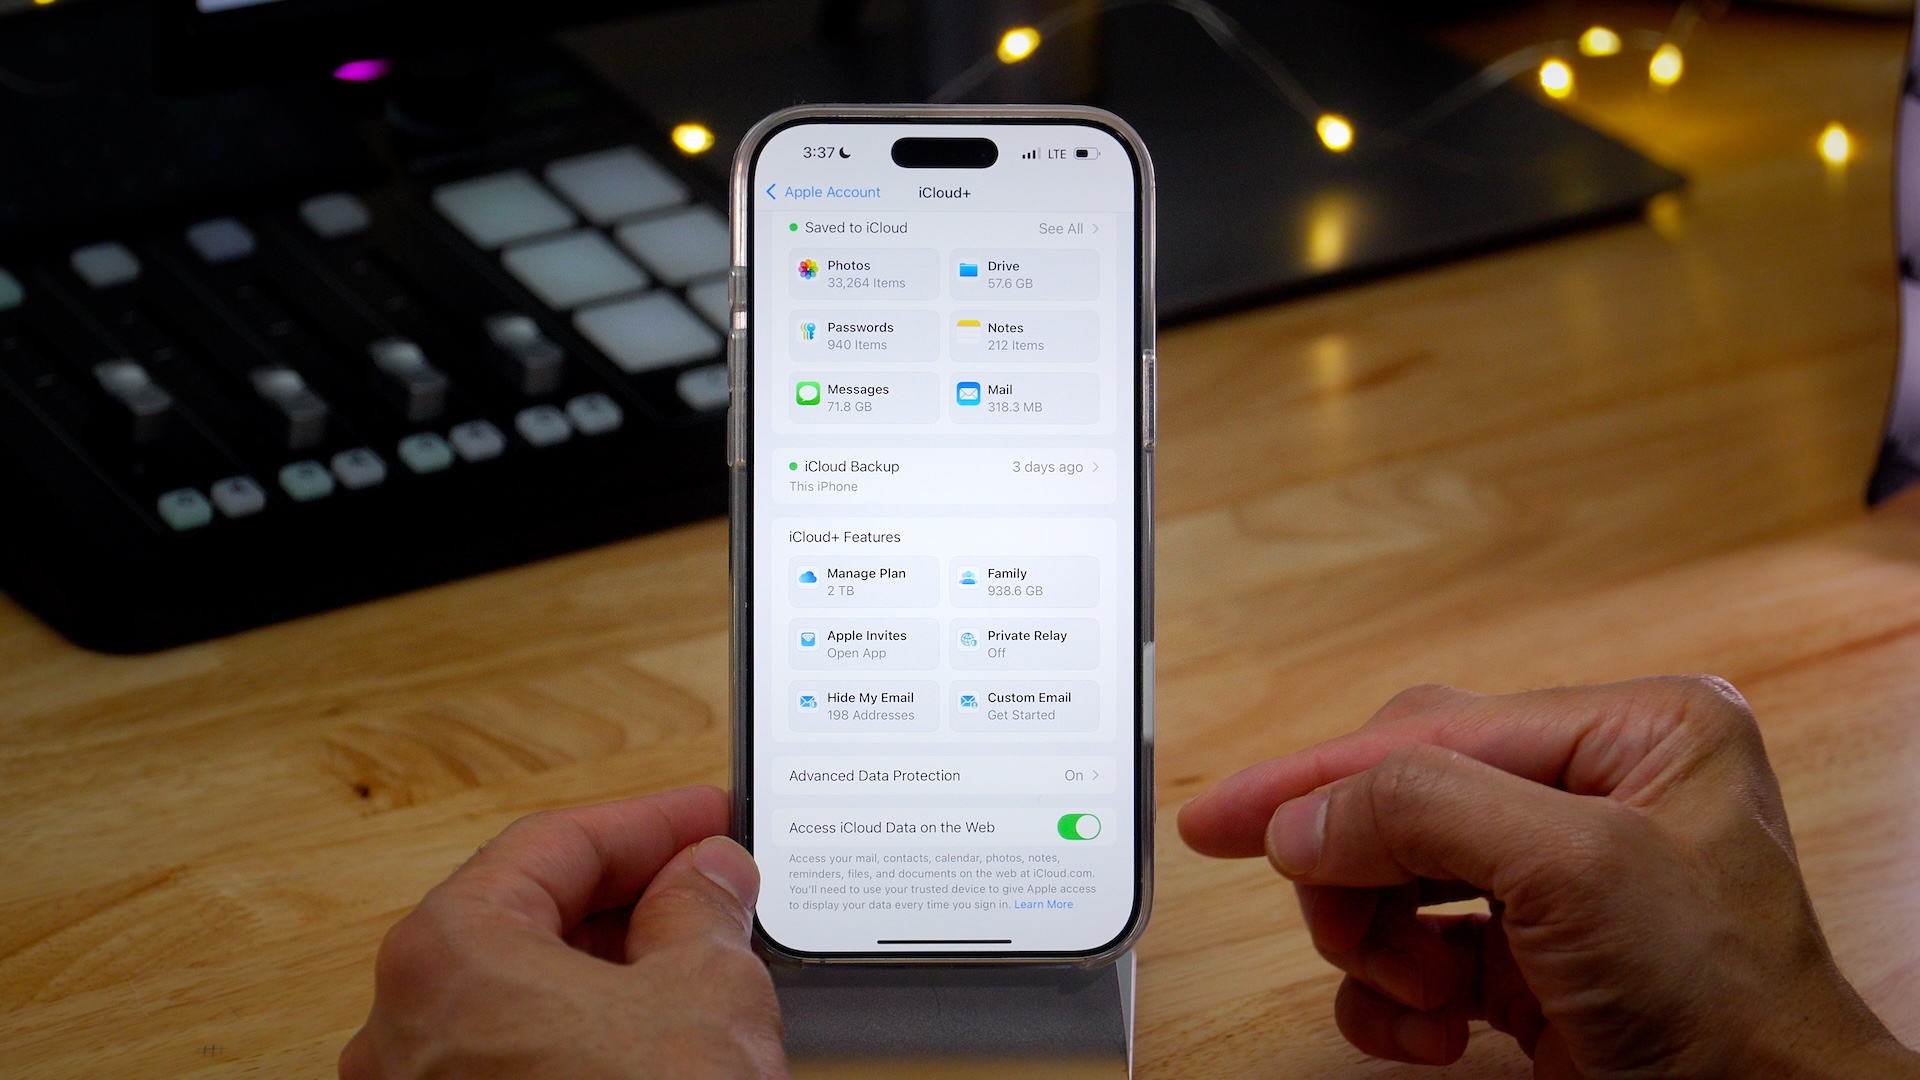
How to enable Advanced Data Protection
Step 1: On your iPhone or iPad go to Settings → → iCloud.
Step 2: Scroll down and tap the Advanced Data Protection panel, then tap Turn on Advanced Data Protection.
Step 3: You’ll see a splash screen indicating that you will be responsible for data recovery. Tap the Review Recovery Methods button to review the recovery options you’ve established, otherwise tap Set Up Account Recovery if you’ve yet to establish recovery options and refer to the Setting up Account Recovery section above.
Step 4: If you have a recovery contact established, and you’re satisfied with it, tap the Contacts Up to Date button to proceed. Otherwise, you can tap Update Recovery Contacts.
Step 5: Next, assuming you have one set up as instructed above, you’ll be asked to verify your 28-character recovery key to continue. Enter your recovery key and tap the Next button in the upper right-hand corner.
Step 6: Enter your device’s passcode to enable Advanced Data Protection. Tap the Done button once you get the Advanced Data Protection is On confirmation page.
How to disable Advanced Data Protection
Step 1: On your iPhone or iPad go to Settings → → iCloud.
Step 2: Scroll down and tap the Advanced Data Protection panel, then tap Turn Off Advanced Data Protection.
Step 3: Tap Turn Off and then enter your iPhone’s passcode to verify.
Your device will securely upload the needed encryption keys to Apple’s servers and Advanced Data Protection will be disabled. Your Account Recovery options will be maintained, unless modified.
9to5Mac’s Take
Advanced Data Protection is simply a way to enable end-to-end encryption across more iCloud data types, bringing the total number of data types to 25. If you’re looking for a way to increase the security of the data stored in your iCloud account this is a great free way to do it. Just remember that you take on additional responsibility for your data, since Apple no longer houses the decryption keys when Advanced Data Protection enabled. For many people, that’s a small price to pay for the added security of end-to-end encryption.
Are you currently using advanced data protection? Why or why not? Sound off down below in the comments with your thoughts.
FTC: We use income earning auto affiliate links. More.
Foldables have come a long way in the last two years; the Magic V3 and X Fold3 Pro combine great cameras with standout hardware package, and OPPO is looking to outmatch that with the Find N5. The foldable has the distinction of being the thinnest around, and at 4.21mm when unfolded, it is 0.14mm thinner than the Magic V3 — which I didn’t think was possible.
While I didn’t get to test the Find N3, I used the OnePlus Open (which is just a rebrand of the N3) extensively, and the Find N5 builds on that foundation while delivering better cameras, brighter panels both inside and out, and a bigger battery. The ultra-thin design basically means that the Find N5 feels like a regular phone most of the time — it is just 0.4mm thicker than the Pixel 9 Pro XL when folded — and it makes using the device an absolute delight.
It has a new hinge mechanism that uses titanium, and while that’s undoubtedly a good thing, what I like about the change is that the crease is barely visible this time. That was the case on the Open too, but the Find N5 takes things to a whole new level, and honestly, I can say the same in a lot of other areas. The device even gets IPX9 ingress protection and a massive 5600mAh silicon battery that lasts more than any other foldable I used until now, and there’s 50W AirVOOC alongside 80W charging.
The Find N5 isn’t just a great foldable — it’s one of the best Android phones you can buy in 2025.
OPPO unveiled the Find N5 on February 20, and the foldable is set to go on sale in the coming weeks. It is available in a single configuration with 16GB of LPDDR5X RAM and 512GB of UFS 4.0 storage, and comes with ColorOS 15.0.1 based on Android 15.
The phone costs
Swipe to scroll horizontally
Category
OPPO Find N5
Cover Display
6.62-inch 120Hz LTPO OLED, 2616 x 1140, HDR10+ Dolby Vision, 1600 nits HBM, 2540 nits max
Inner Display
8.12-inch 120Hz LTPO OLED, 2248 x 2480, HDR10+, Dolby Vision, 1400 nits, 2100 nits max
The Find N5 clearly builds on the design of its predecessor; it has a similar aesthetic with contoured edges and flat sides, and the in-hand feel is exquisite. But what I like the most is the ultra-sleek profile; the foldable is thin and light enough that it is just like using a regular phone when it’s folded, and that is a huge deal. At 8.93mm, it is chunkier than the likes of the Find X8 Pro and the Pixel 9 Pro XL, but not by much, and coming in at 229g, it doesn’t weigh that much more either.
It’s when you unfold the Find N5 that you realize just how thin it really is; at just 4.21mm, the foldable is only a smidgen thicker than the width of the USB-C port, and that’s incredible. I got a similar feeling when using the Magic V3, but where the Find N5 has an advantage over Honor’s foldable is that the flat sides make it just that little bit better to hold and use. There’s enough width along the sides to comfortably hold the device, and the 7000-series aluminum mid-frame adds decent rigidity to the overall structure.
I would have liked a leather back like last time, but OPPO is using a fiber material on the Find N5 — ostensibly to save weight — and the silky texture makes it easier to hod the device. On the plus side, it doesn’t pick up any smudges whatsoever, and I didn’t feel the need to use a case with the foldable.
The camera island is cleaner this time around, and the oversized module dominates attention at the back. Given the svelte profile of the foldable itself, the camera module protrudes quite a bit from the chassis, and there is a wobble when using the device while it’s unfolded on a table — this isn’t a problem when it’s folded.
Thankfully, the alert slider is intact, and it’s located on the left. The volume and power buttons are on the right, and like most other foldables, the Find N5 uses a side-mounted sensor baked into the power button to unlock. It is fast and reliable, and I didn’t see any issues in this regard.
The Find N5 is available in two colors, and the white model is the one to get if you need a device that stands out visually. Interestingly, the foldable gets the distinction of being the only device in this category with IPX9 ingress protection in addition to IPX8, so it is able to withstand high pressure jets in addition to submersion in water. Like other foldables, there’s no rating against dust ingress, but it has the usual seals and gaskets to ensure dust doesn’t get into the hinge or any of the other moving parts.
Talking about the hinge, the Find N5 uses a redesigned hinge mechanism that uses 3D printed parts and a titanium alloy, and it is 26% thinner than time while delivering 36% better durability. It’s now called the Titanium Flexion Hinge, and it has a smooth articulation and doesn’t take as much force to unlock.
There are two distinct advantages to the new hinge system: the Find N5 stays locked at any angle between 50 and 150 degrees, and that makes it much more versatile than the Magic V3. The best use case for this mode is to shoot photos in interesting angles with the camera, and it also has productivity benefits.
But the biggest gain is the crease; the Find N5 still has a crease in the middle when it’s unfolded, but it is nowhere as visible as other foldables. I didn’t even notice it after a day of use, and it doesn’t affect usability at all. The crease is so shallow that it makes the Galaxy Z Fold 6 look outdated when using both foldables next to each other.
In fact, the design and svelte profile makes the Find N5 feel futuristic when you put it next to Samsung’s foldable. So I guess it’s a good thing from Samsung’s point of view that this device isn’t launching in the U.S.
along with the 20.7:9 ratio means it feels like a regular phone, and honestly, I just used the outer panel most of the time. The outer display goes up to 1600 nits in outdoor use, and hits 2450 nits in HDR content. It has Dolby Vision and HDR10+, and color vibrancy is among the best of any foldable I’ve used. You get a good range of customizability as well, and I like the selection of always-on styles available within ColorOS.
The inner panel is noteworthy as it is a tablet-sized 8.12 inches — the biggest of any book-style foldable yet. Colors are fantastic, and the inner panel is ideally suited to view content or play games; I had a lot of fun with Balatro on this device. It goes up to 1400 nits in outdoor use, and 2100 nits when viewing HDR content, and there was never a scenario where I felt like it didn’t get bright enough even under intense sunlight. While I didn’t have OPPO’s stylus (it isn’t bundled in the package), you can use it with the foldable.
Both panels go up to 120Hz and leverage LTPO to dynamically adjust refresh on the fly, and the inner screen even gets an anti-reflective coating that makes a noticeable difference when using the device outdoors. Another advantage is that it has a dual shielded protective layer that leverages an elastomer material to deliver better resistance in the event of a tumble. The outer panel uses a custom Nanocrystal Glass, and it held up without any issues after taking two tumbles onto a tiled surface.
You get loud stereo sound as well, and it makes a difference when viewing content on the inner panel. Basically, I didn’t see any problems with the inner or outer screens, and OPPO did an incredible job in this area.
The Find N5 has the distinction of being the first foldable featuring the Snapdragon 8 Elite platform, but unlike the OnePlus 13, ASUS Zenfone 12 Ultra, and a multitude of phones that run Qualcomm’s latest silicon, it’s using seven cores instead of the standard eight.
The reasoning is that with you get better efficiency with a seven-core design, and honestly, there’s no way of knowing in regular use that it is any different to other phones powered by the same platform. It is just as fluid in demanding tasks, and games run just as well. The only limitation is that it doesn’t quite have the same thermal thresholds, so you see some throttling earlier than usual — that is the case with all devices in this category, so it isn’t unique to the Find N5.
Swipe to scroll horizontally
Category
OPPO Find N5
ASUS Zenfone 12 Ultra
Honor Magic V3
Geekbench 6 (single-core)
2625
3116
1489
Geekbench 6 (multi-core)
7201
9824
5291
Geekbench AI
2505
5478
2923
PCMark Work 3.0 (Overall)
15611
25558
15720
PCMark Work 3.0 (Web Browsing)
15098
32147
18363
PCMark Work 3.0 (Video Editing)
7065
9152
7706
PCMark Work 3.0 (Writing)
22931
32843
16451
PCMark Work 3.0 (Photo Editing)
14264
59086
30295
3DMark Wild Life Extreme (score)
5252
4782
4170
3DMark Wild Life Extreme (FPS)
31.45
28.64
24.97
3DMark Solar Bay (score)
9898
7863
7605
3DMark Solar Bay (FPS)
37.64
29.9
28.91
Row 12 – Cell 0
Row 12 – Cell 1
Row 12 – Cell 2
Row 12 – Cell 3
Even then, I didn’t see any issues getting stable framerates in visually-demanding games. In fact, the only way to see that the foldable is using a non-standard option of Qualcomm’s silicon is via synthetic workloads; the Find N5 didn’t get quite as high a score in Geekbench’s multi-core tests, but it doesn’t make a noticeable difference in real-world use. It hit a stability score of 55.9% in 3DMark’s Steel Nomad stress test is 55.9%, and went up to 48 degrees. While that is hotter than other foldables, it was localized to the middle, and it didn’t feel uncomfortable to hold at the sides
The foldable is sold in a single 16GB/512GB configuration, and it doesn’t miss out when it comes to connectivity. I didn’t see any issues while making calls or with cellular connectivity in general. If anything, the foldable had better connectivity than most other devices I tested recently, and that’s likely due to the 360-degree antenna design.
In a similar vein, the vibration motor is pretty good; it doesn’t deliver the granular feedback that you get on the Find X8 Pro, but it is one of the better options I’ve used on a foldable.
There really isn’t anything missing on the Find N5; even though it is using a modified Qualcomm chipset, you just don’t notice that in regular use, and that alone illustrates just how powerful mobile platforms are getting.
The Find N5 lasts longer than any other foldable I tested until now. Even though it’s thinner than other foldables, there’s a massive 5600mAh battery under the hood, and it easily lasts a day even with heavy use. I’ve had the phone for a week now, and there was never a point where I had to worry about the battery running out before the end of the day — even during a week where I was basically travelling most of the time.
Like most other 2025 phones, the Find N5 is using silicon battery tech to great effect, delivering much better density and longevity than previous years. It uses 10% silicon in the anode, and OPPO says the battery is 30% thinner than what’s used in most foldables because of the inclusion of silicon — it’s thinner than the 4800mAh battery in the N3.
There’s even 80W charging, and it takes just over 47 minutes to fully charge. The best part is that the device gets 50W AirVOOC wireless charging, and although I didn’t have OPPO’s charging puck, it should work just as well with the OnePlus AirVOOC magnetic charger that debuted alongside the OnePlus 13. The only caveat is that just like the OnePlus 13, you’ll need to use a magnetic case to take advantage of the AirVOOC tech.
The convenience of AirVOOC along with the standard 80W charging means you don’t really need to plug in the Find N5 overnight, and I’m just glad that we are getting to a point where foldables last as long as regular phones.
OPPO knows how to deliver a strong camera package, and there’s a lot to like on the Find N5. The foldable gets a 50MP Sony Lytia LYT700 main camera; this is the same sensor that’s used to great effect in the Find X8. It’s joined by a 50MP Samsung JN5 telephoto lens with 3x optical zoom, and an 8MP wide-angle lens with autofocus.
Both the main camera and telephoto modules have OIS, and you get an 8MP camera tucked inside both the inner and outer panels. Interestingly, you can use the tele lens to shoot macros, and it does a good job in this regard. There’s 4K60 10-bit HDR video as well, but it’s limited to the main and zoom lenses — the wide-angle only goes up to 4K30. Hasselblad integration is intact, and you get orange accents in the interface and the distinctive leaf shutter sound.
There’s also a Hasselblad Master mode that’s basically a manual mode, and you get the usual set of shooting modes and filters that debuted on the Find X8. The camera interface itself hasn’t changed, but because the Find N5 is a foldable, you can use FlexForm mode to good effect and take photos in interesting angles. On that note, you can use the viewfinder with the outer panel, giving you the ability to take selfies with the rear cameras, and this is what I did most of the time — I just used the selfie cameras when making video calls.
You get the same set of AI editing features as the Find X8, including an unblur option that does a good job restoring details, and a fantastic eraser mode that’s among the best you get on any Android device.
Thanks to the LYT700 imaging module and latest-gen Hasselblad camera tuning, the Find N5 takes outstanding photos in daylight scenarios. You get good dynamic range and white balance, and colors look natural; there isn’t too much saturation.
Foliage is rendered accurately, and there isn’t any issue with aggressive smoothing. Macros came out really well too, and this is an area where the Find N5 does a better job than just about every other foldable. The wide-angle lens is the weakest sensor at the back, but it still does a decent job in most situations, even if you don’t get the same color vibrancy in low-light.
On that note, the main camera takes outstanding photos in challenging conditions. It preserves intricate details and minimizes highlights, and there isn’t any visible noise. The tele lens is really good as well, and you get the same caliber of shots as the main camera at 3x.
There is a noticeable difference in detail retrieval at 6x, but you still get great shots, and the phone uses AI to smooth out images beyond 10x, delivering passable shots at up to 30x. The phone does a great job with portrait shots, but there are situations where you get excessive blooming in the background; this was a problem on the Find X8 Pro when it debuted, but a software update sorted out those issues — I believe that will be the case on this device as well.
I still think the Find X8 Pro and Vivo X200 Pro have an edge in low-light, but the Find N5 has every other foldable beat when it comes to the cameras. If anything, the cameras on the Find N5 are better than the Galaxy S25 and Pixel 9, and that’s a big deal in and of itself.
The Find N5 runs ColorOS 15.1 based on Android 15, and having used the Find X8 and Find X8 Pro quite a bit in the last four months, the software felt familiar. ColorOS 15 has a new interface with vivid colors, and it bundles a decent set of AI utilities; the Find N5 has a nifty call summarization and instant translation feature, but they’ll be rolling out at the end of Q1.
Multitasking is a pretty big use case on a foldable, and OPPO’s Boundless View is back on the Find N5. The mode makes it extremely easy to set up a split-screen pair and multitask on the device, and I want other manufacturers to borrow this mode as soon as possible.
What’s new this time is split-screen suggestions; if you’re switching between two apps in unfolded mode, ColorOS 15 suggests creating a split-screen mode instead, and it’s intuitive. You can also save these split-screen pairs on the home screen if you need quick access.
Other foldable mainstays like an app dock and taskbar are intact, and while the notification pane now defaults to a split option with the toggles to one side and notifications on the other, you can switch back to a unified option if that’s what you like (as I do).
The Find N5 is optimized incredibly well, and the foldable has a fluidity that you just don’t get with many devices in this category. I didn’t see any slowdowns whatsoever, and most of the time, I didn’t even realize I was using a foldable.
I have two issues with the software; the app grid is still limited to 4×4, and I just don’t understand why that’s the case. Every other Android phone I use has the ability to switch to a 5×5 grid, and not being able to do that on the Find N5 is annoying. The second is that there’s still plenty of bloatware on the device, and while it can be easily uninstalled, I don’t want to see any bloatware on a phone that costs this much.
With the Find X8, OPPO introduced the ability to share content with iPhone uses via O+ Connect, and it’s extending that feature to macOS with the Find N5. You’ll need to install O+ Connect on your MacBook, and you can easily transfer content to and from the Find N5, view photos on the MacBook, and even control your MacBook using the foldable.
When it comes to software updates, the Find N5 will pick up five Android platform updates alongside six years of security updates, and that’s better than most foldables. OPPO is doing a good job rolling out updates on time, and the device should make the switch to Android 16 shortly after it becomes available in Q2 2025.
Honor’s Magic V3 is the closest rival to the Find N5. It also has a svelte design, great hardware, and an outstanding camera package. It may not be as powerful, but there are no problems gaming on the device, and Honor leads the industry when it comes to eye comfort tech. Having used both devices, I think the Find N5 has a slender edge with the design and cameras, and I generally prefer using ColorOS to MagicOS. That said, these are minor differences, and both foldables are among the best around.
There isn’t anywhere as much of a choice if you’re in North America. While I like the design and software of the Pixel 9 Pro Fold, the cameras just don’t hold up in 2025, and it isn’t as comfortable to hold and use. The only other option is the Galaxy Z Fold 6, but that’s hilariously outdated next to the Find N5, and I honestly wouldn’t recommend the device.
You need a foldable that feels like a regular phone
You want a foldable without a visible crease
You need the latest internals and the best cameras
You need standout battery life
You want reliable ingress protection
You shouldn’t buy this if:
You’re in North America
You need a clean software interface
One of the main reasons why I like the Find N5 so much is that it doesn’t feel like a foldable. When interacting with the outer panel, I felt like I was using a regular phone, but I still have the versatility of unfolding the device and accessing a tablet-sized panel. That is a big deal, and while Vivo and Honor also have ultra-thin foldables, I think OPPO did a better job overall.
Both the inner and outer displays deliver outstanding color fidelity and contrast levels, and I didn’t see any issues in this regard. The unbelievably-thin design makes using the inner panel that much more enjoyable, and while I was worried about the durability of the device in the beginning — it is the thinnest foldable, after all — it hasn’t been a problem.
It is just as fast as a regular phone, and it holds up very well even during extended gaming sessions. Similarly, the battery life is outstanding, and it outmatches every other foldable I’ve used up to this point — even with heavy use, I easily got a day’s worth of battery.
The cameras are the best of any foldable yet, and you get a good amount of versatility as well, which isn’t always the case. The software is packed with useful features too, and OPPO managed to find a nice balance with its AI suite.
In fact, my only annoyance with the device is with its positioning. With OPPO taking the lead this time, the Find N5 won’t be available in as many global regions, and it isn’t coming to North America. That’s a real shame, because the Find N5 is a fantastic showcase for what’s possible with foldables, and it effortlessly outshines what Samsung is doing. If you’re in a country where the Find N5 is going on sale and are interested in switching to a foldable, you should consider picking it up — this is the best foldable I’ve ever used.
If you are a fan of sports, few streaming services will suit your needs better than Paramount+. Every month, basketball games, soccer matches, and major golf tournaments stream live on the service. Plus, the entire Showtime library is now available on Paramount+. There are also plenty of new shows and movies coming to Paramount+ in March 2025.
The most intriguing new release on Paramount+ this month is Happy Face, a true crime series starring Dennis Quaid as the Canadian-American serial killer known as the Happy Face Killer. The critically acclaimed 2023 thriller Strange Darling is streaming as well.
If the latest releases have you intrigued, you can sign up for Paramount+ here. It was named the best-value streaming service as well.
New on Paramount+ in March 2025
Paramount+ Originals, Exclusives, and Premieres
3/1: Strange Darling
3/3: Rumours
3/4: Sin City Gigolo: A Murder in Las Vegas premiere
3/10: Ringo & Friends at the Ryman special
3/11: Tom Petty: Heartbreakers Beach Party Extended premiere
3/20: Happy Face series premiere
Sports on Paramount+
3/1: NCAA Men’s Basketball – Connecticut @ Providence; Seton Hall @ St. John’s; Cincinnati @ Houston
2/24: EFL Championship – Sheffield United vs. Leeds United
Throughout February: Scottish Professional Football League competition
Throughout February: English Football League competition
Throughout February: Serie A competition
Throughout February: AFC Champions League Elite competition
Streaming February 1
A Mighty Heart
A Walk on the Moon
Adore
Along Came A Spider
American Gigolo
Attack the Block
Babel
Bebe’s Kids
Birthday Girl
Boys And Girls
Brokeback Mountain
Chocolate City
Cinema Paradiso
Come Away
Critical Condition
Dangerous Beauty
Doubt
Ferris Bueller’s Day Off
Geostorm
Hooking Up
I Hope They Serve Beer In Hell
In & Out
Into The Wild
Jersey Girl
Juice
Just Another Girl on the I.R.T.
Like Water for Chocolate
Losing Isaiah
Mansfield Park
Marvin’s Room
Men, Women & Children
Menace II Society
Muriel’s Wedding
My Best Friend’s Wedding
My Boss’s Daughter
O (Othello)
Old School
Pretty In Pink
Road to Perdition
Roman Holiday
Saturday Night Fever
Serendipity
Shakespeare in Love
Shall We Dance?
Shooter
Suffragette
Terms of Endearment
The Babysitter
The Boy in the Striped Pajamas
The Color Purple
The Evening Star
The Firm
The Hunt for Red October
The Love Guru
The Love Letter
The Mask
The Pursuit of Happyness
The Smurfs
The Smurfs 2
The Stepford Wives
The To Do List
The Wood
Transformers
Vampire in Brooklyn
What Lies Beneath
What Women Want
When Harry Met Sally
Win A Date With Tad Hamilton!
World War Z
Wuthering Heights (2003)
Streaming February 2
67th Annual Grammy Awards
Streaming February 3
Streaming February 5
Bar Rescue (season 9)
The Patrick Star Show (season 2)
Super Bowl Greatest Commercials: F.O.A.T special
Streaming February 7
NCIS: Sydney (season 2 premiere)
Streaming February 12
PAW Patrol: Big Truck Pups
CMT Crossroads (seasons 1-3,5,10-16,18-20)
How Did They Fix That? (season 3)
MTV Unplugged (seasons 1-8, 10-13)
VH1 Storytellers (seasons 1-9, 11-13,15,16)
Fanboys
Streaming February 16
The Equalizer (season 5 winter premiere)
Tracker (season 2 winter premiere)
Streaming February 17
On TV: A Black History Month Special
Halloween
Deadlock
Streaming February 24
Beyond the Gates (season 1)
Southpaw
Streaming February 26
Survivor (season 48)
The Loud House (season 7)
Streaming February 27
Streaming February 28
Those are all of the new releases on Paramount Plus for February 2025. We’ll be back every month with more new shows and movies coming to the streaming service.
With the Academy Awards drawing near, you might want to catch up on all the nominees. Chances are your local multiplex won’t be showing them, so if you want to catch The Substance and the rest of the Oscar picks in theater-quality screen size, it’s time to upgrade to a home projection system. Digital projectors are delivering better picture quality than ever, with 4K resolution, flicker-free motion and clear, accurate color. We’re seeing big discounts on some of our favorite digital projectors as we come out of Super Bowl time and head toward award season. (Plus, certain projectors are great for other things, too, like gaming, all year around.)
If you haven’t sat down with a digital projector recently, prepare to be dazzled at how good their image quality has become. Whether you’re interested in a high-end model with vivid colors and sharp contrast that’s fast enough for console gaming, or something more affordable and portable with slightly diminished specs, major brands have high-quality projectors available at deep discounts. Here are the best projector deals we can see in February.
Let’s start our offers off with a solid $70 price cut on a crossover projector that works for both home entertainment and work presentations. In our review, contributing editor M. David Stone praised the EpiqVision Flex’s “high brightness and good color accuracy,” noting that its 2,700-ANSI-lumen rating makes it easily viewable even in lit rooms. The three-LCD chip image array paired with a traditional bulb helps minimize the artifacts other budget projectors suffer from. While it doesn’t deliver the kind of contrast and quality that home theater cinephiles demand, at this price, it’s a solid option for budget shoppers looking to add a projector to their arsenal.
With a built-in battery, this is a capable portable projector at a nice discount that’ll only last while Best Buy has it in stock. You can see how it compares to the other models on our list of the best portable projectors, but the specs on the Ion are solid: 1,280-by-720 video resolution with 100 ANSI lumen brightness, coupled with two hours of battery life for video and 10 hours for audio. The built-in 70-watt speakers feature dual 3-inch drivers and 1.5-inch tweeters for surprisingly robust sound. You can even use it as a karaoke machine with two included 1/4-inch mic inputs.
It’s pricey, but the picture quality of the Vista T4 will dazzle you. We reviewed this model, praising its cutting-edge triple-laser design that delivers incredible color quality and sharpness. It’s a heavyweight unit, clocking in at over 37 pounds, so it’s best suited for a permanent place in your home theater. With a maximum image size of 150 inches on the diagonal, it’ll easily dominate whatever room you install it in. It even supports 3D images (glasses not included). An included 60-watt Dolby Audio speaker gives you cinema-quality sound, and a $1,000 discount is nothing to sneeze at.
For a well-rounded projector that works well for home entertainment and office presentations, the Miroir M700S is hard to beat. While it doesn’t push the envelope on resolution, this projector features a built-in rechargable battery with up to two hours of playback time. It’s portable, it’s easy to set up, and it’s decent on audio with a built-in 3-watt speaker. The M700S is also built to last, with an estimated 20,000 hours of usage life in Normal Mode. That’s enough to watch the Lord of the Rings trilogy (extended editions) 1,652 times. Compare it against our list of the best projectors before you buy.
We gave this tiny but potent projector an Editors’ Choice award in our review, noting that the Anker Nebula Capsule 3 was “easy to set up, delivers impressive image quality, and even doubles as a Bluetooth speaker.” With its built-in Android TV 11 functionality, you don’t even need to hook it up to a computer to stream your content through it, and the excellent color accuracy and contrast make it ideal for all kinds of video. Sound quality is quite good for the size as well, and a $100 price drop is always awesome.
Recommended by Our Editors
This somewhat pricey LG projector earns its keep with exceptional 4K resolution and surprising brightness in a pint-size package. The retro-styled housing is just five inches high and weighs 3 pounds, making it easy to set up anywhere. Able to project up to a 120-inch maximum screen size, the tri-color RGB laser provides exceptional contrast, and the unit delivers realistic, vibrant hues. LG’s built-in WebOS platform gives you native access to streaming services, and you can also play content through Apple AirPlay, USB-C, or the HDMI input. Right now, Amazon has it for 14% off.
In terms of image quality, this portable projector from GPX isn’t going to top the charts. It delivers 1,280-by-720 resolution with 1000 ANSI lumens of brightness, with a maximum screen size of 150 feet on the diagonal. That’s all perfectly acceptable, especially for a model in this price range. You can run input through HDMI or USB, or you can stream video from a MicroSD card. It even has a built-in DVD player so you can enjoy your old physical media. There’s no built-in speaker, but the GPX has a Bluetooth transmitter for easy audio. Right now, it’s $53 off. See how competing models fare on our list of the best portable projectors.
More Projector Deals
*Deals are selected by our commerce team
FAQ
What Are the Different Types of Projectors?
Digital projectors create images using three primary types of technology. The most basic, DLP (Digital Light Processing), has an array of minute mirrors inside the lens to transform white light into other colors. 3LCD projectors use a trio of LCD screens, one for each primary subtractive color. LCoS (Liquid Crystal on Silicon) uses an active-matrix display on a silicon backplate for the most accurate colors, although it is significantly more expensive.
What Should I Look for in a Projector?
The two most important metrics for a projector are brightness and resolution. Brightness is measured in lumens, with a larger number being better. However, projectors typically have two distinct brightness numbers, one for white light and one for color. Images may appear dull if the color rating is lower than the pure white rating. Resolution determines the number of pixels the projector uses to create the image. 1080p high definition is the most common. For best results, match your projector resolution to the image source.
Do I Need a Screen for My Projector?
The projector deals above don’t come with an included screen. In general, although you can cast an image from a projector on any wall or surface, it’s not going to look as good as if you use a non-reflective white screen designed for that purpose. There are many different types of screens on the market, including some that are inflatable for easy setup and storage. While they’re not strictly required, they definitely make your viewing experience better. Here’s our handy guide for how to choose the right screen for your projector.
What Is the Best and Cheapest Projector?
We’ve put together a robust rundown of the best projectors on the consumer market, covering a wide range of uses, from large units to anchor a home theater to portable models for movies on the go. Overall, we rate the Vankyo Performance V700W as the best all-around cheap projector. It’s fast enough for casual gaming and bright enough for movies, and it even has surprisingly decent built-in speakers. In our review, our expert said that it was “a highly capable choice for home use,” and it often sees price drops.
Why Are Mini Projectors So Cheap?
Hardware size keeps shrinking in the projector market. In our rundown of the best portable projectors, we examine why these mini-projectors are often so cheap. The most typical compromise that’s made in a small projector is bulb brightness.
Pico-size models, which fit in a pocket, usually cap out at around 100 ANSI lumens of brightness, which can get washed out in ambient light. Image resolution is also often lower than you’d get in a more expensive model. 720p is more common among mini projectors. That said, they’re more than enough for most casual uses.
How Do We Test Projectors?
The short answer? Thoroughly. When we test projectors, be they data projectors, home entertainment projectors, or home theater projectors, we perform both video and data tests, as well as give the units a 30-minute warm-up time while running through preliminary setup steps. And that’s just the start! Dive into any of our reviews to see how deep we go.
Unlock Exclusive Deals on the Latest Tech Products
Sign up Now for the Tech Deals Newsletter
This newsletter may contain advertising, deals, or affiliate links.
By clicking the button, you confirm you are 16+ and agree to our
Terms of Use and
Privacy Policy.
You may unsubscribe from the newsletters at any time.
About K. Thor Jensen
Contributing Writer
K. Thor Jensen is a writer and cartoonist living in the Pacific Northwest. He has contributed to dozens of prestigious outlets, including PCMag, Tested, Clickhole, and Newsweek. His second graphic novel, Cloud Stories, was released in 2017.
Grado Labs reckons its founder Joseph Grado invented the whole idea of the properly high-end headphone when he developed and launched the Signature HP1 over 30 years ago.
In recognition both of this feat and of what would have been Joseph’s 100th birthday, the company has launched these Signature HP100 SE headphones – and it promises a contemporary version of a classic, with fresh design elements at every stage.
Promises, promises. So can the Signature HP100 SE blaze the sort of trail their illustrious predecessors managed and be considered among the best wired headphones in existence?
How much do the Grado Signature HP100 SE cost?
The Grado Signature HP100 SE wired over-ear open-backed headphones launched in late November 2024. In the United Kingdom they currently sell for £2795. In the company’s native United States they’re a slightly less punchy $2495. Australia, meanwhile, sees them cost around AU$3999 – if you can find a pair, anyway.
I hardly need to say that this is a lot of money for a pair of hard-wired, over-ear, open-backed headphones – but equally, the Grado are far from short of competition. Similarly priced alternatives from the likes of Austrian Audio, Final Audio, Focal and Yamaha are available – and that’s just for starters…
What’s special about Grado’s Signature HP100 SE?
(Image credit: Future)
For the first time, here’s a pair of Grado headphones that features detachable cables. This is unarguably a good thing, especially when you consider the business end of the cable here features a 6.3mm unbalanced connection.
Grado is making vague noises about alternative cables with different terminations, but details as to when these might be available and what they might cost are extremely thin on the ground. Each earcup requires wiring, so the other end of the cable splits into ‘left’ and ‘right’ four-pin mini-XLR connections.
The cable feeds a pair of newly minted, completely redesigned speaker drivers. Measuring 52mm across, each cone is of paper composite construction and is backed by a rare earth alloy high-flux magnetic circuit and new voice coil made from copper-plated aluminium.
This arrangement not only results in a claimed frequency response of a touch over 3Hz to more than 51kHz, but is designed to produce optimal dynamic and transient response, spacious and well-defined soundstaging, and low distortion combined with high refinement. Which all looks very good when it’s written down, doesn’t it?
How does the Grado Signature HP100 SE sound?
(Image credit: Future)
Because the HP100 SE have a 6.3mm unbalanced termination, they’re one of the few pairs of wired headphones I’ve tested lately that can’t be connected to my FiiO M15S digital audio player. Still, wiring them to an iFi iDSD Diablo 2 headphone amplifier that’s joined to an Apple MacBook Pro loaded with Colibri software isn’t a bad alternative.
And with some genuinely high-resolution content playing (thank you, Colibri, not Apple), the little niggles about materials and perceived value go all the way out of the window. The Grado Signature HP100 SE are a thrillingly complete listen.
From the deep, textured, and straight-edged lowest frequencies to the shining, substantial and detailed highest, and at every point in between, the Grado are balanced, insightful and convincingly musical performers. Their tonal balance is carefully neutral, their frequency response completely smooth and even. No matter the sort of music you’re listening to, no matter its source, the HP100 SE deliver it in confidently unified and utterly convincing fashion.
They hit with respectable determination at the bottom of the frequency range, but these headphones are not mindless thumpers. Bass sounds are textured and varied, with plenty of light and shade revealed – and the Grado control the bottom end with such authority that rhythmic expression is always just somehow correct. Languid, hectic, club-footed… it doesn’t matter the nature of the music, the HP100 SE communicate its rhythm in the most persuasive manner.
(Image credit: Future)
The midrange is lavishly detailed, too, and the idea that you’re not getting a complete description of a singer’s technique, attitude and intention is fanciful. There’s just as much information loaded onto the top of the frequency range, too, and the brilliance of the treble reproduction is nicely balanced against a tangible sensation of substance. At every turn, no detail is too fleeting or too minor to elude the Grado – and they do a spectacular job of putting even the most transient occurrences in a recording into proper context.
Best of all, though, is the fact that this forensic attitude is not at the expense of engagement or excitement. Yes, the HP100 SE can peer deep into a recording and let you know exactly what’s what – but their musicality, their energy and the vibrant nature of their reproduction leaves you in no doubt that, first and foremost, music is entertainment.
What else? Well, there’s an absolute bucket-load of dynamism available – and in every sense. So if the orchestra shifts from ‘single contemplative woodwind instrument’ to ‘everyone trying to outdo everyone else at the climax’, the distance the Grado can put between these two positions is prodigious. And when that single woodwind is playing, the harmonic variations are identified in an almost casual manner.
Basically, the Grado Signature HP100 SE have, in performance terms, what sportsfolk like to call ‘an all-court game’. On a pound-for-pound basis, they’re among the very best headphones around.
What’s the HP100 SE’s design all about though?
(Image credit: Future)
Some of the Signature HP100 SE design is a departure for Grado. At a glance, though, you’d be hard-pressed to identify exactly what these design changes are – because these headphones look very much like Grado business as usual, for better and for worse.
The housings around the edge of the earcups are made of individually milled, treated aluminium – they’re in a finish called ‘space grey’, and are engraved with some branding and the model name.
The headband features 50% more padding than previous Grado models – that’s not to say it’s especially generously padded, you understand. Still, a 50% increase in comfort is not to be sniffed at. And the cable is of a softer, but no less durable, braided finish than previous Grado products, and promises better flexibility and lower weight – but then it would have been difficult to find a less flexible, heavier cable in all of headphone-land than the one supplied with previous high-end Grado designs.
(Image credit: Future)
Otherwise, there’s not a lot to differentiate the Signature HP100 SE from Grado’s older premium models. They arrived fitted with the big, raw foam ‘G’ cushion earpads – they’re eminently fit for purpose, but hardly the last word in luxury – and a pair of the smaller ‘F’ cushions is supplied in the packaging. The idea is to achieve your preferred sonic balance, says Grado, but it also means you’re offered the choice between ‘too much earpad’ and ‘not quite enough earpad’.
Headband adjustment is achieved using the long-serving ‘friction pole’ arrangement. It’s perfectly adequate in the way it functions – although the Signature HP100 SE are likely to prove too large for the smaller-headed among us – but there’s no denying that it’s rather agricultural and certainly not the sort of methodology you might be expecting from a pair of headphones costing the thick end of three grand. Still, a bit of cachet is clawed back by the fact the Signature HP100 SE are assembled by hand at the Grado facility in Brooklyn.
Grado Signature HP100 SE review: Verdict
(Image credit: Future)
If an appraisal of a pair of headphones began and ended with the way they sound, the HP100 SE would already have taken their seat at the top table.
But there’s more to it than audio performance when you’re contemplating spending this sort of money on headphones, and where the peripherals are concerned the Grado are on slightly shakier ground.
Still, I can’t emphasise enough that the Grado sound uncomplicatedly brilliant – you’ll just need to wrap that up in the context of pride of ownership and perceived value.
Also consider
You can spend considerably less than this on a pair of Meze Audio Liric 2 and get yourself a pair of great-sounding headphones that feel (and smell) almost as good as they sound.
Or you could nudge a little closer to Signature HP100 SE money and get yourself a pair of Austrian Audio The Composer – again, great sound and no compromise where materials or perceived value is concerned.
The same is true of the Focal Stellia: excellent sound, a very agreeable product in visual and tactile terms. Different sounding to the Grado, certainly, but not necessarily ‘better’ – depending on your preferences.
Creating a chart from a dynamic array in Excel 2024.
Howard Wen / Foundry
Changes made to the original table data that update the dynamic array will also be reflected in the dynamic chart automatically.
To customize the appearance of your chart, click on the chart to select it. At the top of your spreadsheet, select the Chart Design tab. You can then add a title to your chart, adjust its axes, or change its colors. For more about working with charts in Excel, see our charts and sparklines tutorial.
Excel: Create custom-filtered views for a spreadsheet
Using Excel’s Sheet Views feature, you can create a copy of a sheet and then apply filtered or sorted views of the data to the duplicate sheet. This can be helpful when you’re collaborating on a spreadsheet, where someone would like to create a customized view without altering the original sheet.
You and your collaborators can create several such custom-filtered/sorted views for a sheet. Then each person can select among them, switching from one view to another.
Note: In order for this feature to work, the Excel file must be stored in OneDrive.
Create a sheet view
Along the bottom of your spreadsheet, click the tab for the sheet that you want to create a sheet view for.
Then at the top of the spreadsheet, click the View tab, and on the toolbar, select Sheet View > New. You’ll be switched to a new sheet view of this sheet.
Creating a new sheet view. Here you can filter or sort the data without affecting the original data set.
Howard Wen / Foundry
Apply whatever filters and sorting you like to the data on this sheet — your actions won’t affect the original version of the sheet.
When you’re finished making your customizations, save the new sheet view and give it a unique name: On the View tab, click Temporary View (this is the name given to a new sheet view by default). You’ll be prompted to type in a new name for your new sheet view. Then click the Keep button.
When you click Exit on this toolbar, the sheet view is dismissed, and the spreadsheet returns to its original, default state.
Switch among sheet views
Once you and any of your collaborators have created sheet views for the spreadsheet, you can easily switch from one to another. At the top of the spreadsheet, click the View tab. Then at the left of the toolbar, select the name of the current view (it says Default if you’re viewing the spreadsheet without a sheet view applied) to open a dropdown listing the names of sheet views that have been created for the spreadsheet. Click the name of one of these sheet views to switch to it.
Click the dropdown on the toolbar to switch to a different sheet view.
Howard Wen / Foundry
Manage your sheet views
You can delete, duplicate, or rename your sheet views. At the top of your spreadsheet, click the View tab. Then toward the left of the toolbar, click Options.
On the “Sheet Views options” panel, click to select the name of a sheet view. Then click the Rename, Duplicate, or Delete button to perform that action on the selected sheet view.
Excel: Place images in cells with the IMAGE function
This feature requires Excel 2024.
Using the IMAGE function, you can insert and display web-based images in your spreadsheets to create visually engaging dashboards, inventories, and so on. Instead of floating on top of a cell, images inserted with the IMAGE function live within a cell and will remain there when you sort, filter, calculate, or otherwise manipulate a table.
The formula for the IMAGE function that you enter into a cell is:
source: Insert the web link to an image here, whether it’s on the internet or stored in your OneDrive. You can also reference another cell that contains an image or web link. BMP, JPG/JPEG, GIF, TIFF, PNG, ICO, and WEBP image formats are supported.
alt_text: Optionally, you can type in text that names or very briefly describes the image. This is useful if the image cannot be displayed, such as if the link becomes inactive.
sizing: This is also optional and determines how the image will be sized inside the cell. You can enter one of the following numbers:
0: This is the default. The image will be sized to fit inside the size of the cell, while maintaining the image’s original aspect ratio.
1: The image’s length and width will be stretched to fill the cell, which may distort its original aspect ratio.
2: The image’s width will be stretched to fill the cell’s width, but not its height, thus maintaining the image’s original aspect ratio.
3: The image’s height will be stretched to fill the cell’s height, but not its width, thus maintaining the image’s original aspect ratio.
height: This optional value specifies the height of the image in pixels.
width: This optional value specifies the width of the image in pixels.
Here’s an example that uses all the optional settings above:
The image file at the web link will display “Computerworld Favicon” if this link doesn’t work. It will be sized to fill the cell’s height (“3”), but not its width. However, the image will be restricted to a height and width of 200 x 300 pixels. (Normally you’d use either the sizing or the height and width controls, not all of them.)
In this example, the square CW favicon has been distorted to a height of 200 pixels and a width of 300 pixels.
Howard Wen / Foundry
For more about working with the IMAGE function, see Microsoft’s IMAGE function support page.
PowerPoint: Create internal hyperlinks in a presentation
You can now create hyperlinks within a presentation: When you click linked text or a linked image on a slide, you will jump to another slide in the same presentation.
Go to the slide that contains the object (text or image) that you want to link from. Right-click on this object, and on the menu that opens, select Hyperlink…. Alternatively, you can click on the object to select it. Then, above the slide, click the Insert tab, and on the ribbon toolbar, click Link.
Either action will open the Insert Hyperlink panel. In the left column of this panel, click Place in This Document. In the second column, select the slide that you want the new hyperlink to jump to when it’s clicked. Then click OK.
Adding an internal hyperlink to a presentation.
Howard Wen / Foundry
To test the hyperlink, go to the slide that contains the hyperlinked object. Above the slide, click the Slide Show tab. On the ribbon toolbar, click From Current Slide. Now click the object that you created a hyperlink for — this action should jump to the slide that you selected.
PowerPoint: Create a video recording of a presentation
A presentation is about more than the slide deck. Equally important are the things you say that aren’t written on the slides — and how you say them. That means colleagues who aren’t able to attend a live session may miss out on the full impact of your presentation.
In PowerPoint 2021 and 2024, you can record both audio and video of a presentation and export it as a video to share with others.
Above your presentation, click the Record tab. On the ribbon toolbar, click From Beginning or From Current Slide. This will open a recording studio panel over the screen.
PowerPoint’s recording tools appear at the top of the screen.
Howard Wen / Foundry
Along the top of this panel, you can click the webcam or microphone icons to turn these devices on or off for recording. If you have more than one camera and/or mic connected to your computer, you can switch among them by clicking the three-dot icon on this toolbar.
Before you start the recording, take a moment to review the slides in your presentation — at the lower-left corner, click the left and right arrows to scroll through them. In the area above the slide thumbnail, you can optionally type in notes or a script to read during your recording.
Click the red circle button at the top to start recording. It will turn into a red square, indicating that your actions are now being recorded. Click through the slides and speak aloud, highlighting key points on the slides and providing more context for those who will be watching this video.
You can click the laser pointer, pen, or highlighter icons on the toolbar below the large thumbnail of the slide to point out, draw on, or highlight things on the slide. These gestures will be included in the recording.
At the top of the screen, click the Pause button (to the left of the webcam icon) to pause recording. Click it again to resume.
Click the red square at the top of the screen to stop recording. On the large thumbnail of the slide, click the triangle icon to play back the recording. If you want to redo the recording, click the circular arrow icon at the top of the screen.
When you’re satisfied with the recording, click Export at the top of the screen. On the page that opens, you can type in a file name for the recording and optionally click Browse to select where on your PC you want to save the video file. Then click the Export Video button to save the recording to that location.
Exporting a video of a presentation.
Howard Wen / Foundry
Depending on its length, the video may take a few minutes to export.
PowerPoint: Insert live webcam video into your presentation
This feature requires PowerPoint 2024.
With PowerPoint’s Cameo feature, you can embed live video from your webcam into one or more slides in your presentation. This can be useful when you’re collaborating with your co-workers on a PowerPoint presentation so you can talk with them directly. Or when you’re presenting a slideshow to others, you might want to insert your live webcam feed into a specific slide to explain the information on it.
Go to the slide where you want to add live video. Above the slide, click the Insert tab. On the ribbon toolbar, click Cameo to insert your webcam feed. Select This Slide or All Slides. A large headshot icon will appear on the lower right of the slide. (If you selected All Slides, this icon will appear on all the other slides in the presentation.) Click the crossed-out camera icon on it to switch on a live feed of your webcam.
Your live webcam feed appears at the lower right of the slide.
Howard Wen / Foundry
You can reposition your webcam feed on the slide by clicking-and-holding onto it and dragging it to another area on the slide. You can resize it by dragging one of the nine points bordering it inward or outward.
There are also several ways that you can customize your webcam feed, such as applying styles and visual effects. These options are listed on the ribbon toolbar in the “Camera Styles” area.
When you’re satisfied with the way you appear on the webcam feed, click the Slide Show tab above the slide. On the ribbon toolbar, select to start the presentation From Beginning or From Current Slide (the slide that’s open in the main area of PowerPoint).
As you advance through the presentation, your webcam feed will appear on the slide that you set it on. When the presentation is finished and you exit out of Slide Show mode, the webcam feed will turn off. You can also turn it off by simply clicking on the live feed image.
PowerPoint: Add captions to video or audio on a slide
This feature requires PowerPoint 2024.
If a video or audio file embedded on a slide has a closed captioning file that accompanies it, you can add this caption file so that the captions appear when the media is played. This can be helpful for viewers who are hard of hearing or who aren’t native speakers of your language.
Adding a closed captioning file makes video playback more accessible.
Howard Wen / Foundry
(If a video or audio file isn’t already on a slide, click the Insert tab at the top of the screen. On the ribbon toolbar, click Video or Audio. The interface will prompt you to select a video or audio file on your PC.)
Right-click on the embedded video or audio file, and on the menu that opens, select Insert Captions. Alternatively, click on the video or audio file to select it. Above the slide, click the Playback tab. On the ribbon toolbar, click Insert Captions and select Insert Captions again on the menu that opens.
Either way, the interface will prompt you to upload the caption file (in WebVTT or SRT format) that goes with the embedded video or audio file. Once the captions are uploaded, you can click the Play button below the video or audio clip to see the captions.
Outlook: Find emails quickly with Instant Search
Outlook 2021 and 2024 offer much more powerful search features than their predecessors. Inside the search box at the top of the screen, type keywords related to an email you’re looking for, such as the name of the sender or recipient, a subject line, or words or phrases that may be in the email. As you type, the Instant Search feature will generate results, if any, in a dropdown below the search bar.
You can click the Files or People tabs to narrow the search to emails with a file attachment or a sender described by your keywords. To the left of the search box, clicking All folders will open a dropdown where you can select a specific folder to narrow the results to emails in that folder only.
To search for emails, simply start typing in the search box at the top of the screen.
Howard Wen / Foundry
In the dropdown, click on the email that you want to open. Or you can press the Enter key on your keyboard, and the full list of search results will appear below in the main window of the Outlook app.
When you hit Enter, the full list of results appears below.
Howard Wen / Foundry
Refine the search results using filters
On the toolbar just above the results, you can click options such as Has attachments, Unread, @ Mentions me, and so on to filter the results by those criteria.
Another way to filter results: Back inside the search box at the top, click the Filters icon (three horizontal lines that vaguely resemble a funnel) to the right to open a panel listing various filtering options.
Outlook offers several advanced search options, including searching within a specific date range.
Howard Wen / Foundry
Perform more complex searches with search operators
An even quicker way to refine a search is by using search operators inside the search box. For example, you can type from: and then an email address to find emails that were sent from that address. Type subject: or body: followed by a single word or a phrase in quotes to narrow results down to emails that contain the word or phrase in the subject line or body of an email.
The operators received: and sent: narrow emails down to those that you received or sent on a specified date. For example, received:>=07/01/2024 will narrow the search to emails you received on or after July 1, 2024. And received:<=07/01/2024 will narrow results to emails you received before this date.
For more info about searching in Outlook, including searching for calendar items and contacts, see Microsoft’s Outlook search support page.
Outlook: Translate emails from and to other languages
Outlook can translate emails you receive written in foreign languages into your native language — and it can translate emails you write in your own language into other languages.
When you receive an email written in a foreign language, you’ll see a prompt above its message body. If English is your native tongue and you get an email written in Spanish, click Translate to English and the Spanish text in the body will be translated into English. Outlook automatically recognizes several languages that it can translate for you.
You can translate an email into your own language with a single click.
Howard Wen / Foundry
Alternatively, you can click the three-dot icon at the upper right of the email. On the menu that opens, click Translate.
Translate emails into another language
You can also use Outlook’s translator to translate your text to another language. So, for example, you can translate an email originally written in English into Spanish or another language.
If you’re using classic Outlook: Click the Home tab at the top, then click the Translate button on the toolbar. On the menu that opens, click Translation Preferences…. This will open a panel where you can select the language you want to translate your email to.
If you’re using new Outlook: Click the View tab at the top, then click View settings on the toolbar. On the panel that opens: in the first column, click Mail. In the second column, click Message handling. And in the third column, scroll down to the subheading “Translation.” Below it, you can select the language that you want to translate your email to.
Translate highlighted text in an email
This feature is currently supported in classic Outlook only. Highlight portions of text that you want to translate in an email — it can be an email you’ve received, one you’ve sent, or one you’re composing.
Right-click the highlighted words. On the menu that opens, select Translate > Translate Message. If the highlighted words are your own that you typed in an email draft, you’ll see them automatically translated on this second menu.
Learn more
Now that you’ve familiarized yourself with the notable new features in Office 2021/2024, take a look back at our prior cheat sheets for Word 2016/2019, Excel 2016/2019, PowerPoint 2016/2019, and Outlook 2016/2019; most of the tips outlined in those articles still apply in the later releases.
Or take a look at all of our Microsoft cheat sheets, which cover Windows as well as the Office apps.
PDF files are ubiquitous in this cross-platform world, making it possible to view and share documents across a range of devices. While simply viewing or commenting on a PDF can be accomplished with free software, there are times when you might need to engage with a PDF document more extensively, such as making edits, reorganizing a file, or working with others to make changes. That’s where a a full-featured PDF editor comes in.
The best PDF editors allows you to edit, create, alter, and convert PDF files just like you would with any other text document. Adobe Acrobat is the most well-known option for most people. Its reputation is certainly deserved given its excellent feature set and overall utility. But it’s also quite expensive.
Thankfully, there’s a whole range of respectable and even great third-party PDF editors that provide less expensive alternatives to Adobe’s premier product.
PROMOTION
EaseUS PDF Editor – Edit, Convert, Compress & Protect PDFs
Integrate PDF maker, PDF editor, PDF converter, and PDF reader in one full pack with all the basics you need. The clean interface simplifies your PDF work to edit, convert, comment, annotate, merge, split, background, page, watermark, sign PDFs, or fill forms. Your PDF workloads are down by batch processing efficiently.
Now 25% OFF Exclusive Code: PCWORLD25
Free Download
Our picks below cover the gamut of PDF editing needs and budgets.
Why you should trust us: At PCWorld, we’ve been testing PC hardware and software for over 40 years. Our evaluation process is always hands-on and thorough, taking into account real-world usage needs. We don’t ever recommend something we wouldn’t be comfortable using ourselves. To learn more about our criteria for PDF editors scroll to the bottom of this article.
Adobe Acrobat Pro – Best overall
Pros
Easily navigable tabbed interface
Comprehensive PDF editing features
Streamlined sharing feature makes it easier to fill documents and get signatures
Cons
Rich feature set can be overwhelming for new users
Price When Reviewed:
$19.90/mo I $239.88/yr
Adobe Acrobat Pro remains the industry standard for good reason. Its rich combination of creation, editing, reviewing, and security features are mimicked by the best alternative options, but we feel Acrobat still does it best. Its recent interface redesign makes it much easier to navigate through its robust toolset than the nested menus of yore, and its cloud subscription option puts its advanced features within reach of more individuals and small businesses. (See how it compares to the Adobe Acrobat Standard.)
Though many of its features are available in other, cheaper PDF editors, Acrobat is still the editor against which all others are judged. And, as of this year, it’s also the first PDF editor that we know of to incorporate AI into the feature mix. See our article on “5 ways Adobe Acrobat’s AI Assistant gives you a productivity edge.”
Read our full
Acrobat Pro DC review
Foxit PDF Editor 13 – Best overall runner-up
Pros
Multi-platform
Business-ready capabilities
AI integration helps with document editing
Cons
Can be expensive depending on product license
Price When Reviewed:
PDF Reader: Free; PDF Editor: $10.99 a month; $129.99 a year; PDF Editor+: $159.99 a year
Foxit PDF Editor 13 hits all the right notes for a premium PDF editor and can even take on the formidable Adobe Acrobat. It’s packed with features that are sure to please power users—all the requisite content editing tools; review and markup features; form fill and signing support; and robust security options for sensitive documents, such as permissions, password protection, and data redaction. It supports tons of file formats, and adding hyperlinks, images, and files to a PDF is trouble-free.
Indeed, ease-of-use is one of Foxit’s great strengths. The program uses a Microsoft Office-style ribbon interface which groups tasks in a familiar and intuitive interface, making for a seamless integration with your workflow. It also provides ChatGPT integration so you can easily get help with your documents from an AI assistant. Yes, it’s priced on the higher side for a PDF editor, but with all it has going for it, Nitro PDF Pro more than earns its keep. Plus, you can try it out for free for seven days to see if you like it before making a commitment. If you’re looking for an Acrobat replacement, you won’t find many better.
Read our full
Foxit PDF Editor review
EaseUS PDF Editor – Best budget option
Pros
Full set of editing tools
Annotation options enable easy collaboration
Straightforward interface
Cons
Windows only
Needs subscription to remove usage limits
Price When Reviewed:
Free I $22.46/mo I $49.95/yr I $79.95/lifetime
EaseUS PDF Editor might not have the name recognition of some of the other editors on this list, but it’s more than capable of holding its own in the crowded PDF editor market. It provides all of the essential tools for managing PDF files without any of the elaborate or hard-to-understand features. It allows users to jump right in to their toolset and get straight to editing with only what they need.
While EaseUS’s features are great, they are also pretty standard fare among PDF editors. What makes it stand out is its affordable price—it’s a great value for those who regularly edit PDFs and don’t want to pay out the nose. EaseUS also offers a fully functional free version (with embedded watermarks on your edited documents) so users can take it for a spin to see if it meets their needs before they commit to paying any money.
Read our full
EaseUS PDF Editor review
PDF Candy – Best free option
Pros
Many advanced features
OCR capability
Very easy to use
Cons
No Mac support
Free trial only offers basic features
Price When Reviewed:
Free
PDF Candy is the rare free PDF editor that offers a lot of the features you’d typically have to pay for. We’re talking scanning, multiple file-conversion options, and OCR functionality. All of this combines to make PDF Candy stand out among the multitude of lesser free PDF editors. It does have a bit of a wonky interface, but once you get the hang of it you’re off and running.
Unfortunately, while the free version has access to the expansive toolset of the paid version, you’re limited to one PDF task per hour. If you want unfettered access, you need to shell out $6 per month, or $48 per year.
Read our full
PDF Candy review
PDF Expert – Best full-featured editor for Apple devices
Pros
Syncs across Mac, iPhone, and iPad
Comprehensive editing and annotation tools
Simple, intuitive interface
Cons
Requires annual payment
Lifetime license enables use on Mac only
Price When Reviewed:
Free 7-day trial, then $79.99 annually
PDF Expert is an excellent editor that fits seamlessly into the Apple ecosystem, making it our pick for Macs, iPads, and iPhone users.
While macOS does include a PDF editor in its Preview app, iOS devices don’t have a native PDF editor and PDF Expert fills that gap nicely. It has a clean and intuitive interface and offers a plethora of easy-to-use editing options such as page management, converting scanned files into editable documents, and conversion to other file formats, among other things. The pricing plan is also considerably cheaper than most of the other top picks, meaning this is a no-brainer for Apple users.
Read our full
PDF Expert (iOS) review
Apple Preview PDF editor – Best free option for Mac users
Pros
Full set of PDF markup tools
Supports form filling
PDFs can be protected with passwords, encryption, and permission controls
Cons
Limited native sharing options
Only available to Mac users
Price When Reviewed:
Built into macOS
Mac users needn’t look beyond the macOS for their PDF editing needs, since there is a full set of PDF markup tools already available at their disposal in Apple Preview. It has the chops to handle most personal and business PDF editing needs, including encryption, password protection, and permissions for files.
Apple Preview’s PDF features and capabilities are impressive and should be all you need for most common editing tasks. The drawback, of course, is that only Mac users can take advantage of them.
Read our full
Apple Preview PDF editor review
pdfFiller – Best web-based editor
Pros
Intuitive web-based interface
Robust security options
Lots of business-ready capabilities
Cons
Business features won’t be needed by some users
Requires annual commitment to get best value
Price When Reviewed:
Basic: $8 per month; Plus: $12 per month; Premium: $15 per month. Those prices require an annual commitment. Prices start at $20 a month with no commitment.
pdfFiller is a browser-based PDF editor that allows you do to just about everything PDF-related—editing, securing, sharing, creating, and storing PDF files—all from its intuitive and simple web interface. Its design is similar to a desktop app, with the toolbar across the top, and document thumbnails along the side, so it’s very easy to select the page you want to work on and perform the desired function, be it adding, deleting, or copying/pasting text; changing font style, size, and color; and so on. A standard set of markup tools is also available. It has a surprisingly deep set of features for both personal and business use. For instance the Premium plan offers an impressive legal document library, as well as SignNow support.
While incredibly versatile, not all of pdfFiller’s advanced features will suit everyone. Fortunately, there are three subscription tiers, which gives users a way to meet their editing needs without paying extra for unnecessary features: Basic for $8/mo; Plus for $12/mo; Premium for $15/mo with an annual commitment. Month-to-month options are also available, but at a higher cost, of course.
Read our full
pdfFiller review
Other PDF editor reviews
Swifdoo PDF for Windows: This full-featured, low-priced Acrobat alternative should serve most users well, with most everything you’d need for editing PDFs.
MobiPDF: Budget buyers will find a lot to like about PDF Extra. It offers good basic-to-intermediate PDF functionality that will please both casual and professional users, for a fraction of the cost of pinnacle program Adobe Acrobat Pro.
PDF24 Creator: This is a capable free editor that comes in handy for casual use, but if you need a program for more regular editing duties, PDF24 Creator has annoyances that will hinder its helpfulness.
PDF-XChange Editor: Another full-featured PDF editor that will fulfill most editing needs for a reasonable price. It also offers a respectable free version, if you can accept its watermarks.
Kofax Power PDF 5: This is a close alternative to Adobe Acrobat Pro with essential and advanced editing tools and lots of help resources, making it suitable for old hands and those new to PDF editing.
A word about online PDF editors
Why spend a chunk of change on a desktop editor when free online PDF editors abound? The simple answer is because you get what you pay for. Generally, free online editors will let you add text and comments, merge and split documents, and convert files to and from PDF. With rare exception, however, they won’t let you edit existing text and many have file-size and page-volume restrictions. And a lot of them will watermark your edited document. For these reasons, web PDF editors are best reserved for simple, fast editing jobs. Call in these big dogs for anything more demanding.
What to look for in a PDF editor
PDF editors come in a variety of flavors, offering varying feature sets—from basic functionality to power-user tools. It’s important to know what features best match your workflow before you commit to a PDF editor.
Create, convert, and export PDFs
The most fundamental function of a PDF editor is to make PDFs, either from scratch, scanned hard copies, or by converting digital documents. A good PDF editor should be able to transform a variety of file types—from Microsoft Office formats to images to HTML—and do so seamlessly, preserving the original formatting. It should also include OCR technology to make the PDF text searchable and editable. Likewise, a good PDF editor must be able to export PDFs into other editable formats such as Microsoft Word and PowerPoint, HTML, or plain text, maintaining the original files hyperlinks, images, and other elements.
Content editing
Another bit of magic that PDF editors unlock is the ability to modify text; insert, resize, and move images; and reorganize pages in the PDF. A good one will perform these tasks as easily as in a text document or slide deck, allowing in-line editing, dragging-and dropping graphics, and adding or removing hyperlinks.
Review and annotate
A good PDF editor should also let you or anyone else using it add comments and other annotations to PDF files during review. It should have tools to mark up both text documents and graphic-heavy files like webpages. Common options include sticky notes, callout boxes, highlighting, freehand drawing tools, and stamps with messages like “approved,” “revised,” and “confidential.”
Security
All businesses deal with documents containing sensitive data. Look for a PDF editor that includes security features that allow access for authorized eyes only. Good options will usually offer several levels of security, including password protection, permissions setting, and content redaction, which “blacks out” selected text and images. Most PDF editors will also offer one or more ways to electronically sign documents.
Mobile support
While deep PDF editing is best done on a desktop, it’s nice to be able to review and annotate files when you’re out and about. While PDFs can typically be reviewed in any PDF reader or editor, regardless of which one they were created in, consider looking for an editor that has a dedicated mobile app, is optimized for mobile devices, or allows cloud access to features through a mobile browser.
One of the great things about a PDF is that it can be read and edited in any PDF program regardless of which one it was created in. So beyond the features outlined here, let your personal preferences guide you in making your decision.
FAQ
1.
What is the difference between a PDF document and a PDF form?
While there are a number of different types of PDF file formats, they all fall under the umbrella term of PDF documents. A PDF form is a type of PDF document that has editable form fields a user can fill out. Typically, parts of the document are static and can’t be changed in a PDF form, such as questions in a survey or instructions about filling out the form. In a PDF form, the content fields a user fills out are open to editing and can offer a list of possible answer options or can be written in freely.
2.
Are PDF documents and Word files different?
Yes. They are two entirely different document formats. While you can export from one file format to another, they are not the same. Word file formats are usually used for word processing, editing, and making changes to text. PDF documents on the other hand, are most often utilized for viewing, sharing, and printing. Additionally, Word files are read and write and contain some version of the “.doc” file format. Whereas PDF files are typically read-only and contain the “.pdf” file format.
3.
Can you protect PDF documents from being edited by other people?
Yes. If you have a PDF document that you don’t want anyone else to edit, you can protect the file. You can do this by opening the file in Acrobat, for instance, and clicking Tools > Protect. Then you have a few options as to whether you want to simply restrict editing with a password, or if you want to encrypt the file for further safety. Once you choose how you want to protect the PDF document, you can set a password and save.
4.
Can you merge PDFs with a free PDF editor?
As a matter of fact, many free PDF editors allow you to merge two or more PDFs into one document. Such is the case with our top free pick PDF Candy. Open up the PDF editor application or website in your browser and search for the Merge option. It will then ask you to add the files of all PDFs you wish to merge. Once the files have been added, arrange the page order and alignment before proceeding with the merge. Afterwards, all of your previously PDF files will be merged into one new PDF document.
5.
Does Google have a free PDF editor?
Yes and no. Google doesn’t provide a designated free PDF editor itself, but there are third-party Chrome extensions that you can use to help get the job done. Alternatively, you can make use of Google Drive to edit a PDF document. Simply upload the document onto your Google Drive and then select the file and right-click and select Open with > Google Docs. The file will be opened as an editable Google Docs text document. Then just make your edits and when you’re finished click File > Download >PDF Document to revert it back to a PDF file.
This method is a quick and easy way to edit a simple PDF document, but be careful as Google Docs can run into formatting issues if your original document has complex visual formatting such as tables and graphs. In this case, it is best to use a designated free or premium PDF editor.
2025 Mercedes-Benz GLC 350e review: a sporty feel and solid electric range
MSRP $59,900.00
“If you’re looking for luxury and a solid electric range, the 2025 Mercedes-Benz GLC 350e is an excellent option.”
Pros
Sporty design
Solid electric range
Luxurious interior
Supports Level 3 charging
Cons
Slower than gas models
Limited physical controls
While Mercedes-Benz offers a number of high-end fully-electric vehicles, not everyone is quite ready to make the switch — which is exactly where a plug-in hybrid comes in. The Mercedes-Benz GLC 350e is a plug-in hybrid with a roomy interior and luxury feel, plus it offers plenty of oomph under the hood.
But, because of the fact that not everyone is ready to jump to a full EV, automakers have been working overtime on their plug-in hybrid options. As a result, the Mercedes-Benz GLC 350e has some serious competition. Does it do enough to make a serious case for itself — or should you go for one of the others?
Design
The overall design of the Mercedes-Benz GLC 350e is the same as the non-plug-in version, which, in turn, is the same as the 2024 model. That, however, isn’t a bad thing by any means. It’s a handsome-looking car with a sporty feel overall.
Christian de Looper / Digital Trends
On the front, you’ll find an oversized Mercedes-Benz logo centered on an intake grille that covers most of the face of the vehicle. It’s flanked by two slanted headlights. The roofline of the vehicle is curved and approachable, a trend we’ve seen from Mercedes-Benz in recent years. On the back of the vehicle, you’ll find two separated taillights that kind of merge into the liftgate.
Our review model comes with a few upgrades too. For starters, there’s the Patagonia Red Metallic color, which costs extra to get. Other add-ons include the AMG Line Package and the 20-inch AMG Multispoke Black Wheels, which look fantastic. All that to say, this isn’t exactly what the base variant of the GLC 350e will look like, but it’s also not too far off, which is nice.
Interior and tech
The premium build quality extends to the interior of the too. The cabin of the vehicle is modern and stylish, with unique-looking air vents and clearly premium materials. The seats are covered with stitched leather, and in the front row, you’ll get adjustable lumbar support and seat heating for an even more comfortable ride. All this is coupled with customizable accent lighting.
Christian de Looper / Digital Trends
Both the first and second row in the vehicle get plenty of space, and I found it perfectly comfortable to sit in the rear seats as a six-foot person. In the trunk, you’ll get 24 cu-ft of cargo space, which is solid but not necessarily massive. It’s about average for a crossover-sized vehicle like this.
Like other Mercedes-Benz vehicles in recent years, much of how you’ll control the vehicle is packed into the main infotainment display. The center touch screen is 11.9 inches, and houses controls for climate, media, mapping, and so on. There are very few physical controls outside of those on the steering wheel, though thankfully you will get a strip of physical controls for volume, exterior cameras, and your hazard lights. I wish there were more physical controls offered by this vehicle, especially when it comes to climate controls.
Christian de Looper / Digital Trends
For the most part, the software is responsive enough, but it still doesn’t match the responsiveness offered by tech companies like Tesla and Rivian. I hope this is an area where Mercedes-Benz continues to improve, especially considering the fact that so many controls are packed into its software now.
The main infotainment display is coupled with a bright instrument display behind the steering wheel. In some variants of the vehicle, you’ll also get a heads-up display showing your speed and some other information.
Range and charging
For the first time, there’s a plug-in hybrid option for the GLC SUV, which is great to see. Plug-in hybrids are a solid option for those interested in electrifying some of their driving but not quite ready to dive into a fully electric vehicle that can’t be gassed up in only a few minutes.
The GLC 350e combines a turbocharged four-cylinder engine with a 24.8kWh battery pack. Together, these are able to produce 313hp and 406 lb-ft of torque, which is technically an increase over the gas-only model. That said, despite the improved power, the vehicle isn’t as fast as the gas-only model, considering the fact that it’s so heavy.
Christian de Looper / Digital Trends
Still, the plug-in hybrid variant does mean that you’ll be able to drive limited distances using only the built-in battery. The GLC 350e has an electric range of 54 miles, which is solid, though not incredible for a plug-in hybrid. Like all plug-in hybrids, if you want to be able to use the vehicle as an EV as much as possible, you’ll need to be able to charge either at home or at work. If your commute is 15 miles, or 30 total during the day to get back home, you’ll need to charge up every single day. You’re not going to want to do so at public charging stations.
Of course, instead of using the vehicle as an EV, you could combine the battery and the gas engine for more efficient gas-powered driving. The vehicle offers a number of different modes to take advantage of, including a sport mode that prioritizes performance and a fully electric mode, which really only activates the gas engine when you press the throttle all the way to the ground.
Christian de Looper / Digital Trends
To charge the car, you’ll plug it in via its CCS port, and it has a maximum charging speed of around 60kW. That should allow drivers to charge it from 10% to 80% in around 30 minutes. Again, however, it will be more convenient to simply charge it overnight at home or during the day instead of at level 3 charging stations.
Driving experience
Behind the wheel, the GLC 350e felt sporty and responsive. Generally speaking, it was a joy to drive. Mercedes-Benz is offsetting some of that extra weight with the self-leveling rear air suspension system, which helped make the ride smoother in general. In sport mode, the GLC 350e was quite quick. It’s not as fast as an electric vehicle typically is, but it’s able to accelerate to 60mph in 6.2 seconds, which is more than fast enough to quickly overtake someone on the highway or to get up to speed on an on-ramp.
In electric-only mode, its performance was a little less impressive, though of course, the electric powertrain is more there for efficiency than performance. Again, its acceleration won’t break any records, but it’s still nice to be able to use the vehicle in electric-only mode as needed.
Christian de Looper / Digital Trends
I didn’t love the fact that the vehicle constantly defaulted to electric driving, though. To be sure, it makes sense that this vehicle, in particular, will be bought by those who are curious about battery-powered driving. However, I still prefer that the vehicle simply defaults to the last used driving mode. It’s a small complaint but was a little annoying during my use.
When the vehicle runs out of juice, it can make use of regenerative braking to replenish the battery a little, but you’ll really want to plug the car in. That’s because it’s such a heavy vehicle, which means that it uses more gas to accelerate than its fully gas-powered counterparts. You can also tweak the levels of regenerative braking, which can help the battery charge faster at higher levels.
Christian de Looper / Digital Trends
The steering on the vehicle is decently responsive too, though not quite as much as you would expect from a more sports-focused vehicle. This is common among luxury Mercedes-Benz cars, and it’s certainly not a bad thing. The aim of the game here is a comfortable ride, not necessarily an ultra-responsive drive. You get used to how it feels relatively quickly.
How DT would configure this car
I really enjoyed my week with the Mercedes-Benz GLC 350e. Again, however, it’s best suited for those who can charge it at home overnight or at work during the day. If you can’t do so, you’ll have to be willing to head to a public charger on a very regular basis, and frankly, I doubt most people would do that, instead falling into simply using the vehicle as a gas-powered car that happens to be a whole lot heavier than a gas-only model and ironically ends up using a whole lot more gas.
Configuration, however, is really down to personal preference, and upgrades are purely aesthetic and tech-focused rather than performance-focused. You’ll have to pay extra for some colors and some wheel options, not to mention the AMG Line package, which adds sportier body styling and some interior features. The vehicle can also come in a base variant or with the Exclusive Trim or Pinnacle Trim. Again, neither of these contribute to better performance, but if I were buying the GLC 350e, I might consider the Exclusive Trim for the upgraded Burmester sound system and the surround view camera system, which I’ve come to rely on.
It is, however, also worth considering alternatives. The Volvo XC60 isn’t as luxurious, but it is a little larger and a little faster. That said, its electric range is much lower, at only 35 miles. Ultimately, if you’re looking for luxury and a solid electric range, the 2025 Mercedes-Benz GLC 350e is an excellent option.


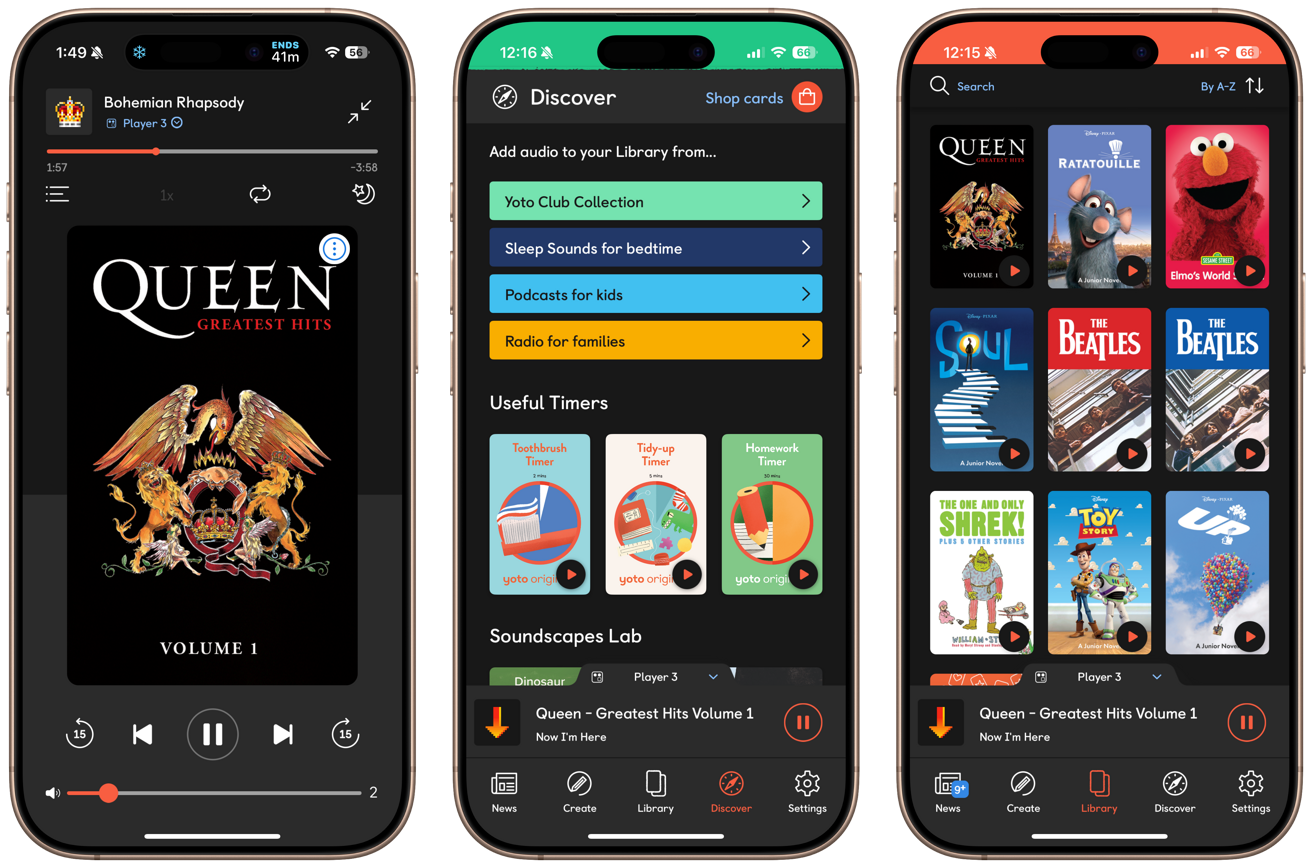
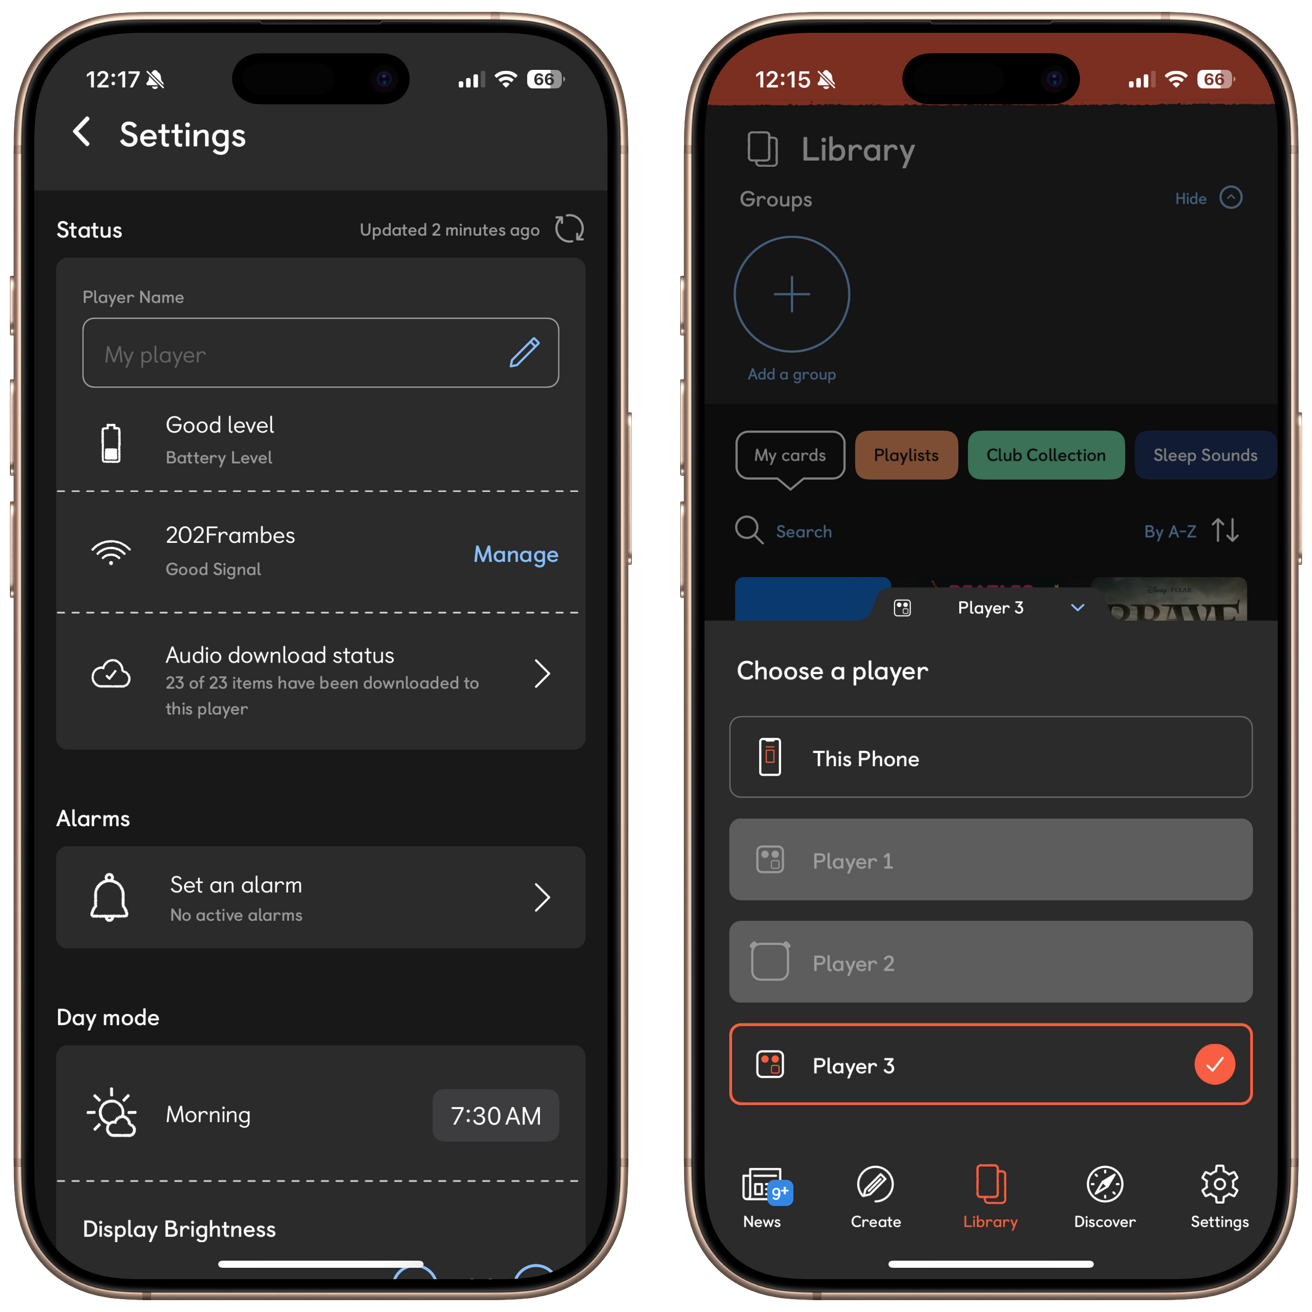


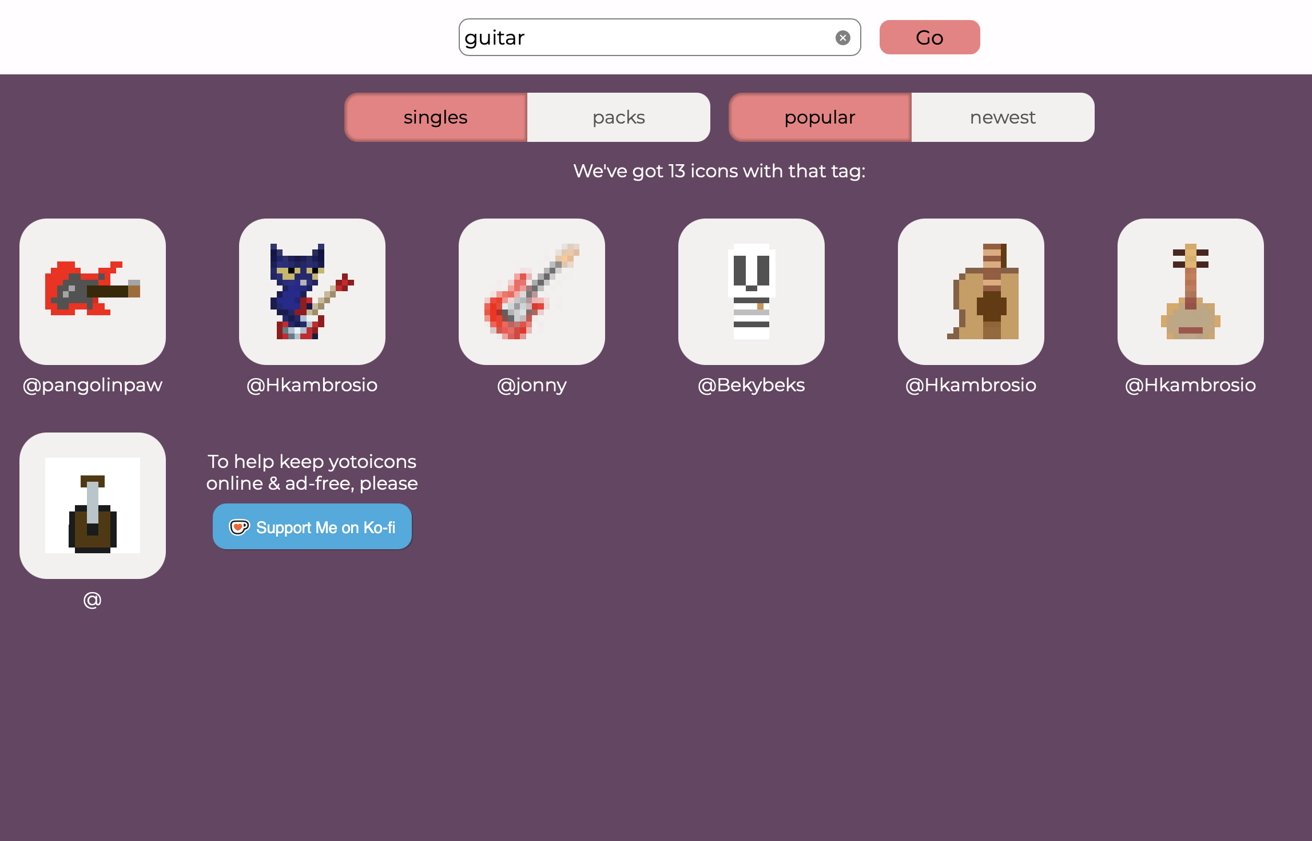


![Advanced Data Protection – how it makes your iCloud data more secure [Video]](https://forbesnewsbbc.site/wp-content/smush-webp/2025/02/1740144163_Advanced-Data-Protection-how-it-makes-your-iCloud-data-270x180.jpg.webp)